

Subscriber
User Guide
Subscriber | 1.4.8 * |
WordPress Profile Extra Fields | 6.2 * 1.2.3 * |
*When using other versions some differences are possible to occur
** Screenshots were taken from a PC
Table of Contents
2.1. Enable Subscription Checkbox for
2.3. Subscription Confirmation
3.1. Customize Service Messages
4.2. Send Email Notifications to
4.6. Un/Subscription Links Redirect to
10.1. Subscribe Form on Posts & Pages
You can download Subscriber Plugin here:
https://bestwebsoft.com/products/wordpress/plugins/subscriber/
1. Introduction
Note: Сlick the “Save Changes” button in order to apply any changes. |
1.1. Open your WordPress Admin Dashboard and find the menu on the left.
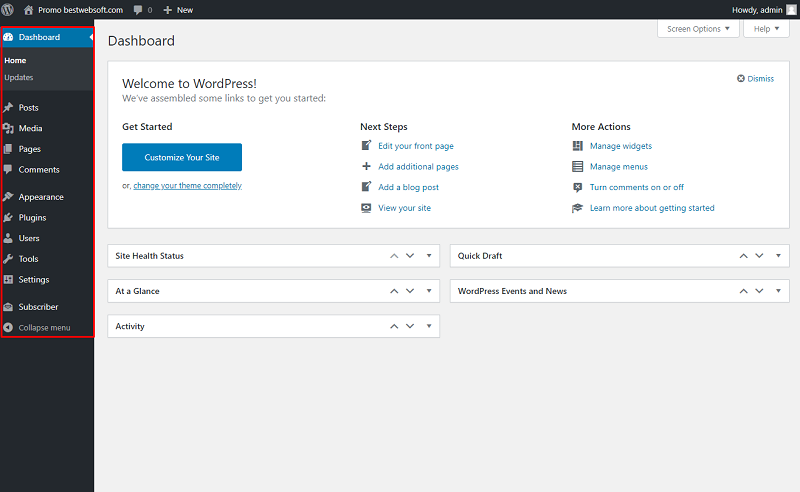
1.2. Open the “Subscriber” > “Settings” page on the dashboard.

2. Settings
Use the options of the “Settings” page to make the global settings for the plugin.
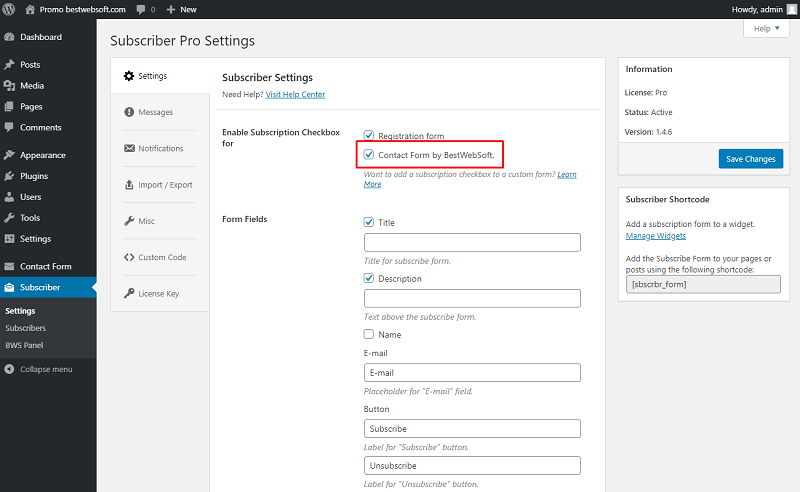
2.1. Enable Subscription Checkbox for
Use the “Enable Subscription Checkbox for” option to add the Subscription checkbox to the available forms of your website.
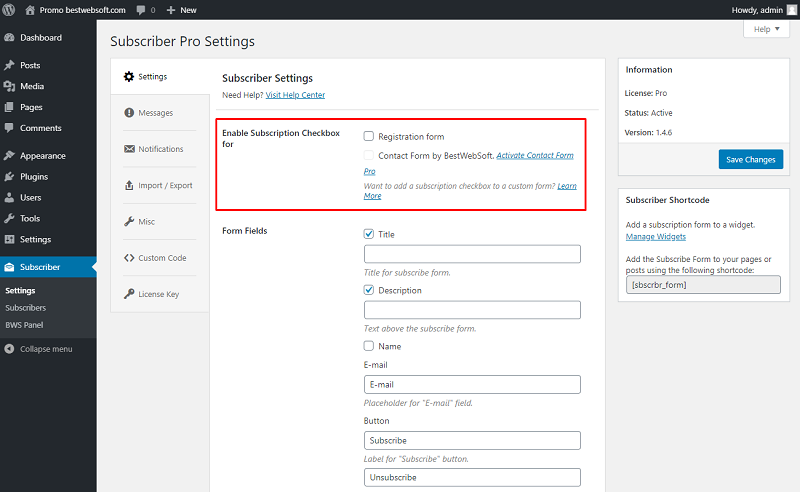
2.1.1. Enable the “Registration form” to display the subscription checkbox in the WordPress registration form.

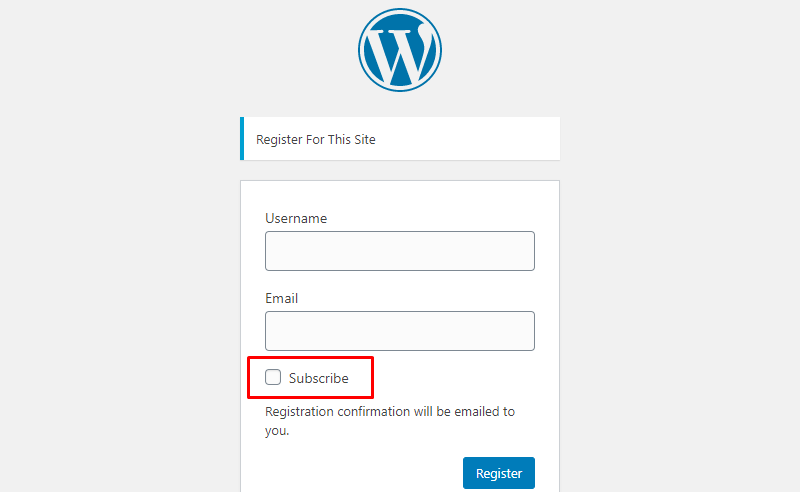
2.1.2. The subscription checkbox will look on the register page as follows.
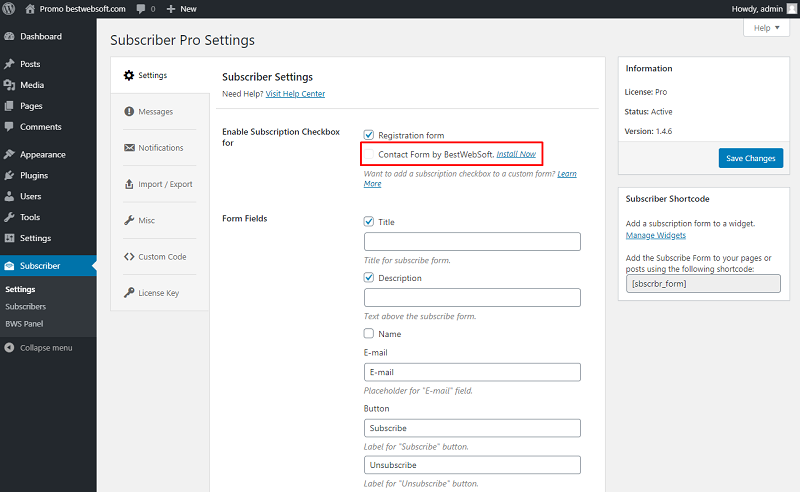
2.1.3. Subscriber by BestWebSoft is compatible with “Contact Form by BestWebSoft”. Download and install the plugin by clicking the “Install Now”.
You can download the Contact Form plugin here:
https://bestwebsoft.com/products/wordpress/plugins/contact-form/
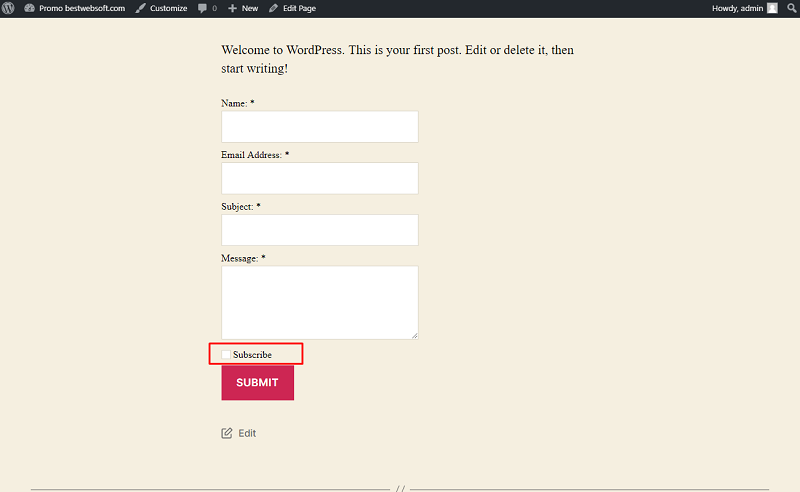
2.1.4. After a successful download and activation of the “Contact Form” plugin enable it to add the Subscriber checkbox to the Contact Form.
2.1.5. The subscription checkbox will look in the contact form as follows.
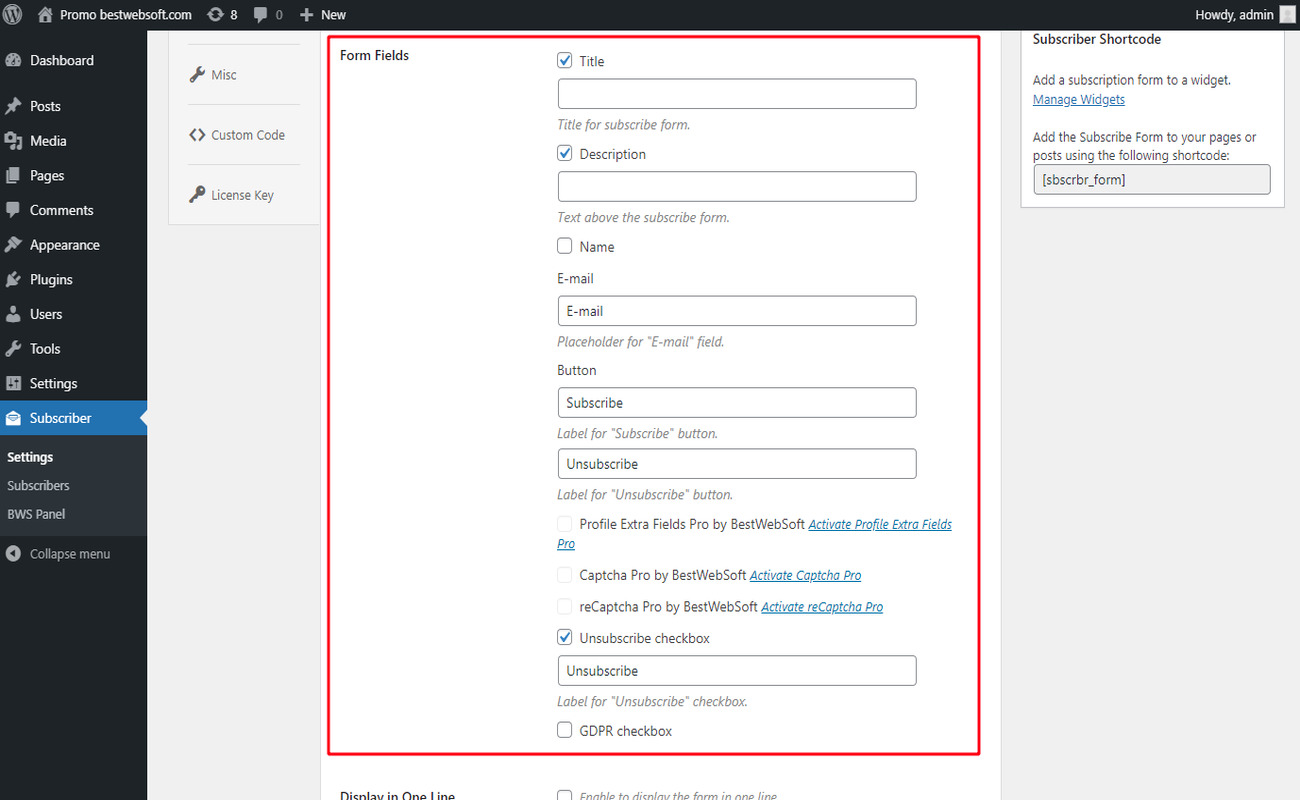
2.2. Form Fields
Use the “Form Fields” option to enable or disable fields in the subscriber form and change their titles, labels, and placeholders.
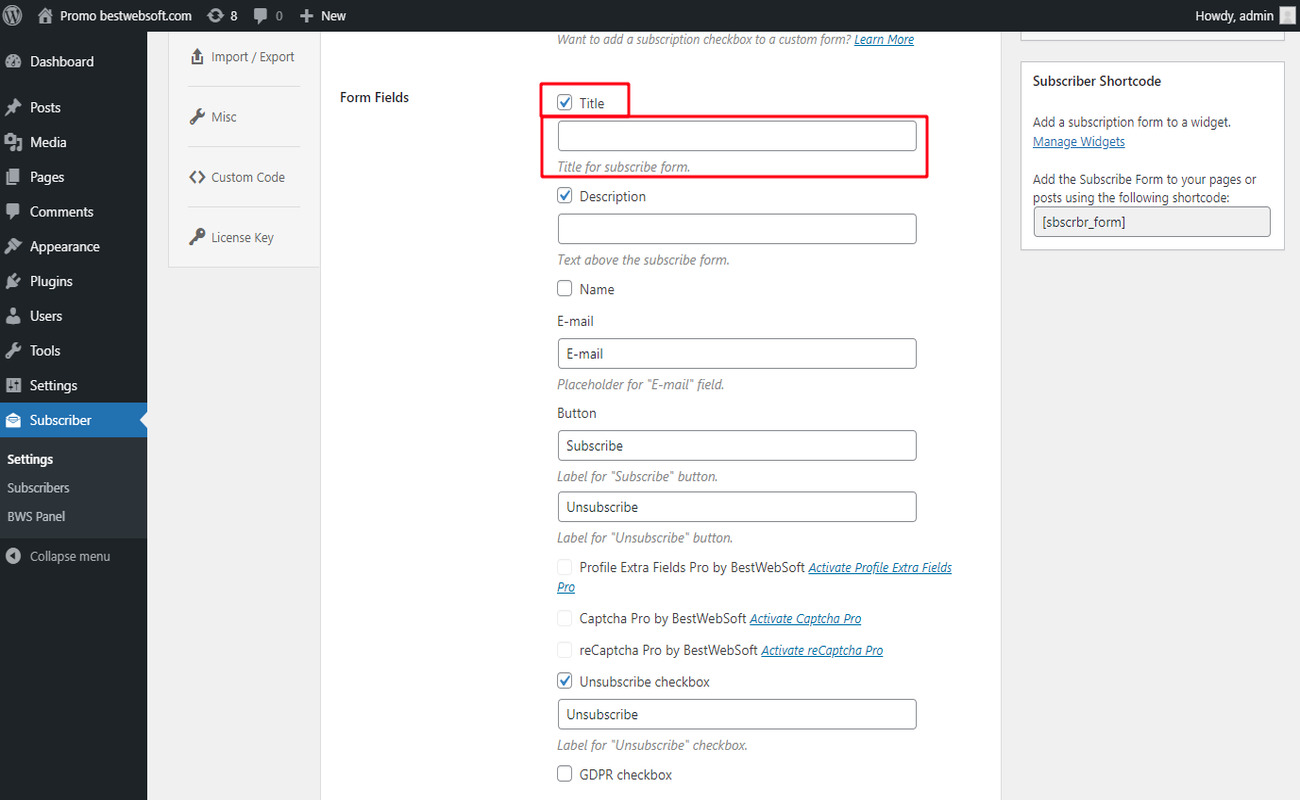
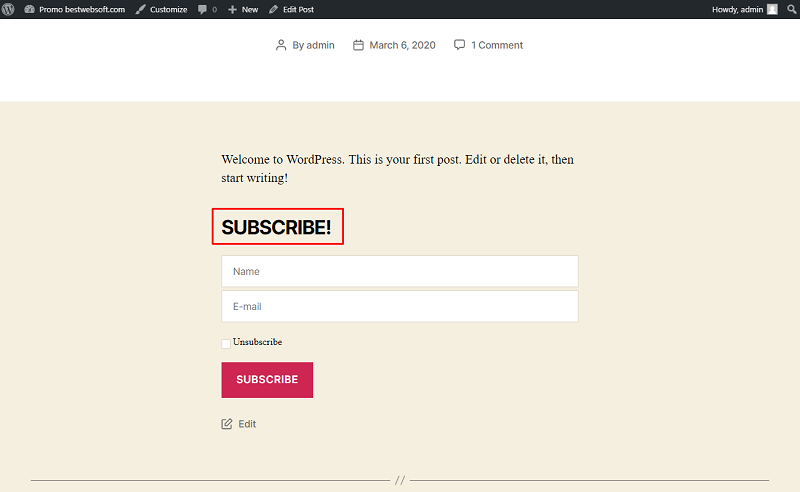
2.2.1. Enable the “Title” to add a title to the subscriber form. Enter a text for the title in the appropriate field.
2.2.2. The title on the subscriber form may look as follows.
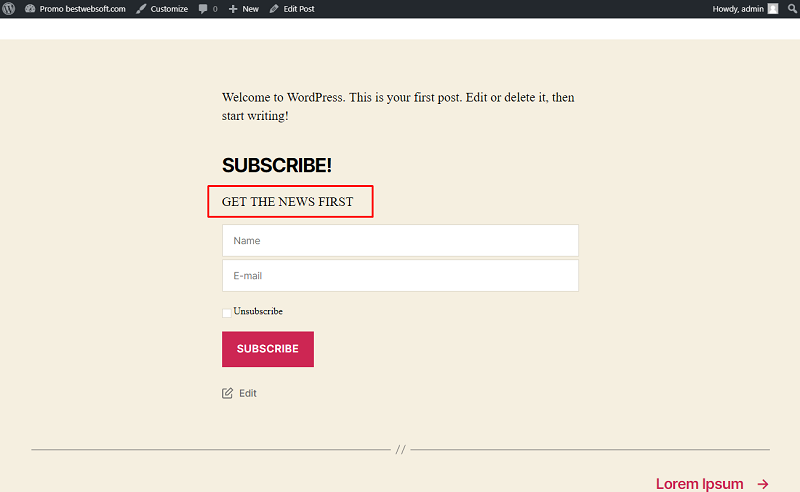
2.2.3. Enable the “Description” to add a description text to the subscriber form. Enter a text for the description in the appropriate field.
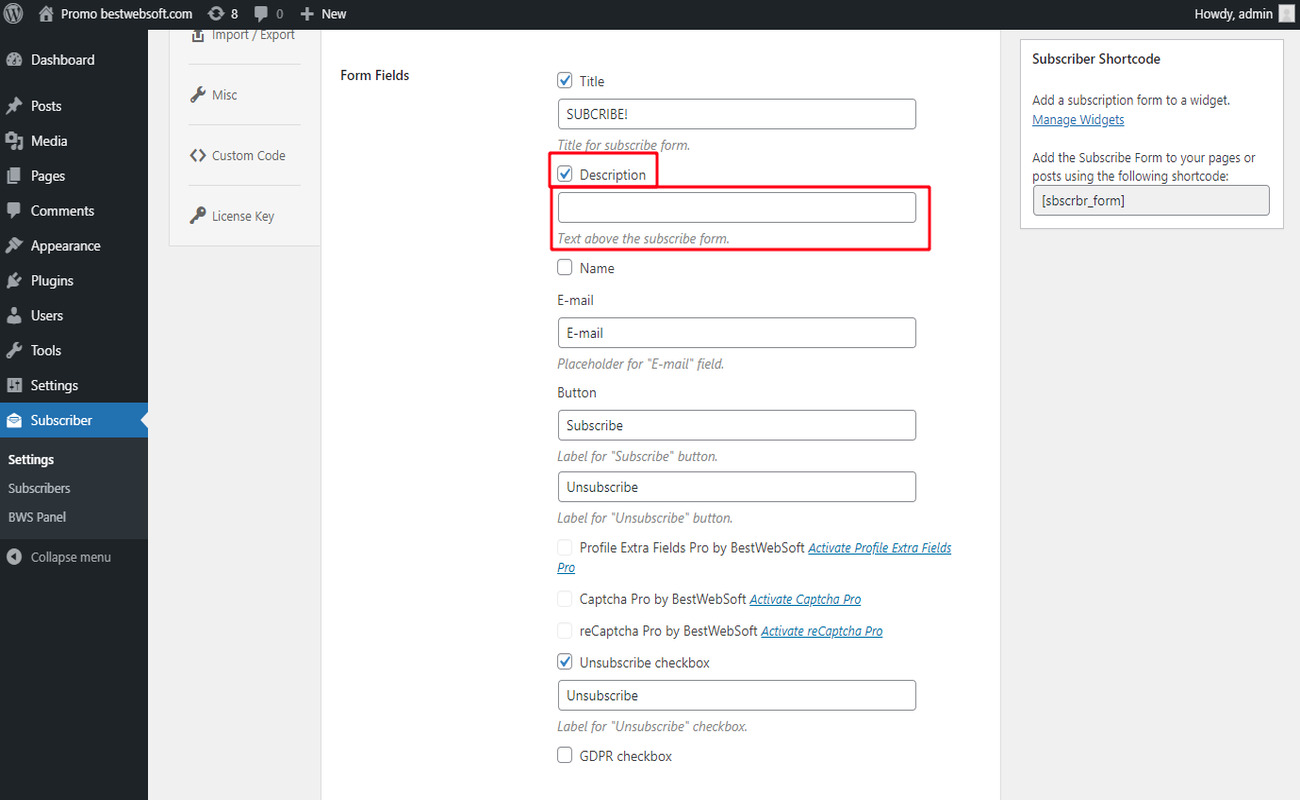
2.2.4. The description on the subscriber form may look as follows.
2.2.5. Enable the “Name” to add a name field to the subscriber form. Change the text for the placeholder for the “Name” field in the appropriate field.
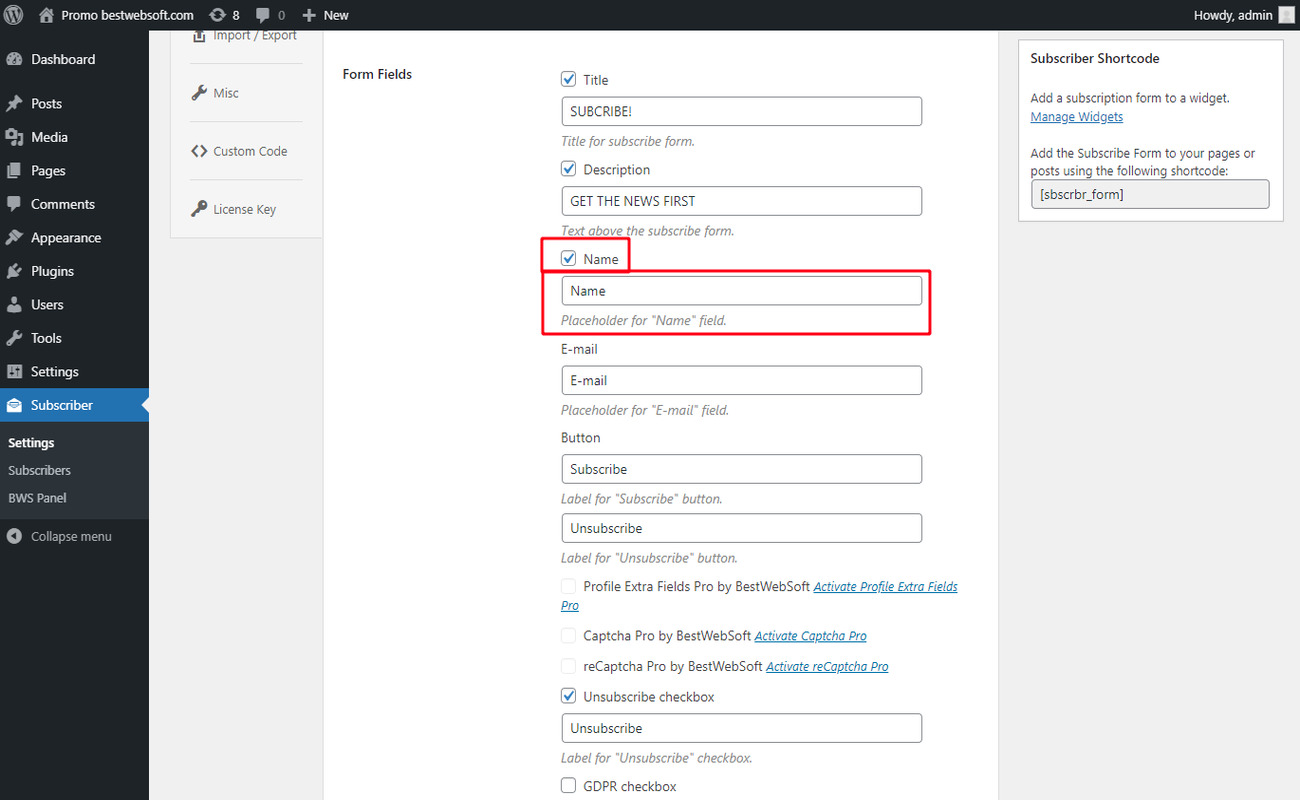
2.2.6. The “Name” field with changed placeholder may look on the subscriber form as follows.

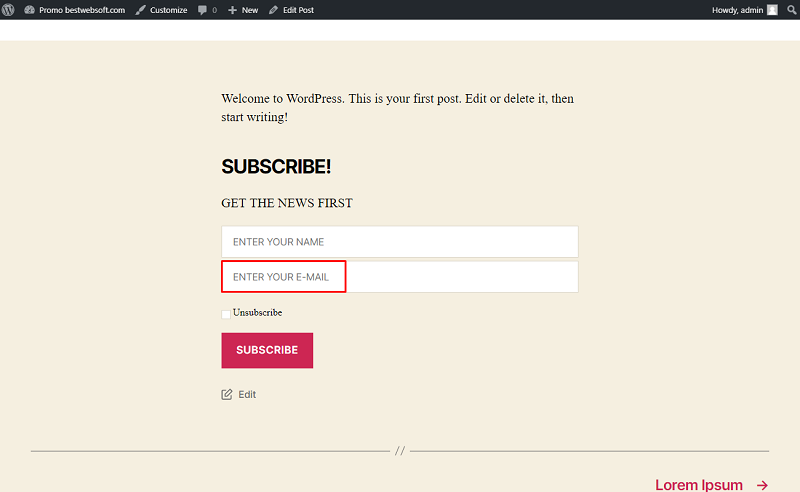
2.2.7. Use the “E-mail” field to change the text for the placeholder for the “E-mail” field.
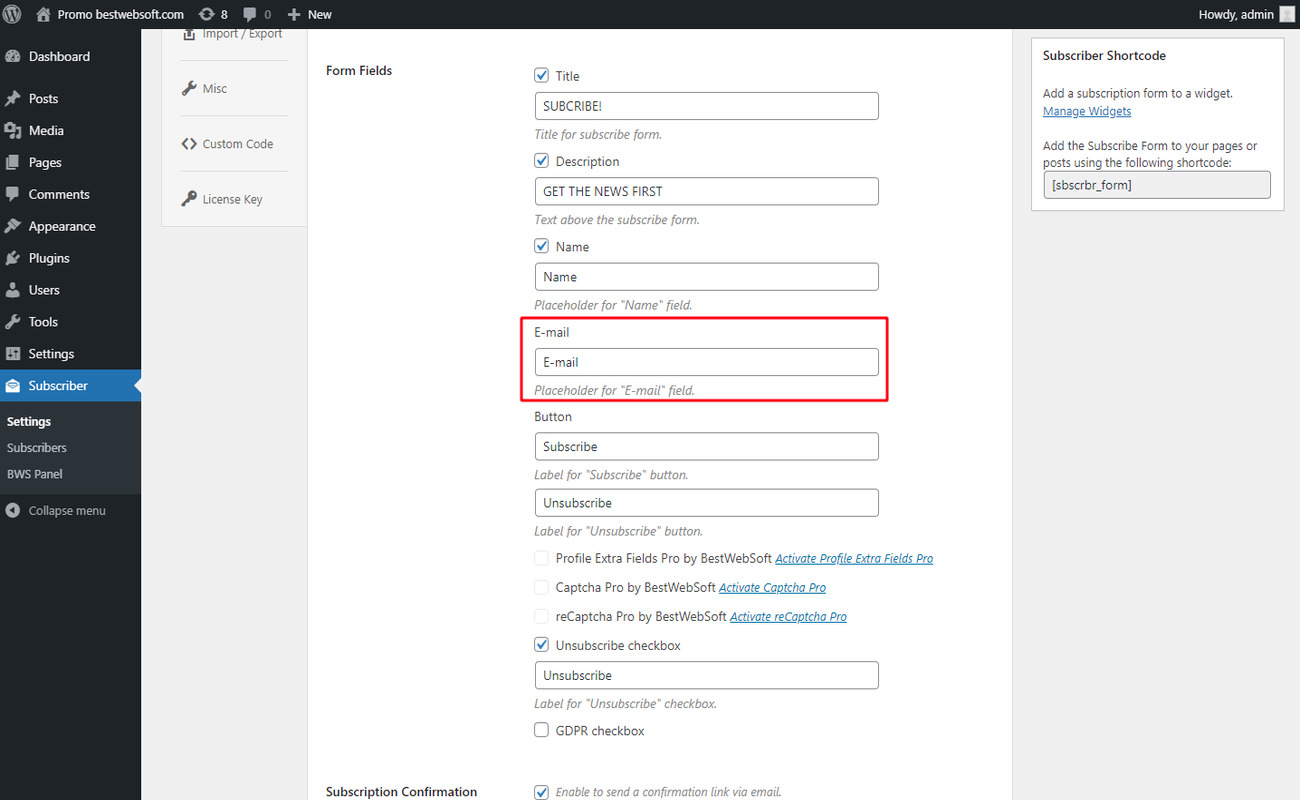
2.2.8. The “E-mail” field with the changed placeholder may look on the subscriber form as follows.
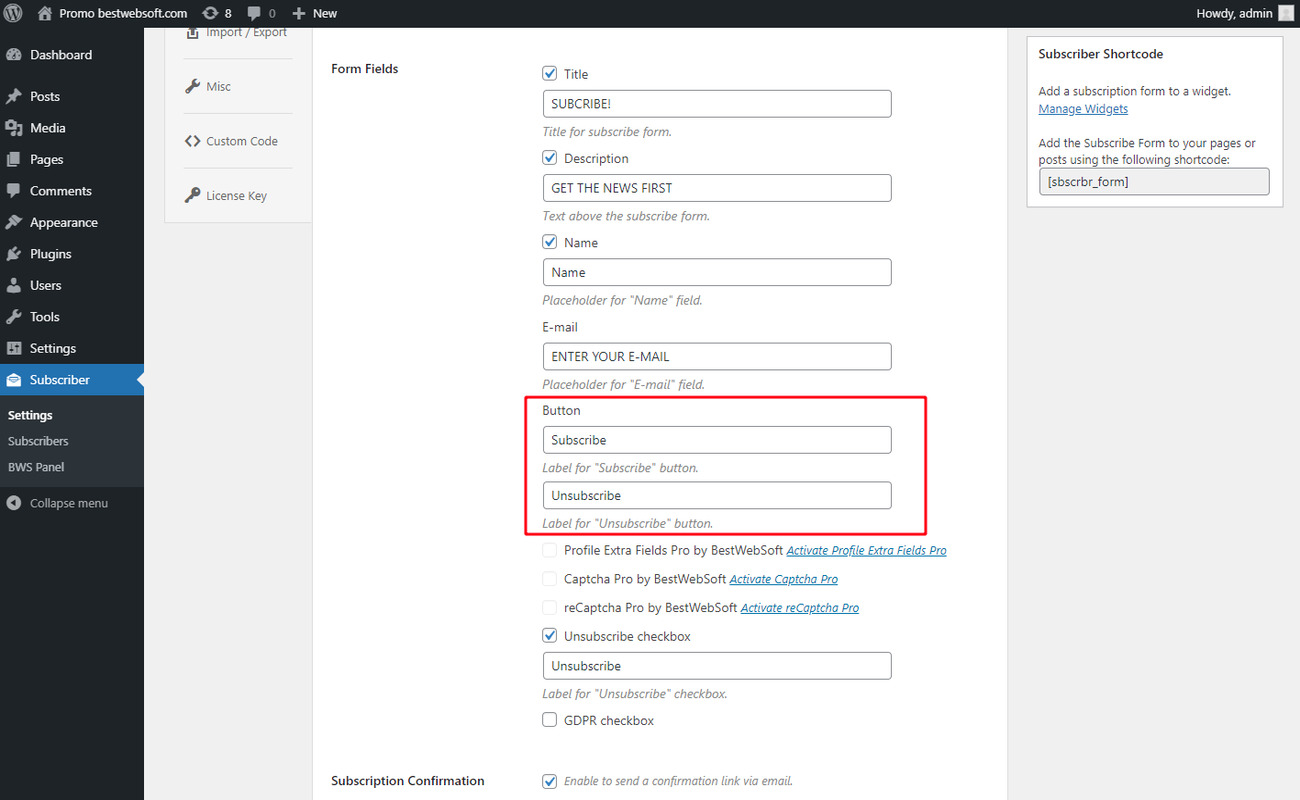
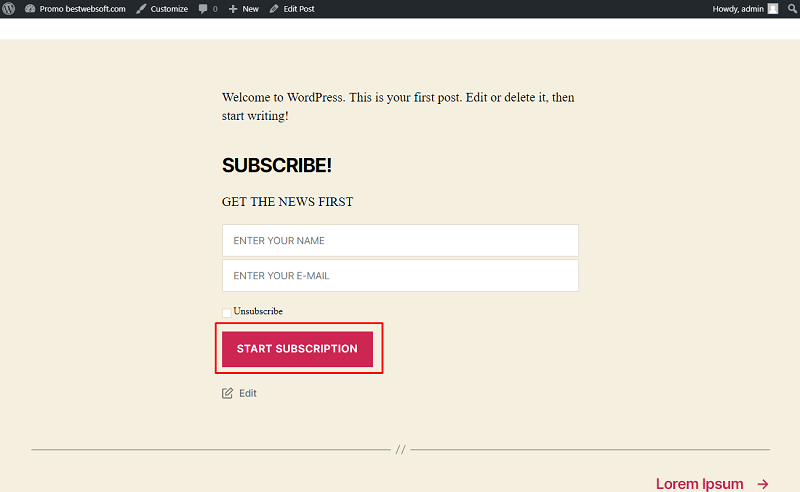
2.2.9. Use the “Button” fields to change the text of the labels for the “Subscribe” and “Unsubscribe” buttons.
2.2.10. The “Subscribe” button with the changed label may look on the Subscriber form as follows.
2.2.11. The “Unsubscribe” button with the changed label may look on the Subscriber form as follows.
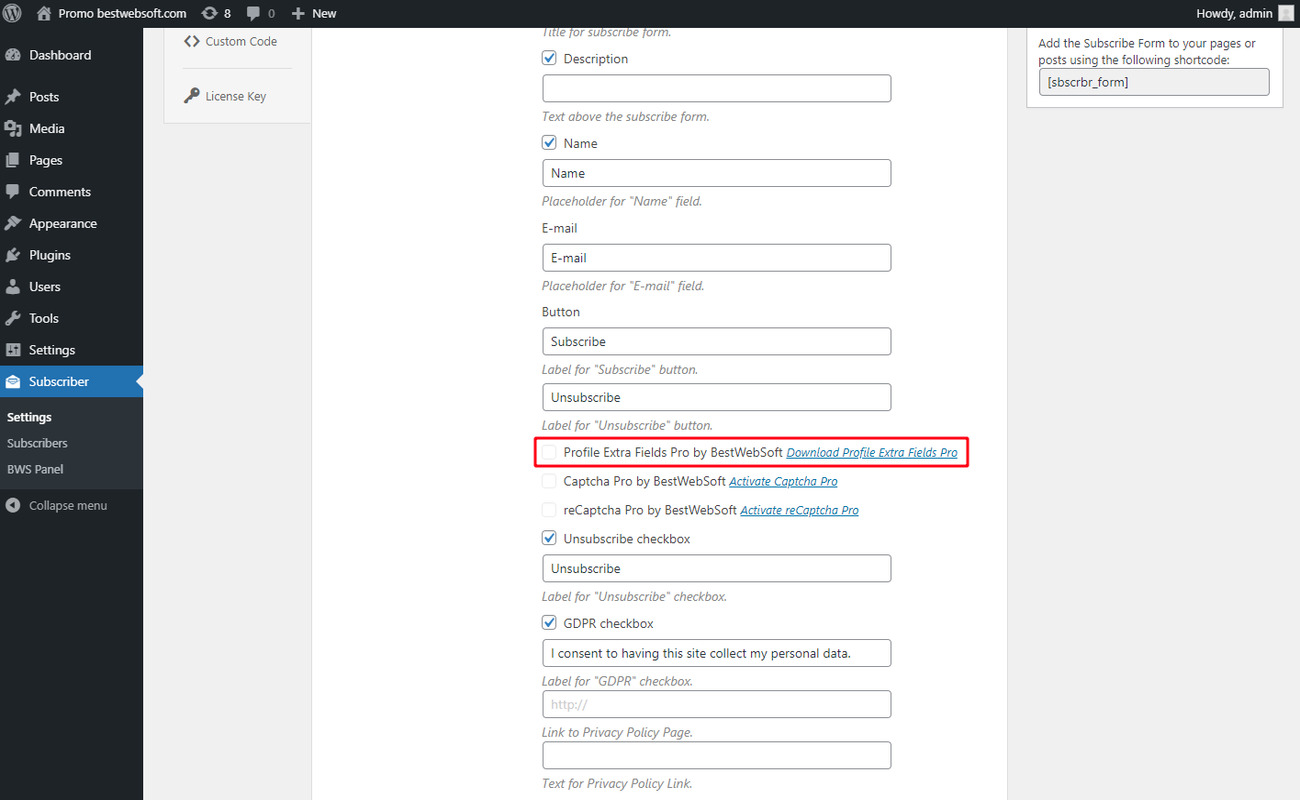
2.2.12. Subscriber by BestWebSoft is compatible with “Profile Extra Fields by BestWebSoft”. Download and install the plugin by clicking the “Download Profile Extra Fields Pro” link.
You can download the Profile Extra Fields plugin here:
https://bestwebsoft.com/products/wordpress/plugins/profile-extra-fields/
2.2.13. After a successful download and activation of the “Profile Extra Fields” plugin enable it to add custom form fields to the subscriber form.
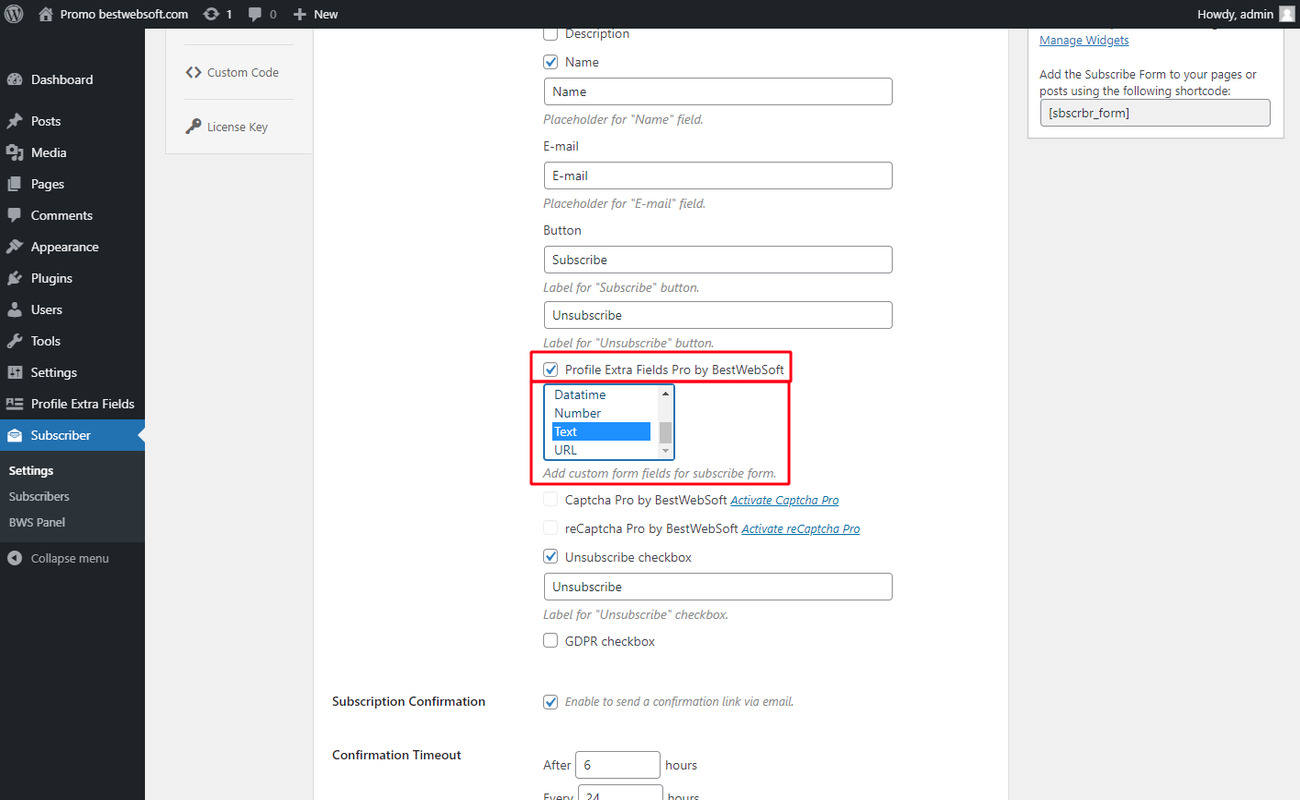
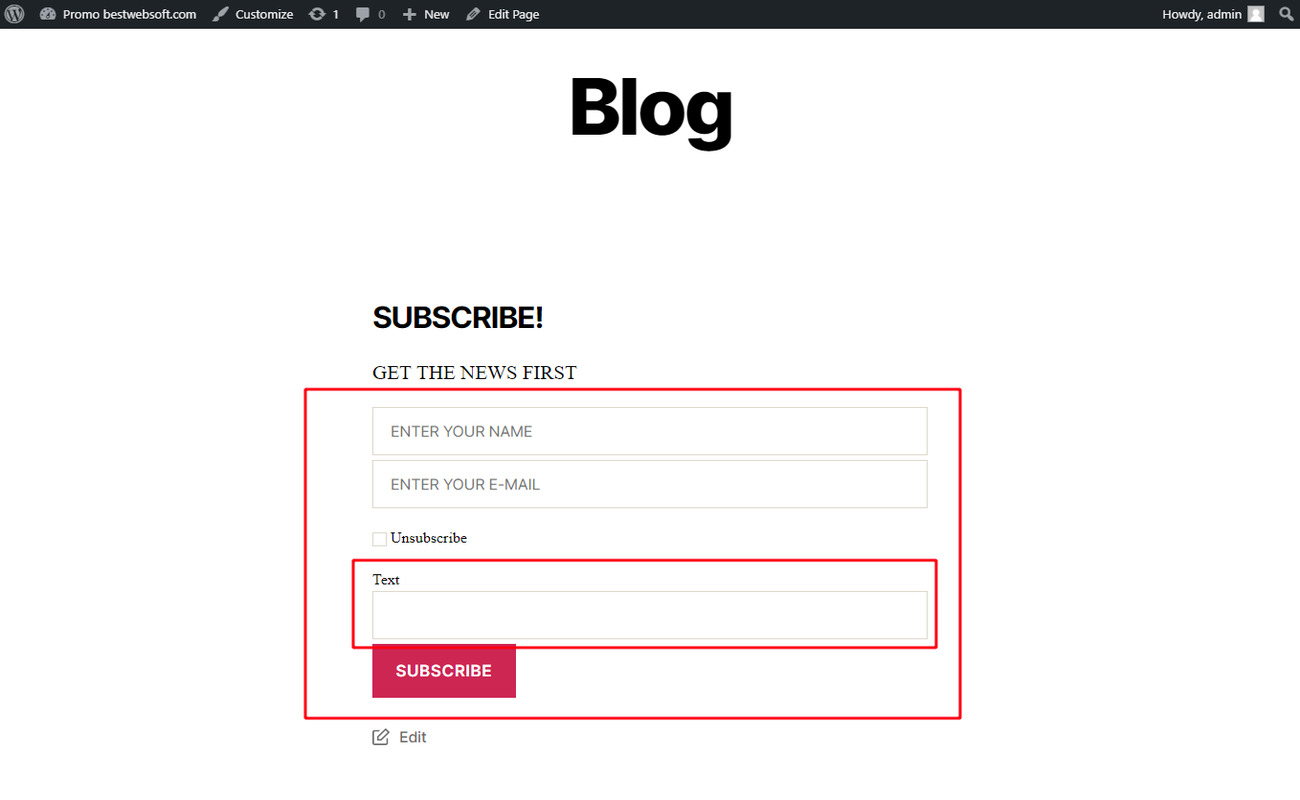
2.2.14. The Subscriber form with custom form fields may look on a page as follows.
2.2.15. Subscriber by BestWebSoft is compatible with “Captcha Pro by BestWebSoft”. Download and install the plugin by clicking the “Download Captcha Pro ” link.
You can download the Captcha Pro plugin here:
https://bestwebsoft.com/products/wordpress/plugins/captcha/
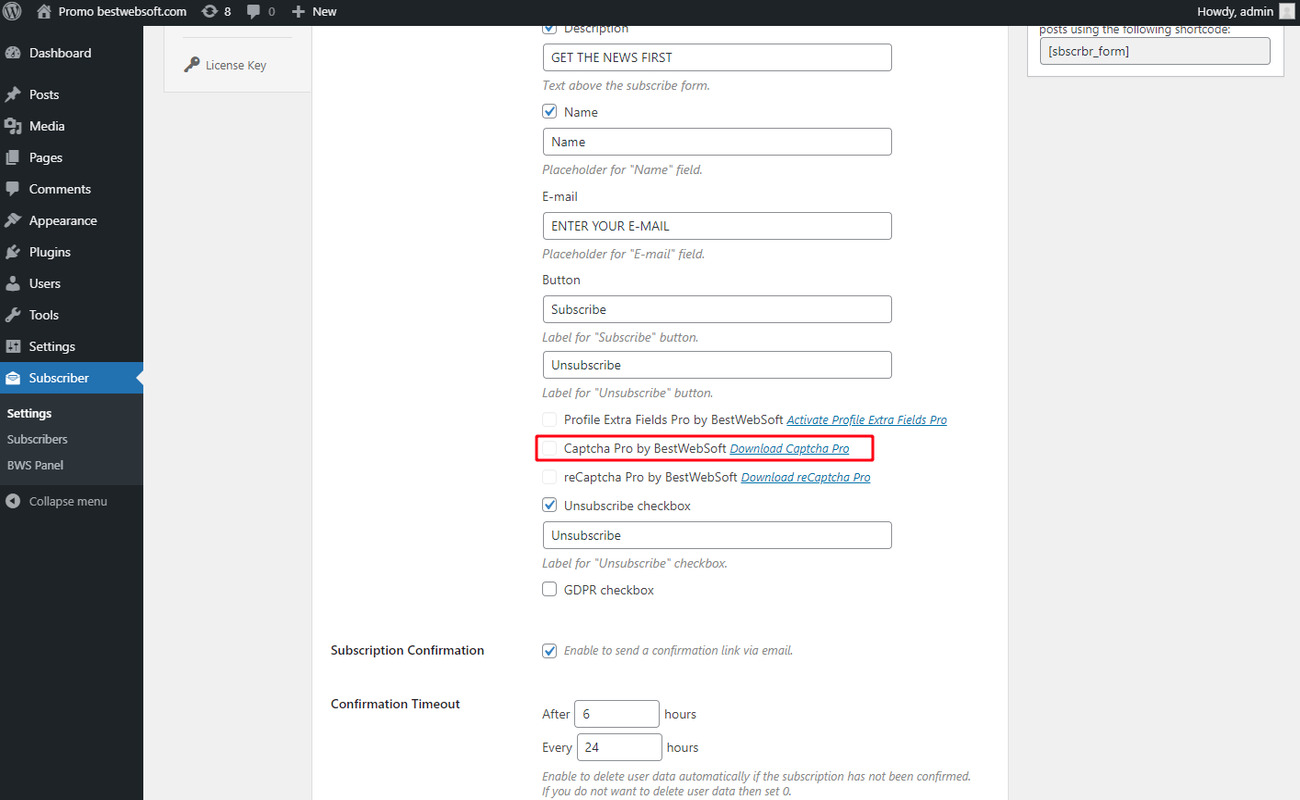
2.2.16. After a successful download and activation of the “Captcha Pro” plugin enable it to add the captcha protection block to the subscriber form.

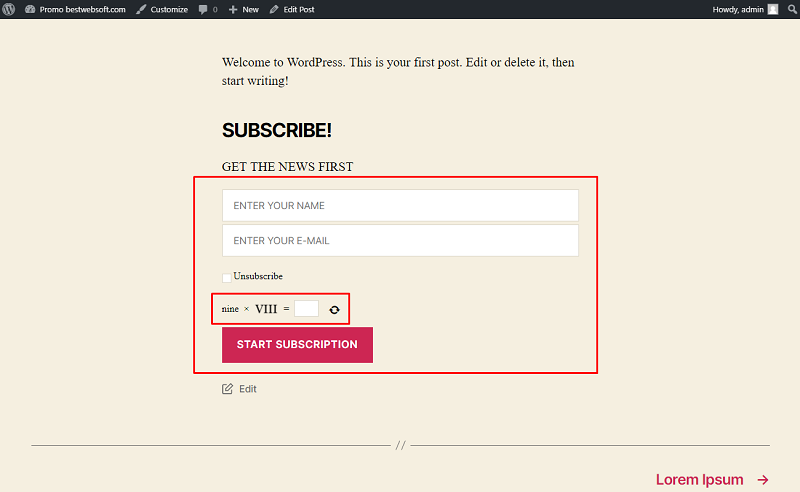
2.2.17. The Subscriber form with Captcha block may look on a page as follows.
2.2.18. Subscriber by BestWebSoft is compatible with “reCaptcha Pro by BestWebSoft”. Download and install the plugin by clicking the “Download reCaptcha Pro ” link.
You can download the reCaptcha Pro plugin here:
https://bestwebsoft.com/products/wordpress/plugins/google-captcha/
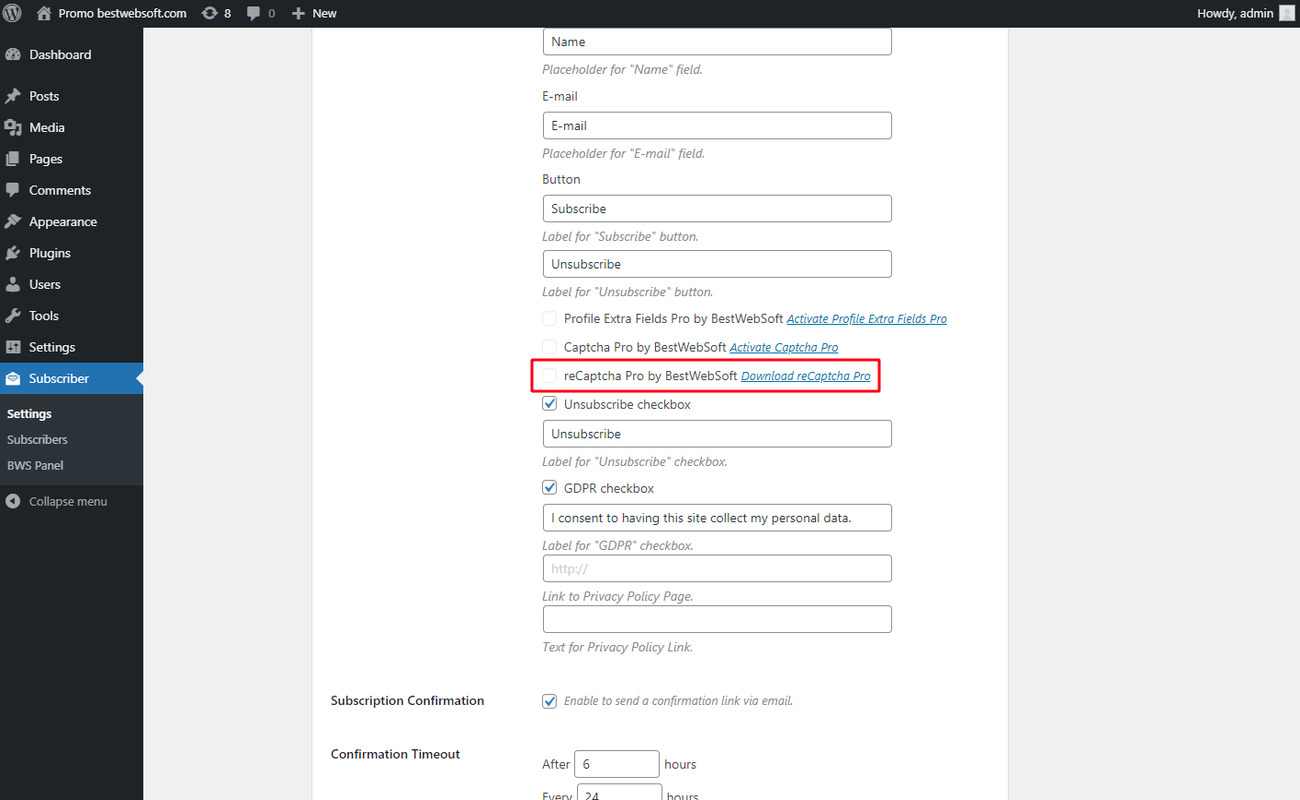
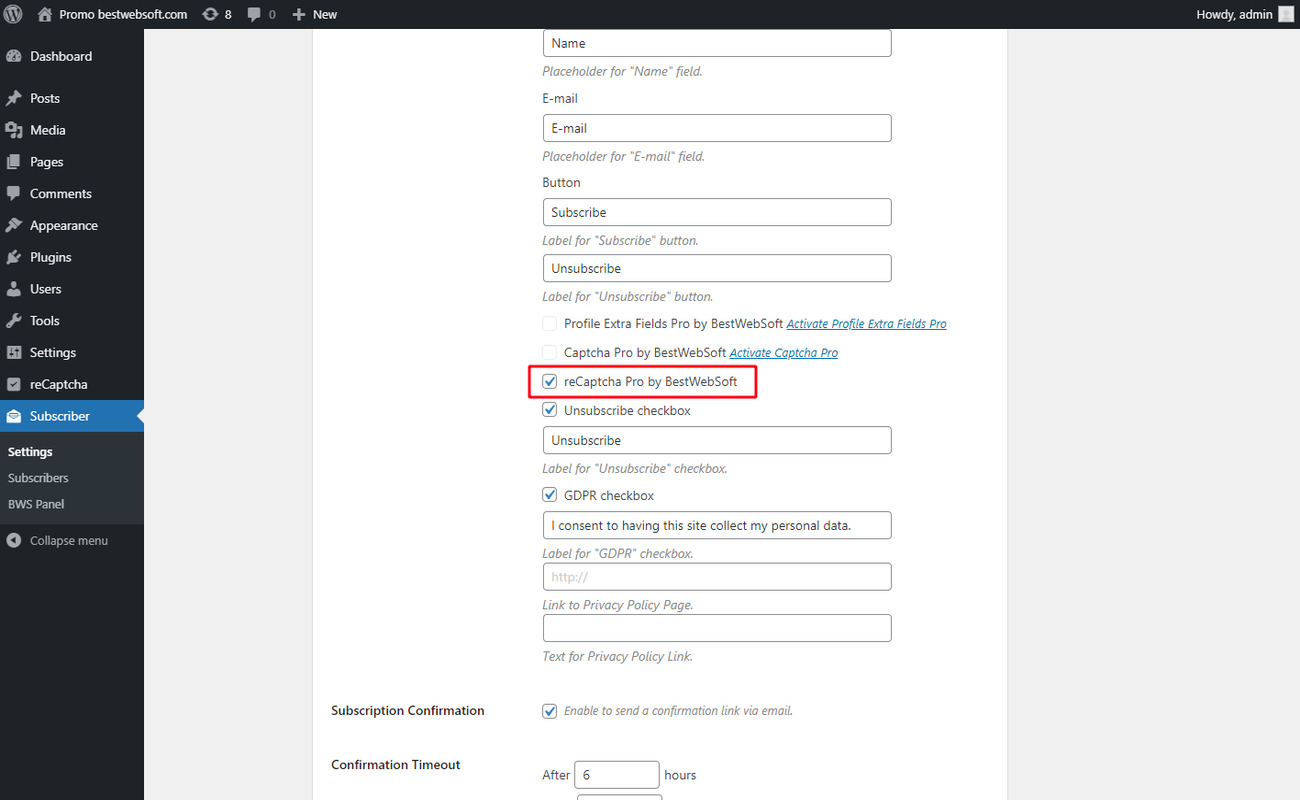
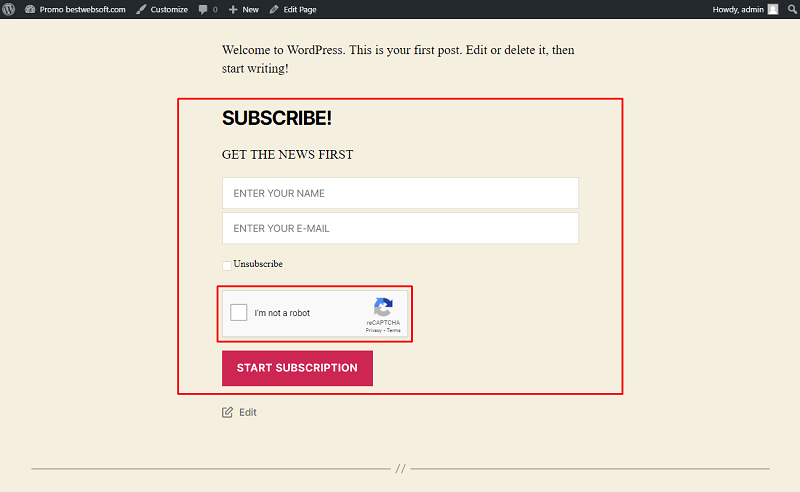
2.2.19. After a successful download and activation of the “reCaptcha Pro” plugin enable it to add the google captcha protection block to the Subscriber Form.
2.2.20. The Subscriber form with reCaptcha block may look on a page as follows.
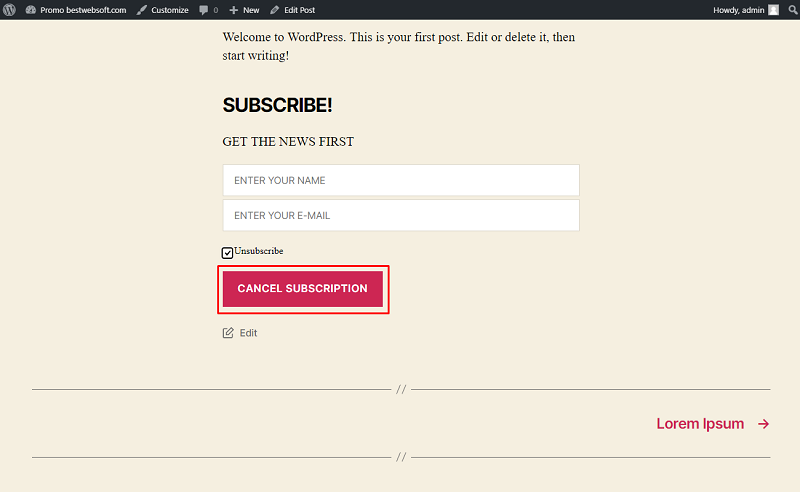
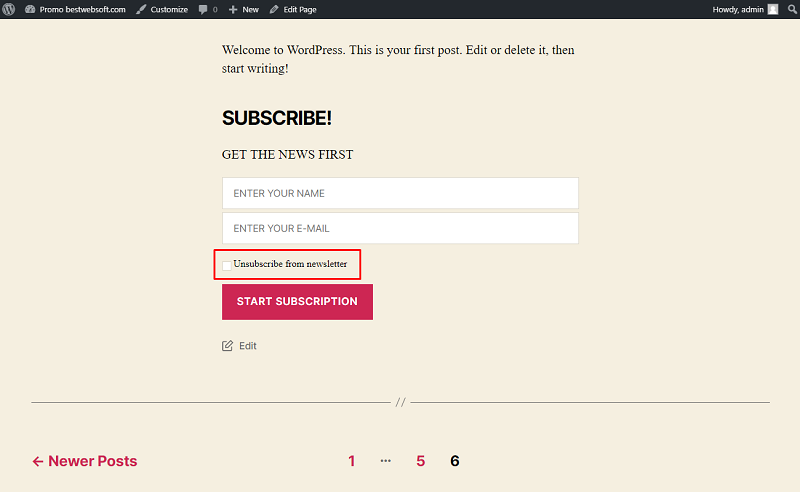
2.2.21. Enable the “Unsubscribe checkbox” to add this checkbox to the subscriber form. Enter a text for the unsubscribe checkbox label in the appropriate field.

2.2.22. The unsubscribe checkbox with the changed label may look on the subscriber form as follows.
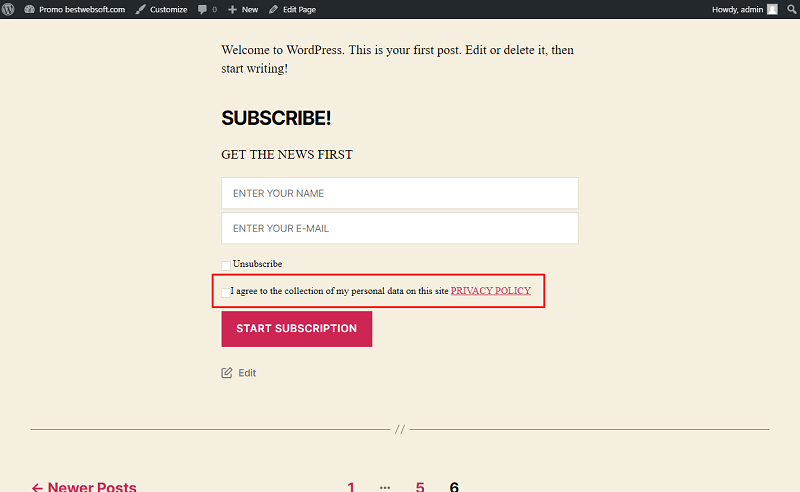
2.2.23. Enable the “GDPR checkbox” to add the Privacy Policy confirmation checkbox to the subscriber form. Enter a text for the GDPR checkbox label, text for Privacy Policy Link, and insert the link to Privacy Policy Page, in the appropriate fields.

2.2.24. The GDPR checkbox with the changed label and inserted link may look on the subscriber form as follows.
2.3. Subscription Confirmation
Enable the “Subscription Confirmation” option to send a confirmation link via email.

2.3.1. Subscription confirmation letter may look as follows.

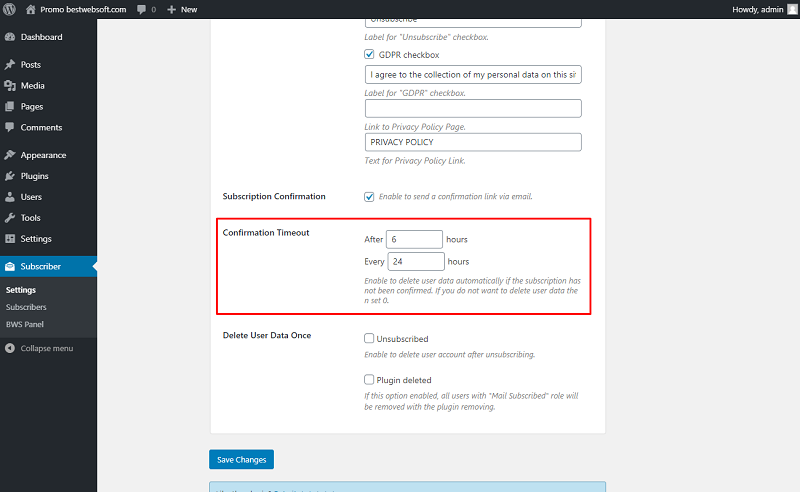
2.4. Confirmation Timeout
Use the “Confirmation Timeout” option to set the time after which user data will be deleted if the subscription has not been confirmed. If you do not want to delete user data then set 0.
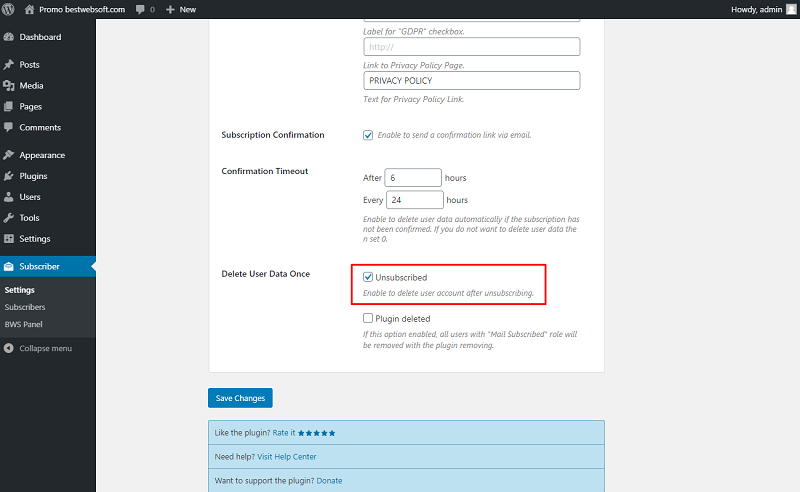
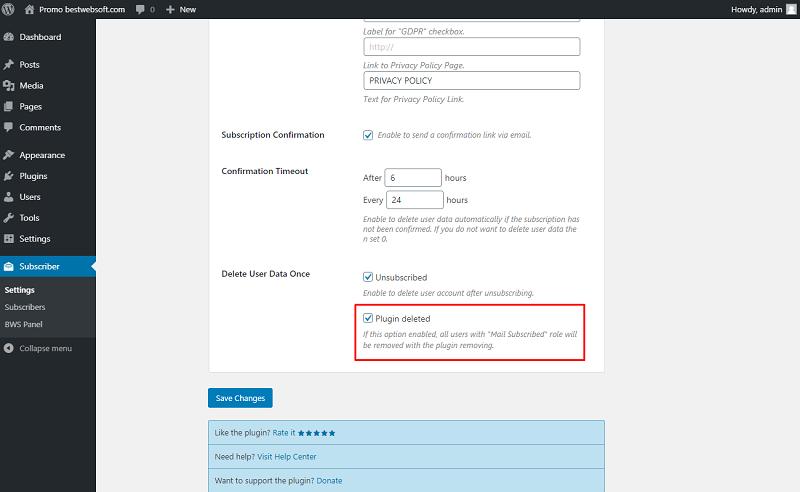
2.5. Delete User Data Once
Use the “Delete User Data Once” to select cases when user data or the “Mail Subscriber” role should be deleted.
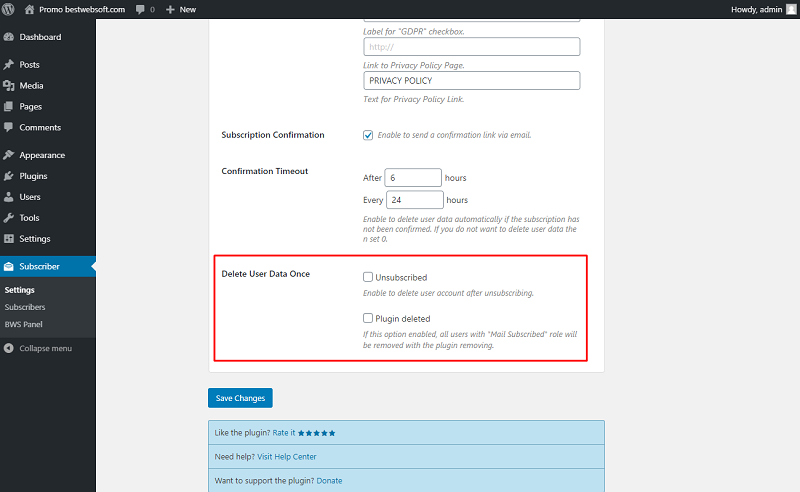
2.5.1. Enable the “Unsubscribed” to delete the user account after unsubscribing.
2.5.2. Enable the “Plugin deleted” to delete the "Mail Subscribed" user role with the plugin removing.
3. System Messages Settings
Use the “System Messages Settings” tab to customize service messages.
3.1. Customize Service Messages
Enter the desired text in the appropriate fields to change the text of the service messages.

4. Notifications
Use the options of the “Notifications” tab to make the settings for the email notifications.
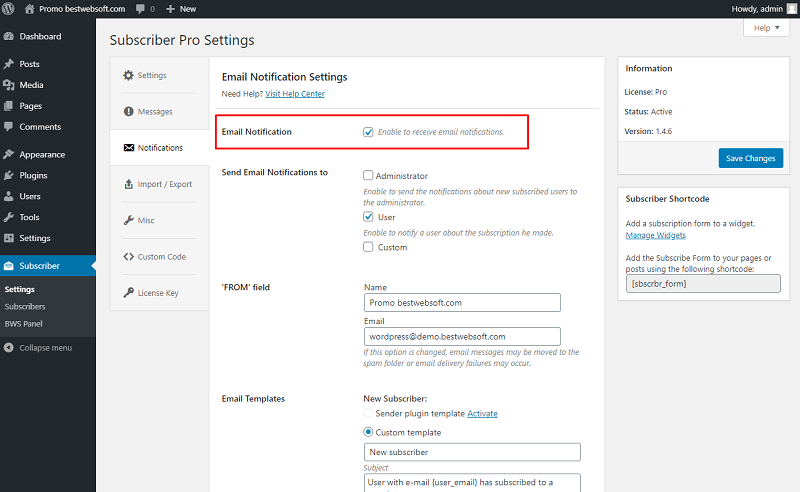
4.1. Email Notification
Enable the “Email Notification” option to receive email notifications and display additional notification settings.
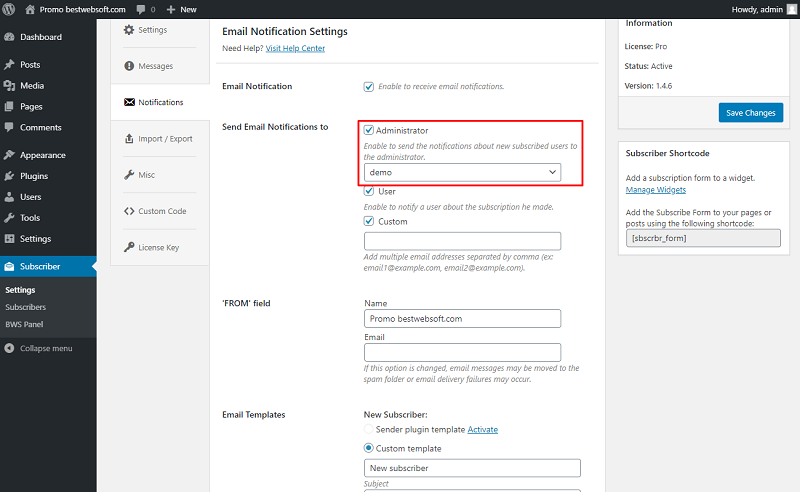
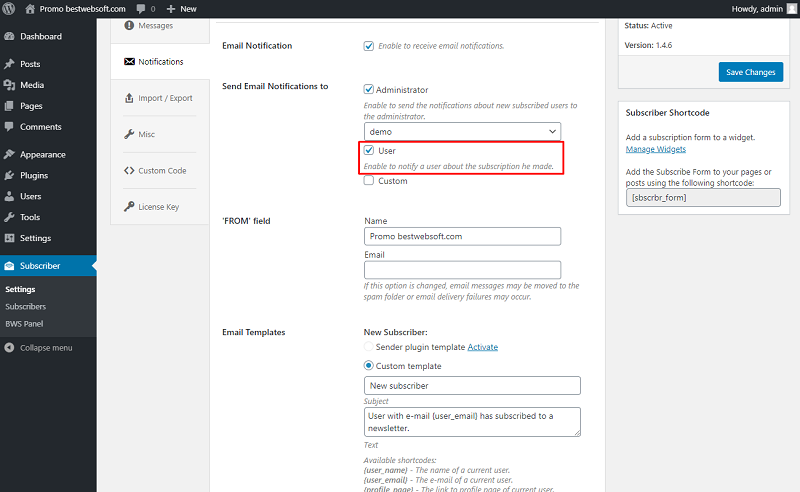
4.2. Send Email Notifications to
Use the “Send Email Notifications to” option to enable email notification sending to administrators, users, and custom emails.
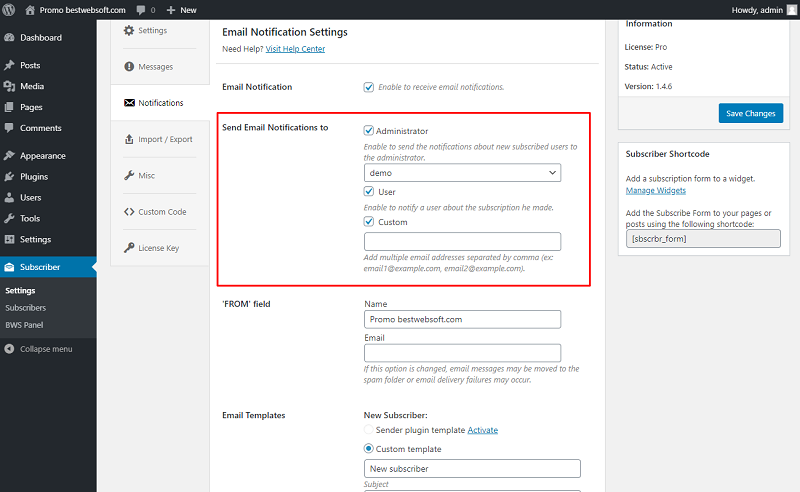
4.2.1. Enable the “Administrator” to send notifications about newly subscribed users to the administrator.
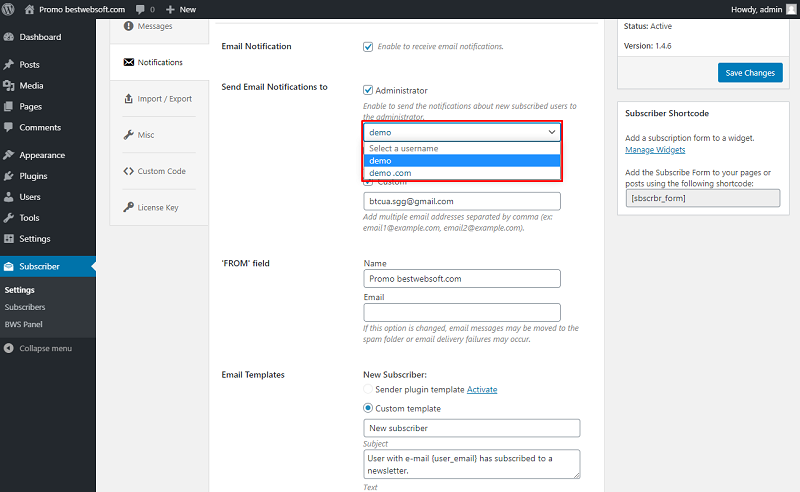
4.2.2. Select the administrator who will receive notifications from the dropdown menu.
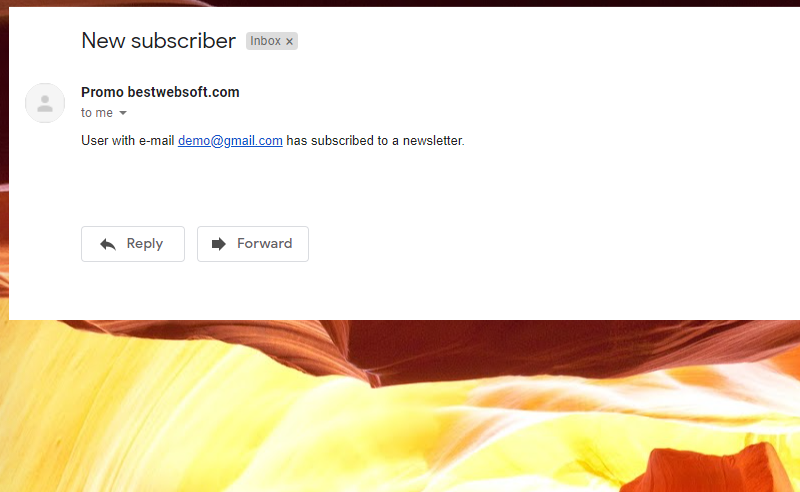
4.2.3. Received email notifications about newly subscribed users may look as follows.
4.2.4. Enable “User” to notify a user about the subscription he made.
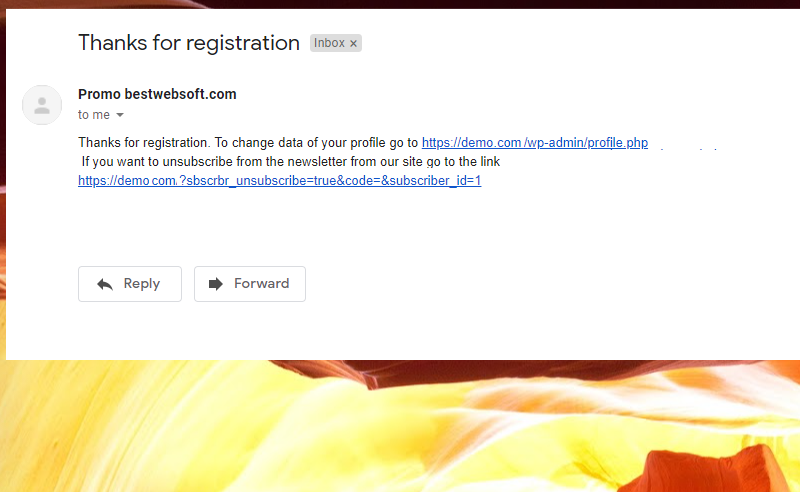
4.2.5. Email notification about the completed subscription on the user’s side may look as follows.
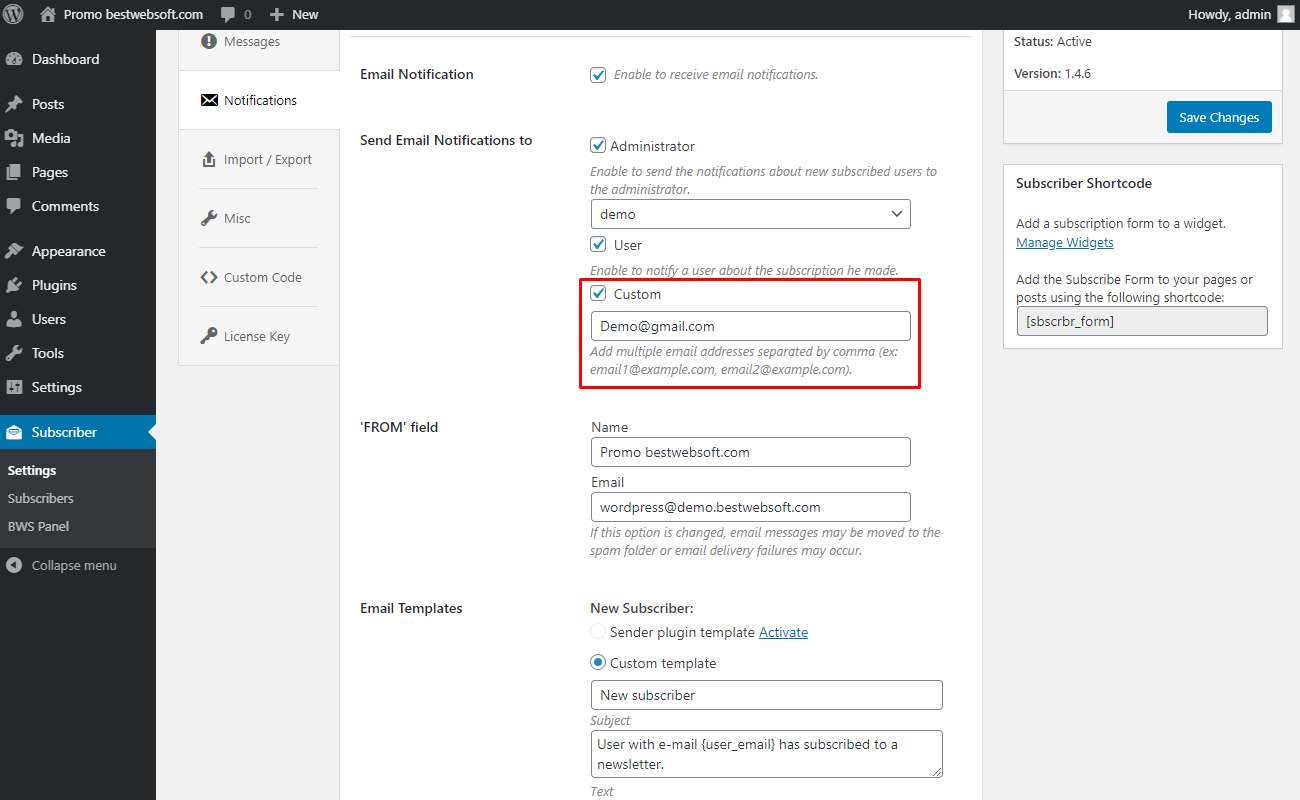
4.2.6. Enable the “Custom” to add custom email addresses to which notifications will be sent. You can add multiple email addresses separated by a comma.
4.3. ‘FROM’ field
Use the “‘FROM’ field” option to set up sender details which will be displayed in the email.
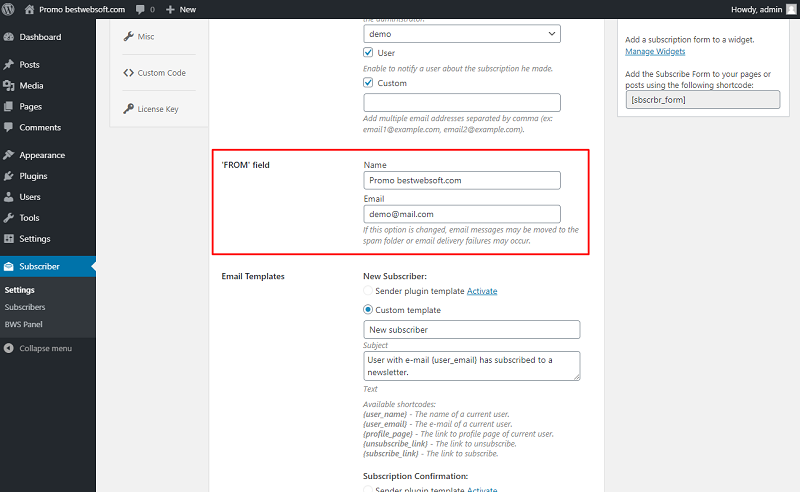
4.3.1. Enter the custom name into the appropriate field.
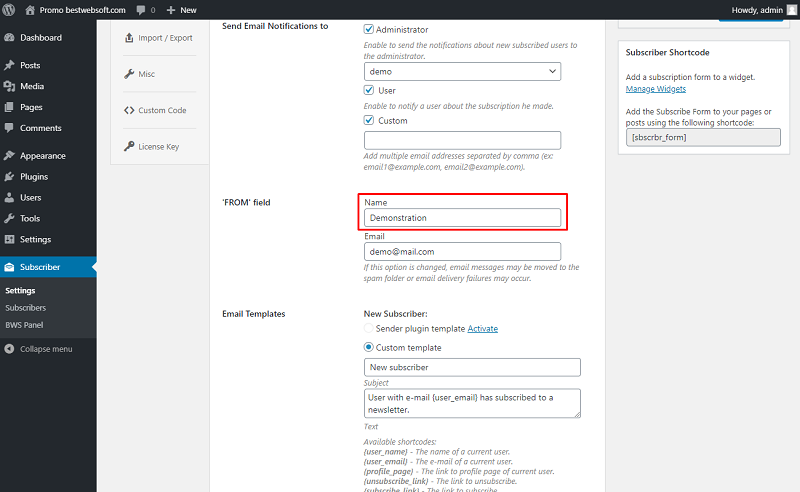
4.3.2. Enter the custom email into the appropriate field.
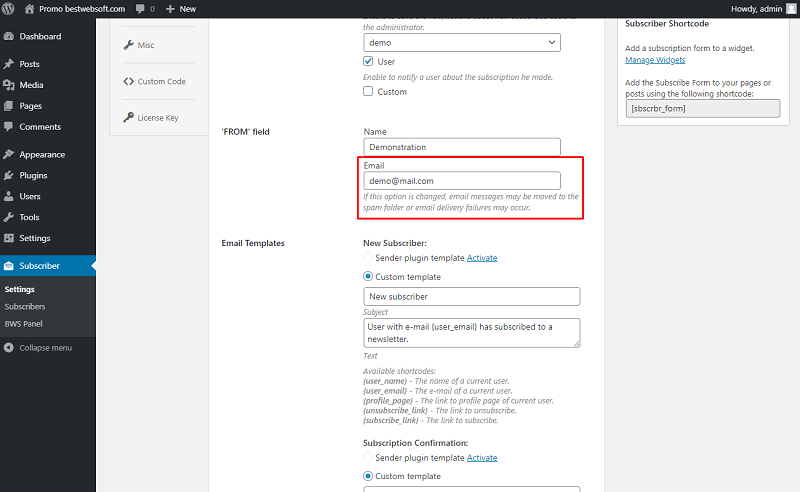
Note: If the email address is changed, messages may be moved to the spam folder or email delivery failures may occur. |
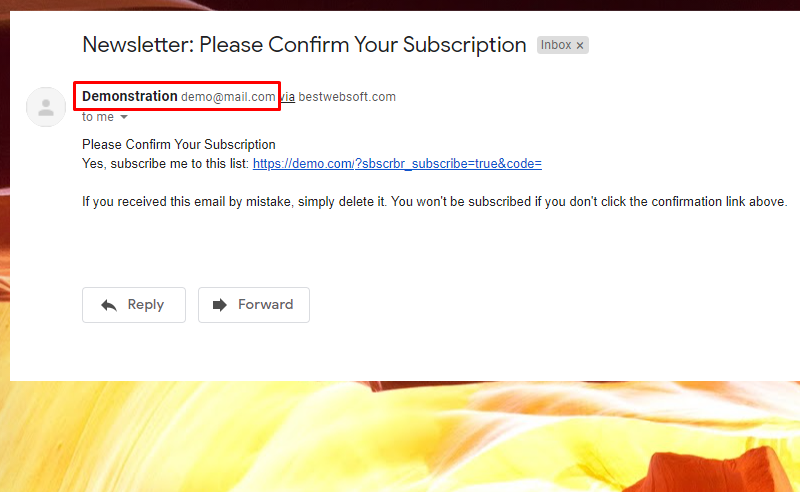
4.3.3. The ‘FROM’ field with custom name and email may look in an email message as follows.
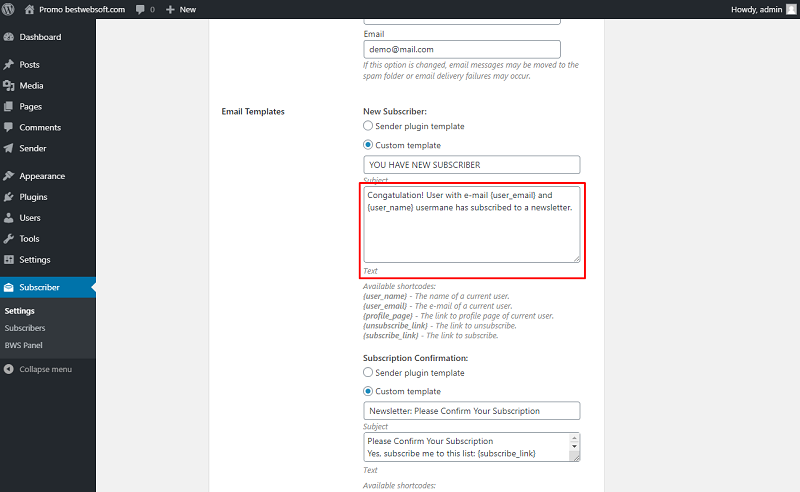
4.4. Email Templates
Use the “Email Templates” option to change the content of email messages received by administrators and users.
4.4.1. Sender Plugin Template
Subscriber by BestWebSoft is compatible with “Sender by BestWebSoft”. Download and install the plugin by clicking the “Install Now”.
You can download the Subscriber plugin here:
https://bestwebsoft.com/products/wordpress/plugins/sender/

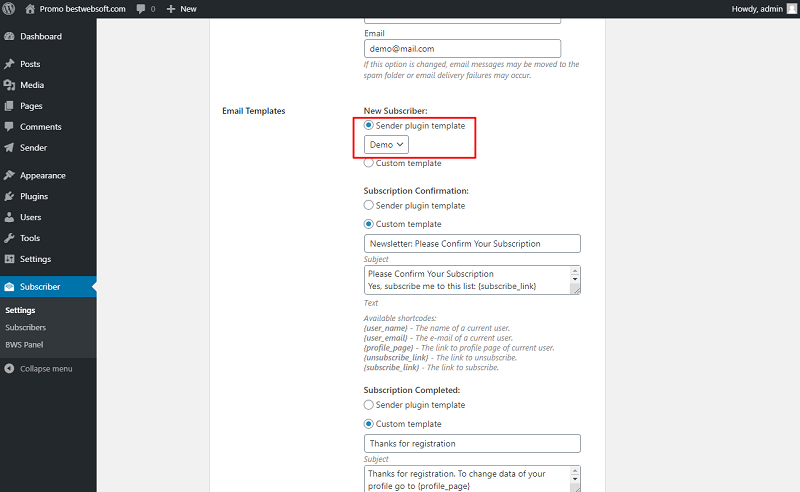
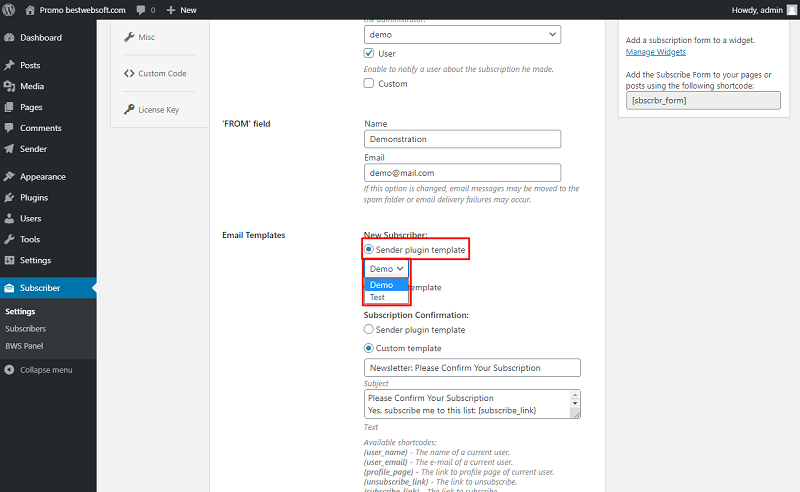
4.4.1.1. After a successful download, activation and configuration of the “Sender” plugin choose the “Sender plugin template” to select the template for notification sending.
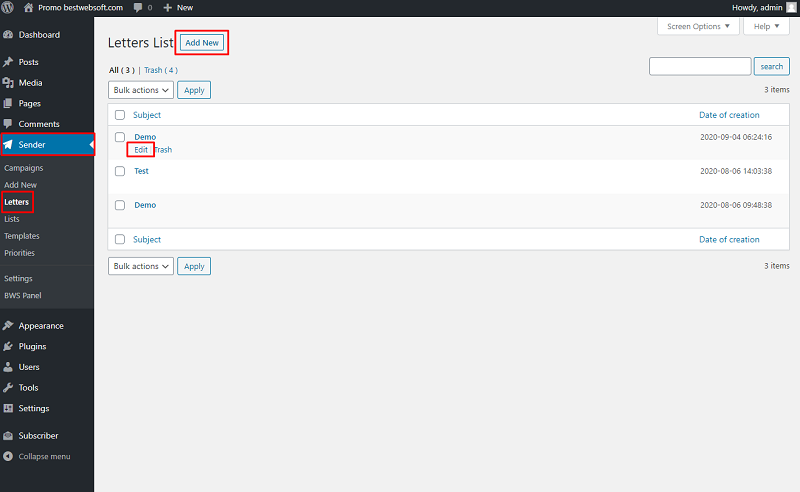
4.4.1.2. To configure or add a new template, open the “Sender” > “Letters” page, and click the “Add New” button, or the “Edit” button on the existing letter template.
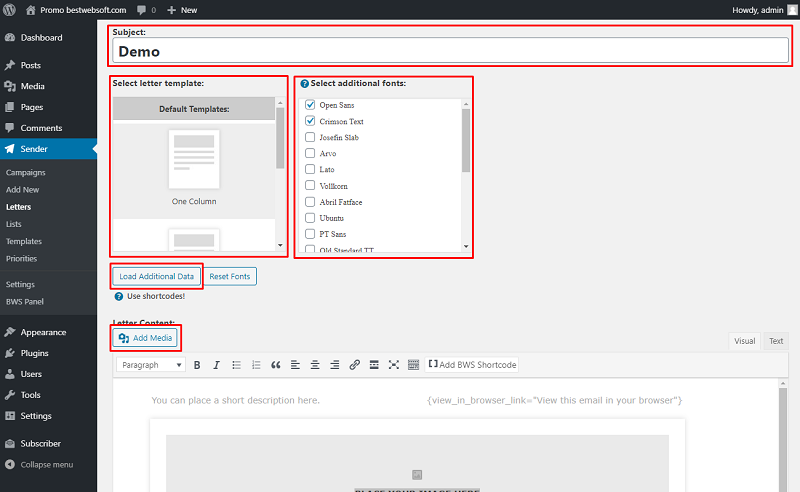
4.4.1.3. Enter the “Subject” of the letter, select the letter template, load additional fonts (if necessary) and click the “Load Additional Data” button. Click the “Add Media” button to add images to the letter content.
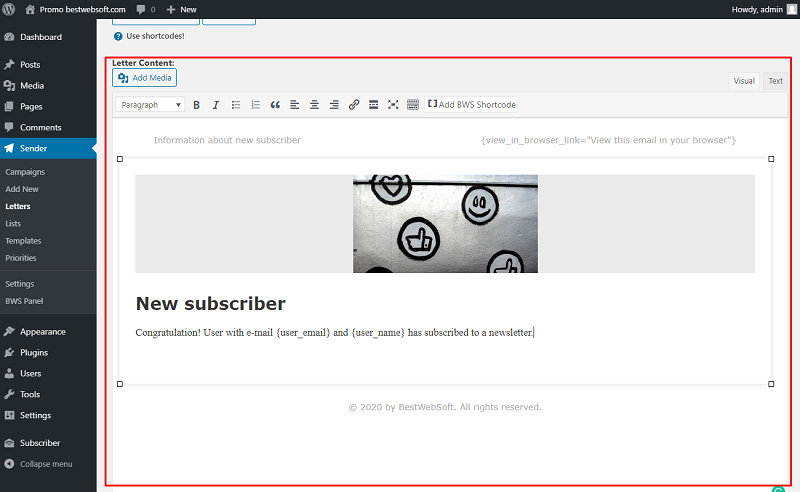
4.4.1.4. Change the letter content in the appropriate section.
Note: You can use the following shortcodes in the letter: {site_url} - site URL {site_name} - site name {user_email} - user e-mail {user_name} - user name {new_post_title} - new post title - only for automatic mailout when publishing a new post {new_post_link} - link to new post - only for automatic mailout when publishing a new post {profile_page} - link to profile page of current user {unsubscribe_link="text"} - link to unsubscribe user from mailout {subscribe_link="text"} - link to subscribe user {view_in_browser_link="text"} - link to view letter in a new browser tab text - some text which will be displayed as link |
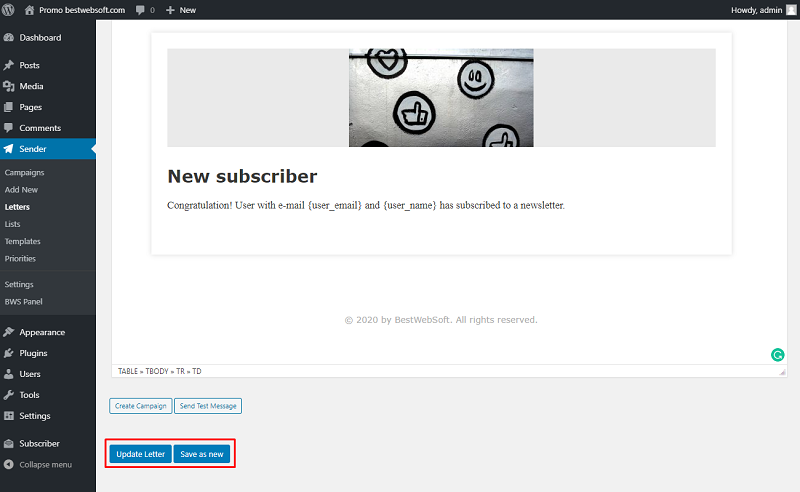
4.4.1.5. Click the “Update Letter” or “Save as new” button to save changes.
4.4.1.6. Open the “Subscriber” > “Settings” > “Notifications”, and select the added or edited template from the “Sender plugin template” dropdown menu.
4.4.1.7. The received email message created with the “Sender” plugin may look as follows.
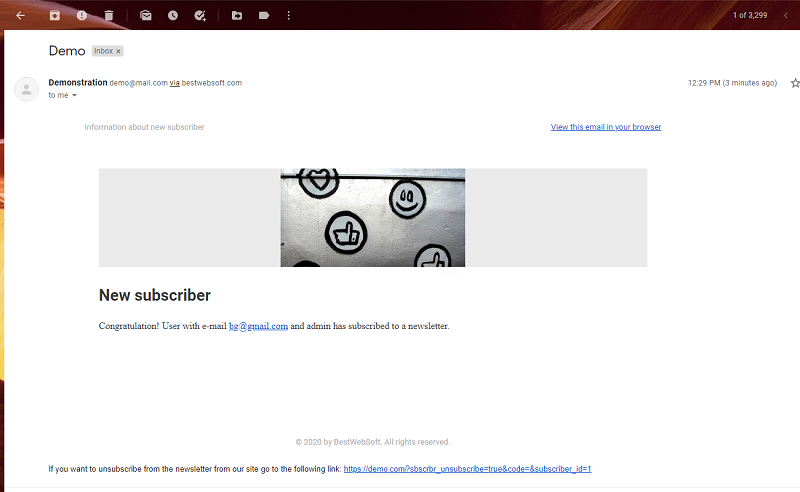
Note: The instruction above is relevant to the “New Subscriber”, “Subscription Confirmation”, “Subscription Completed” and “Unsubscribe Confirmation” templates. |
4.4.2. Custom Template
Choose the “Custom Template” to customize the standard template of the notification.
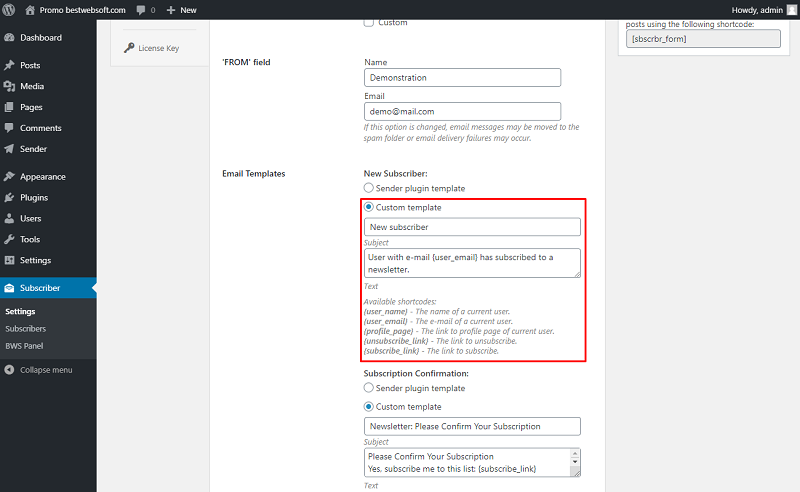
4.4.2.1. Customize the subject of the template in the appropriate field.
4.4.2.2. Customize the text of the template in the appropriate field.
Note: Available shortcodes: {user_name} - The name of a current user. {user_email} - The e-mail of a current user. {profile_page} - The link to profile page of current user. {unsubscribe_link} - The link to unsubscribe. {subscribe_link} - The link to subscribe. |
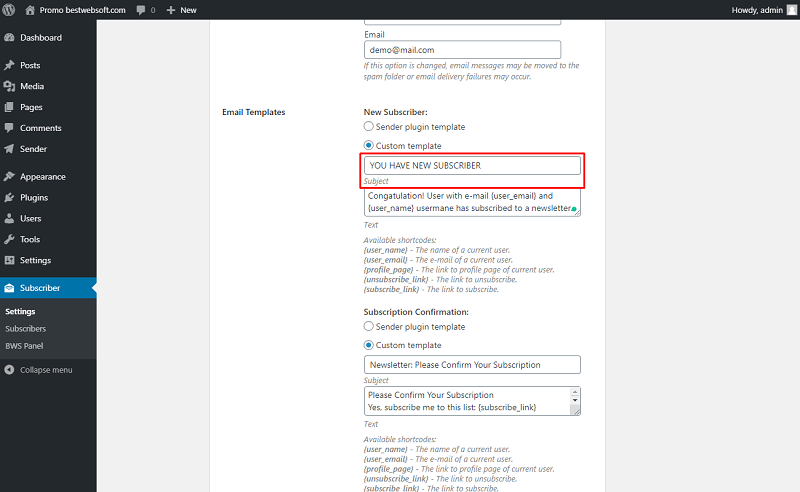
4.4.2.3. The received email message with a customized template may look as follows.
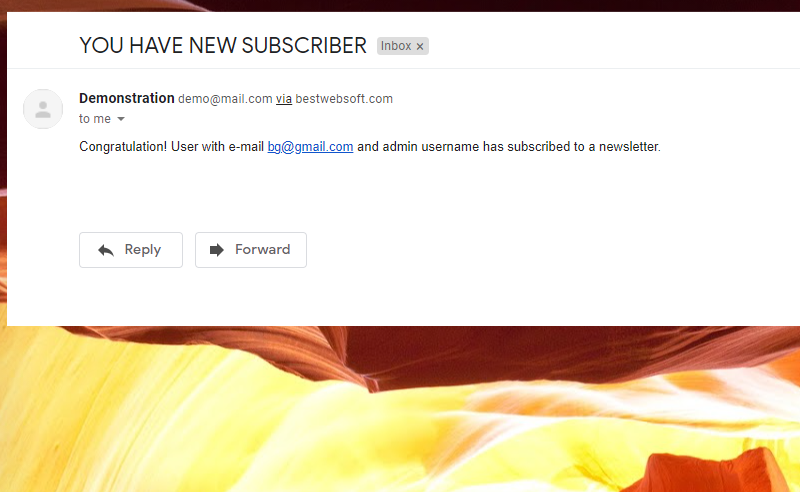
Note: The instruction above is relevant to the “New Subscriber”, “Subscription Confirmation”, “Subscription Completed” and “Unsubscribe Confirmation” templates. |
4.5. Additional Text
Enable the “Additional Text” to include additional text in all email messages created with Sender templates.
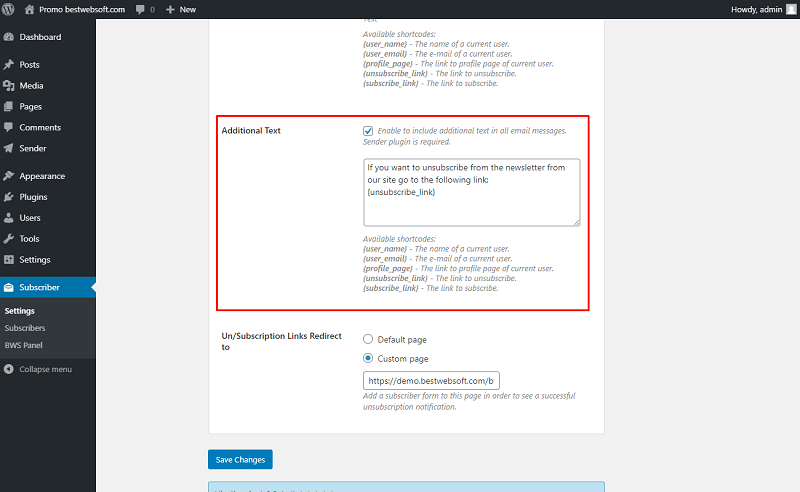
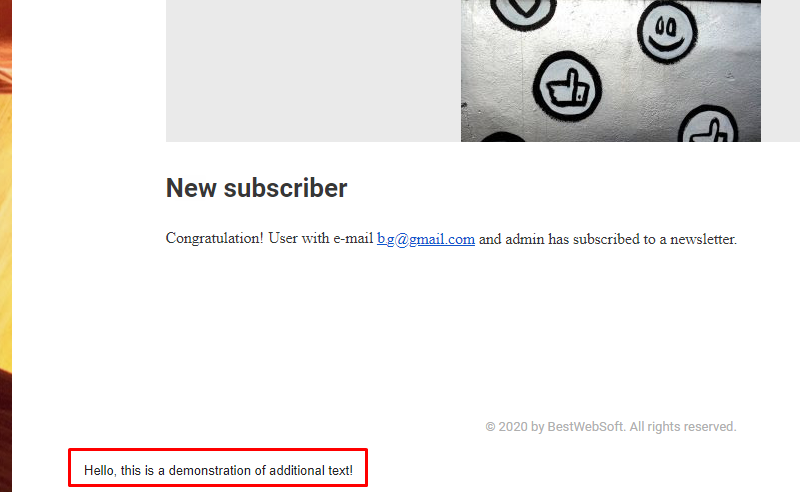
4.5.1. Customize the additional text in the appropriate field.

4.5.2. Additional text in the email message may look as follows.
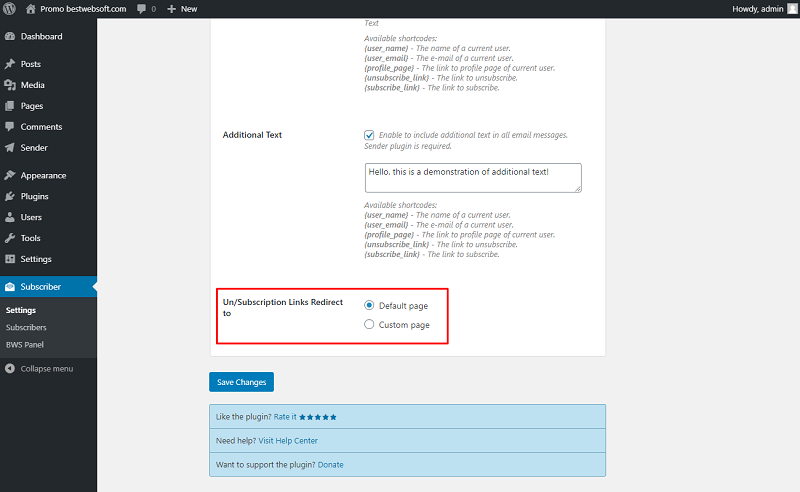
4.6. Un/Subscription Links Redirect to
Use the “Un/Subscription Links Redirect to” to choose the page that the user will be redirected after clicking the subscribe or unsubscribe link.
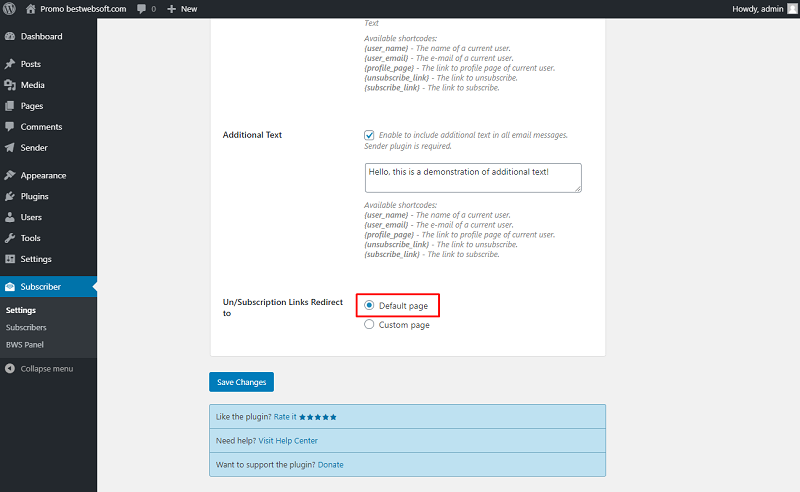
4.6.1. Choose the “Default page” to redirect users to the homepage of your website.
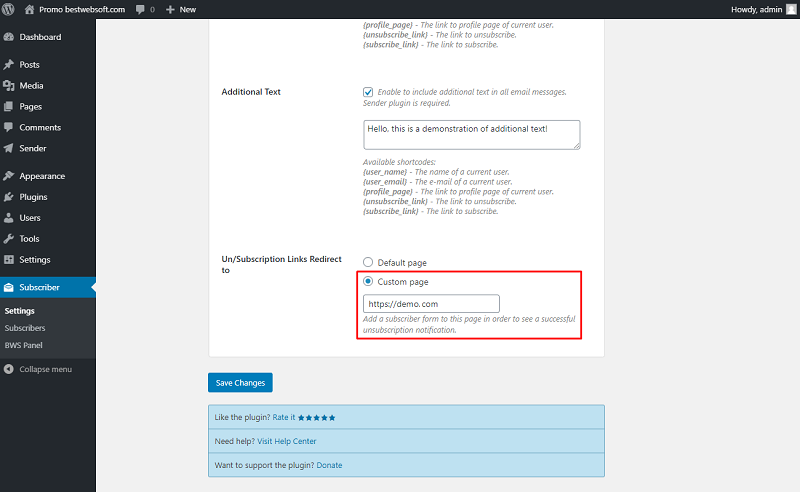
4.6.2. Choose the “Custom page” to insert the URL to any page. Add a subscriber form to this page in order to see a successful subscription or unsubscription notification.
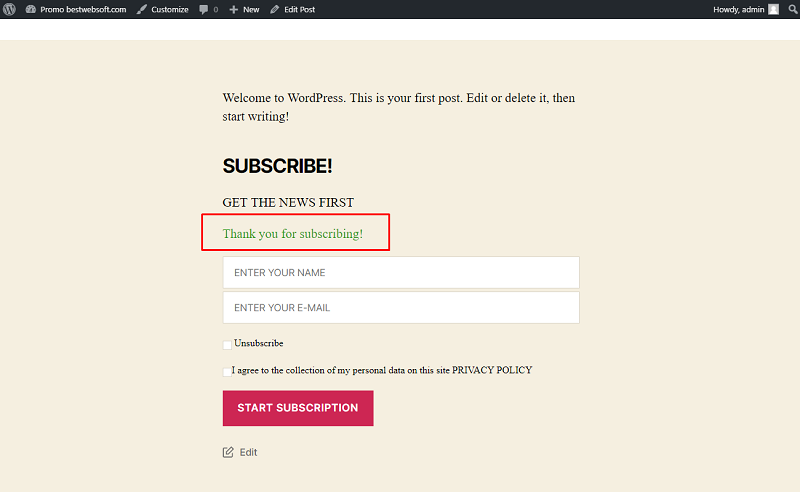
4.6.3. The notification on the subscription form may look as follows.
5. Import / Export
Use the options of the “Import / Export” tab to download or upload data with subscribers’ information.
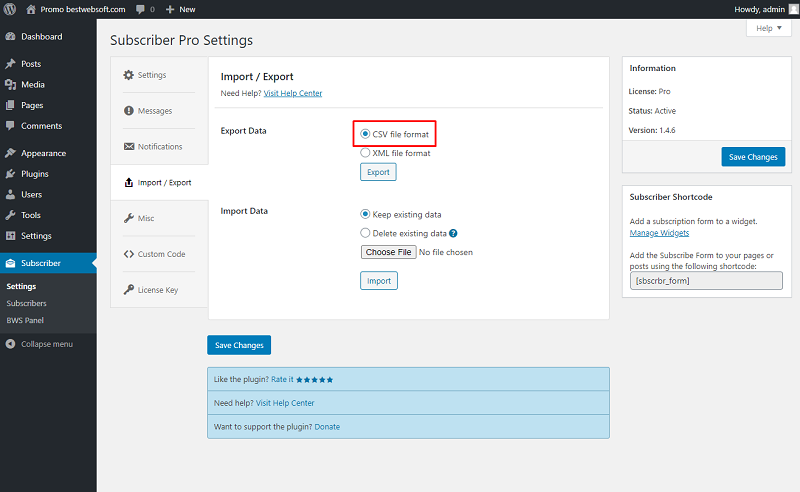
5.1. Export Data
Use the “Export Data” option to download data with subscribers’ info.

5.1.1. Choose the “CSV file format” and click the “Export” button to export data in .csv format.
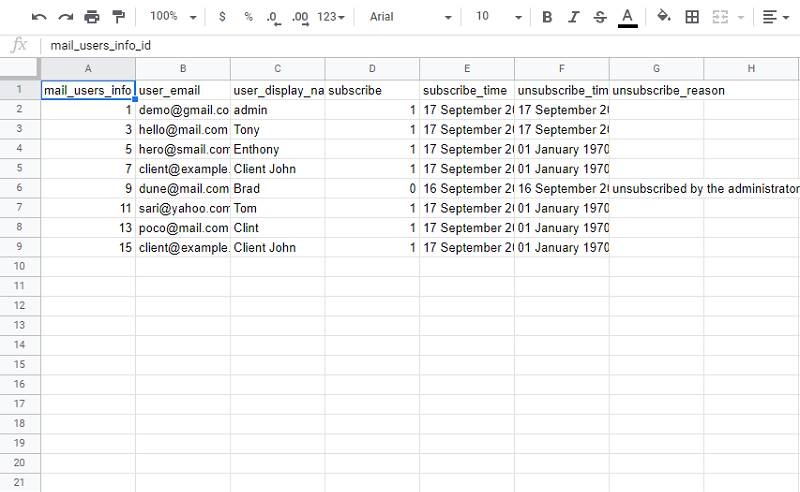
5.1.2. Exported data in .csv format will look as follows.
5.1.3. Choose the “XML file format” and click the “Export” button to export data in .xml format.

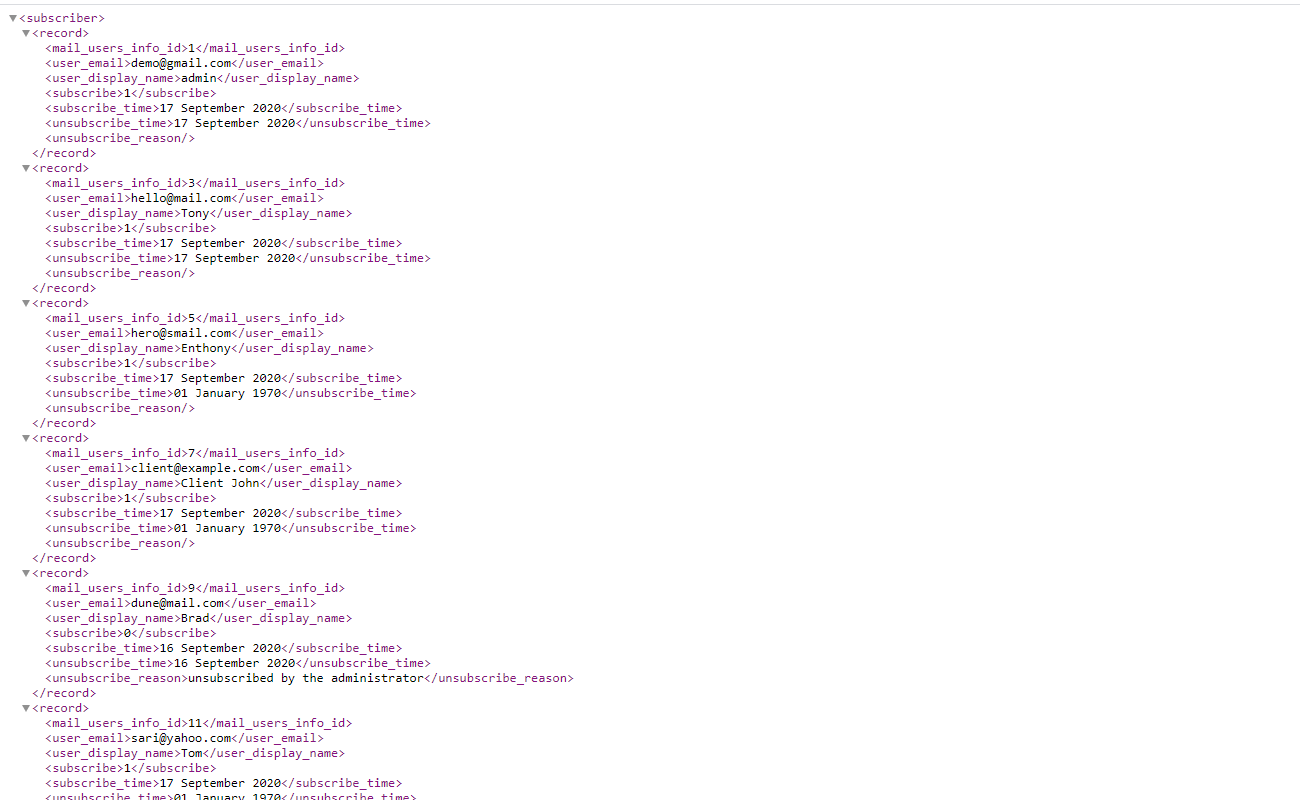
5.1.4. Exported data in .xml format will look as follows.
5.2. Import Data
Use the “Import Data” option to upload data with subscribers’ info.
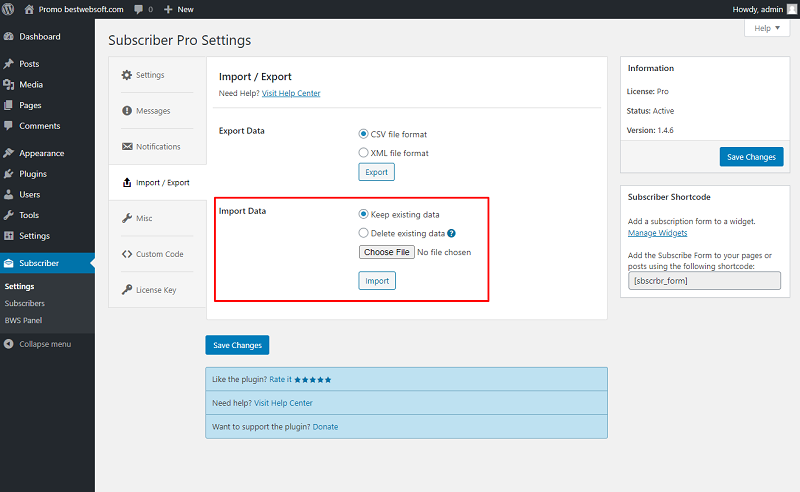
5.2.1. Choose “Keep existing data” to add new data to existing ones. Choose the file in .xml format and click the “Import” button.
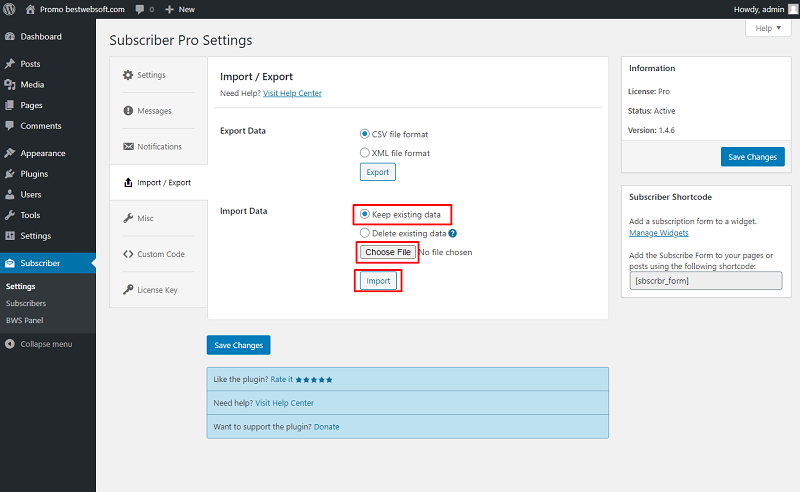
5.2.2. Choose the “Delete existing data” to replace existing data with a new one. Choose the file in .xml format and click the “Import” button.

6. Miscellaneous Settings
Use the options of the “Miscellaneous Settings” tab to make the settings regarding the track usage and default settings.
6.1. Track Usage
Enable the “Track Usage” option to allow tracking plugin usage anonymously.
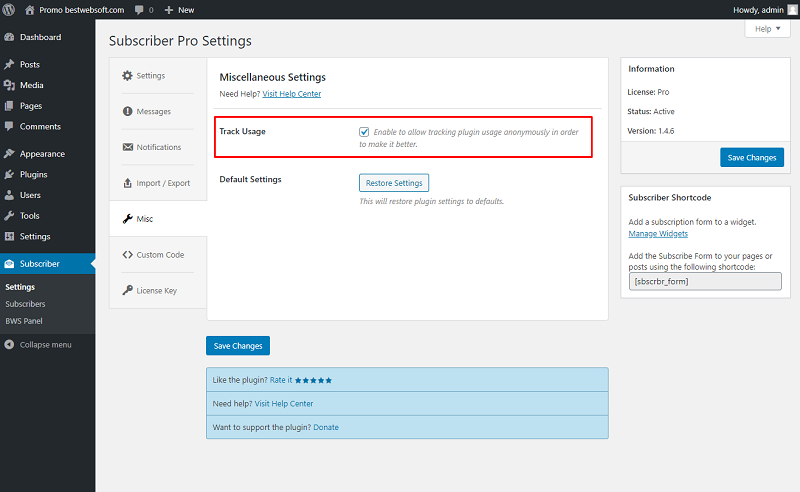
6.2. Default Settings
Click the “Restore Settings” button to reset all the settings made previously and revert them to the default ones.

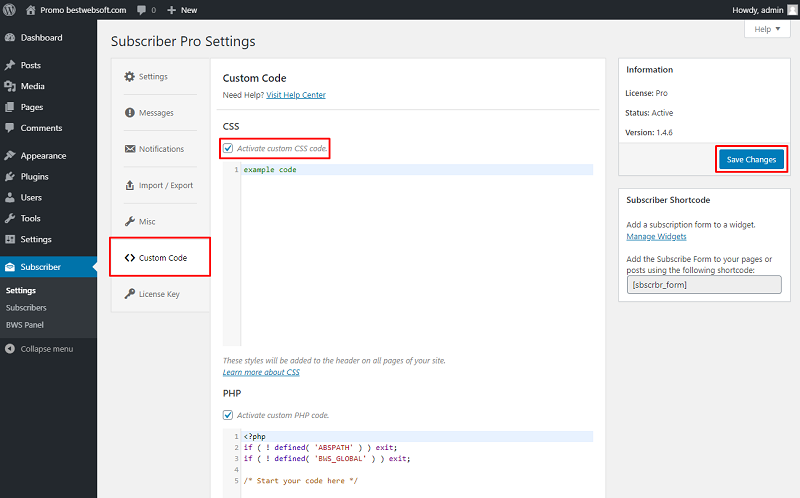
7. Custom Code
Use the “Custom code” tab to insert a CSS, PHP or JavaScript code. To activate a custom code, enable the “Activate custom … code” option and save changes.
8. License Key
Use the “License Key” tab to activate or check the Pro plugin license.
8.1. Pro License
After a successful plugin purchase, you will receive an email notification with a download link and a license key. Activate Pro license by pasting a license key into the “Subscriber Pro License” field and clicking the “Save Changes” button.
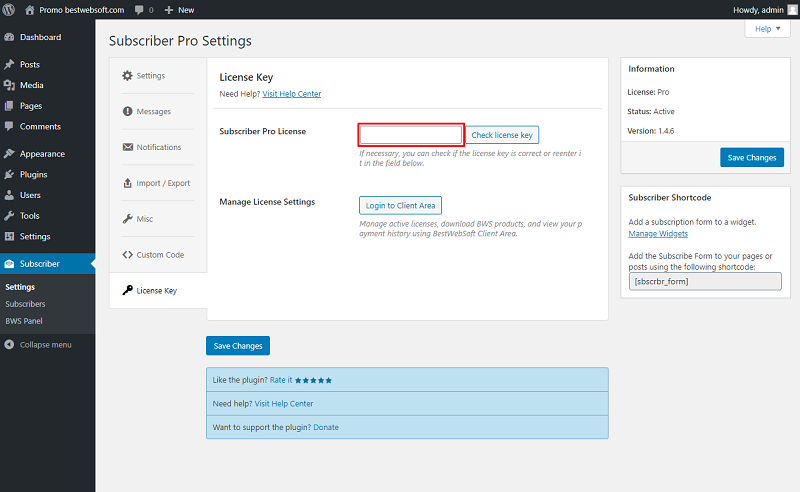
8.2. Check License Key
To check the license key, click the “Check license key” button. If the entered key is correct, the notification “The license key is valid. Your license will expire on XXXX-XX-XX” will be displayed in the upper left corner of the page.

8.3. Manage License Settings
Use the “Manage License Settings” option to change your license settings. Click the “Login to Client Area” button to open your personal Client Area dashboard located on the https://bestwebsoft.com/ website. Browse and download purchased products, change the license domain and copy the license keys.

9. Subscribers
Use the “Subscribers” page to manage the subscribers’ list.
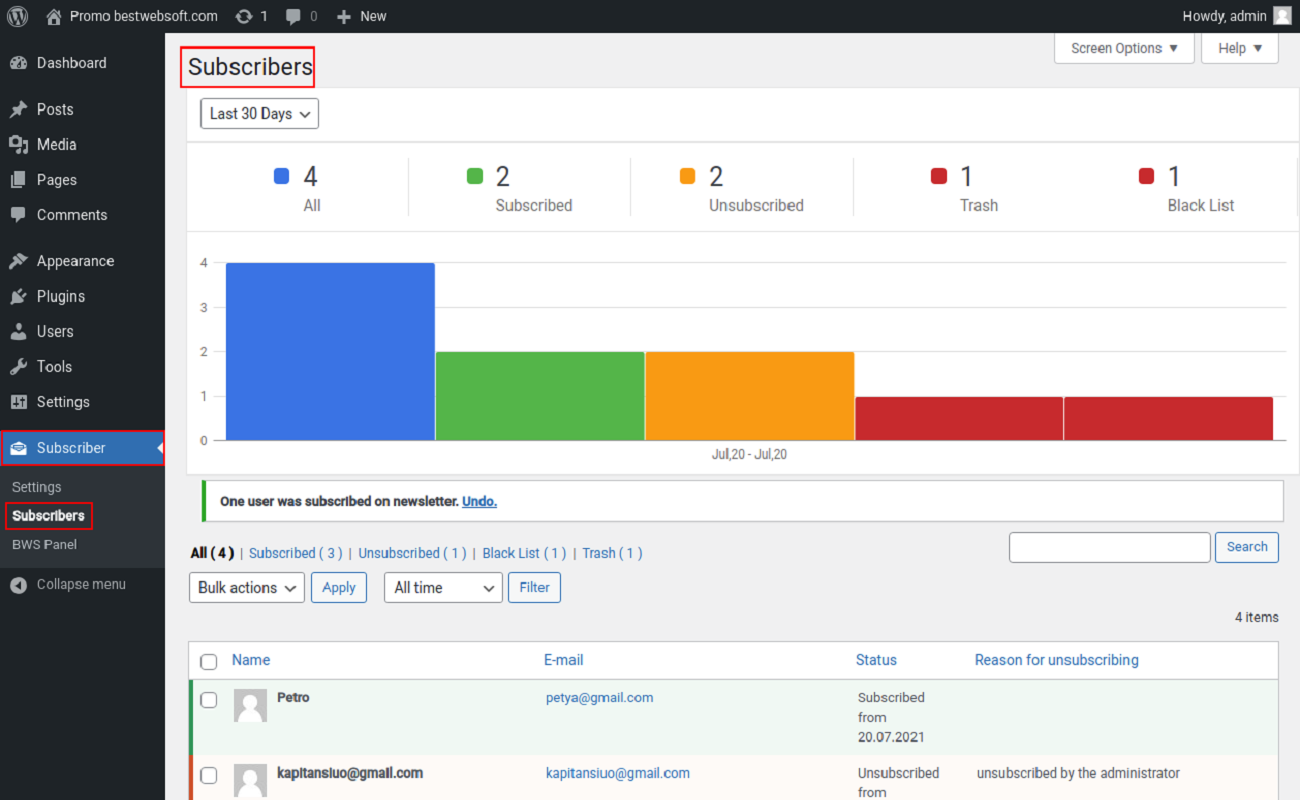
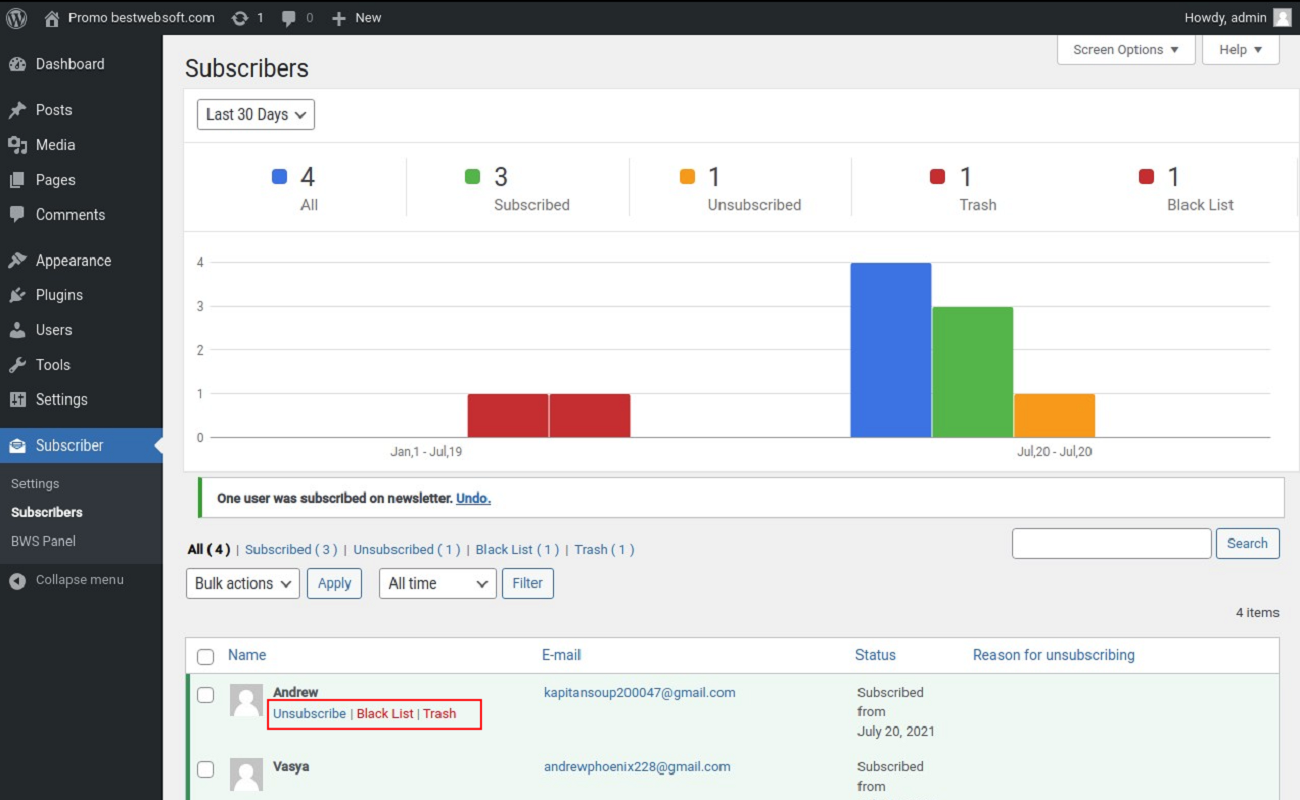
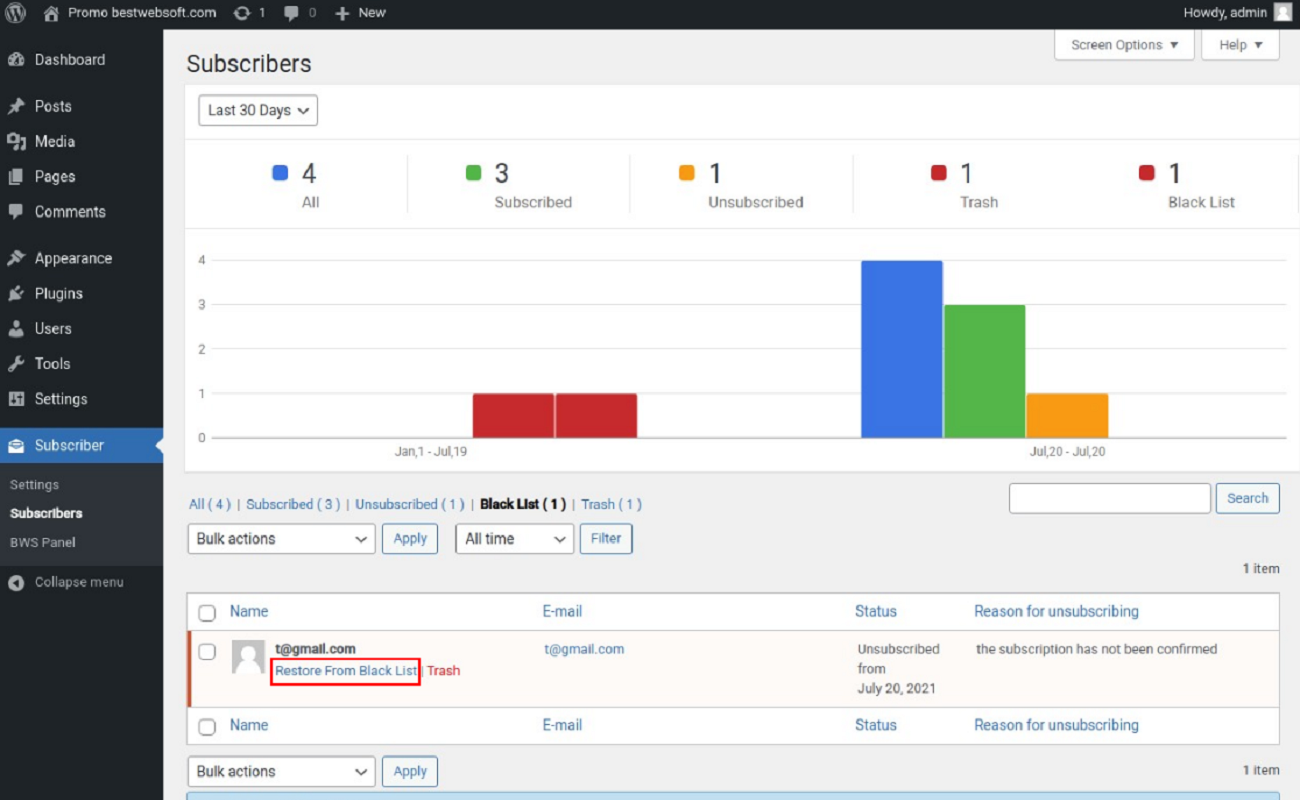
9.1. Use the statistics chart to view the number of "Subscribed", "Unsubscribed", "Trash" and "Black List" users.
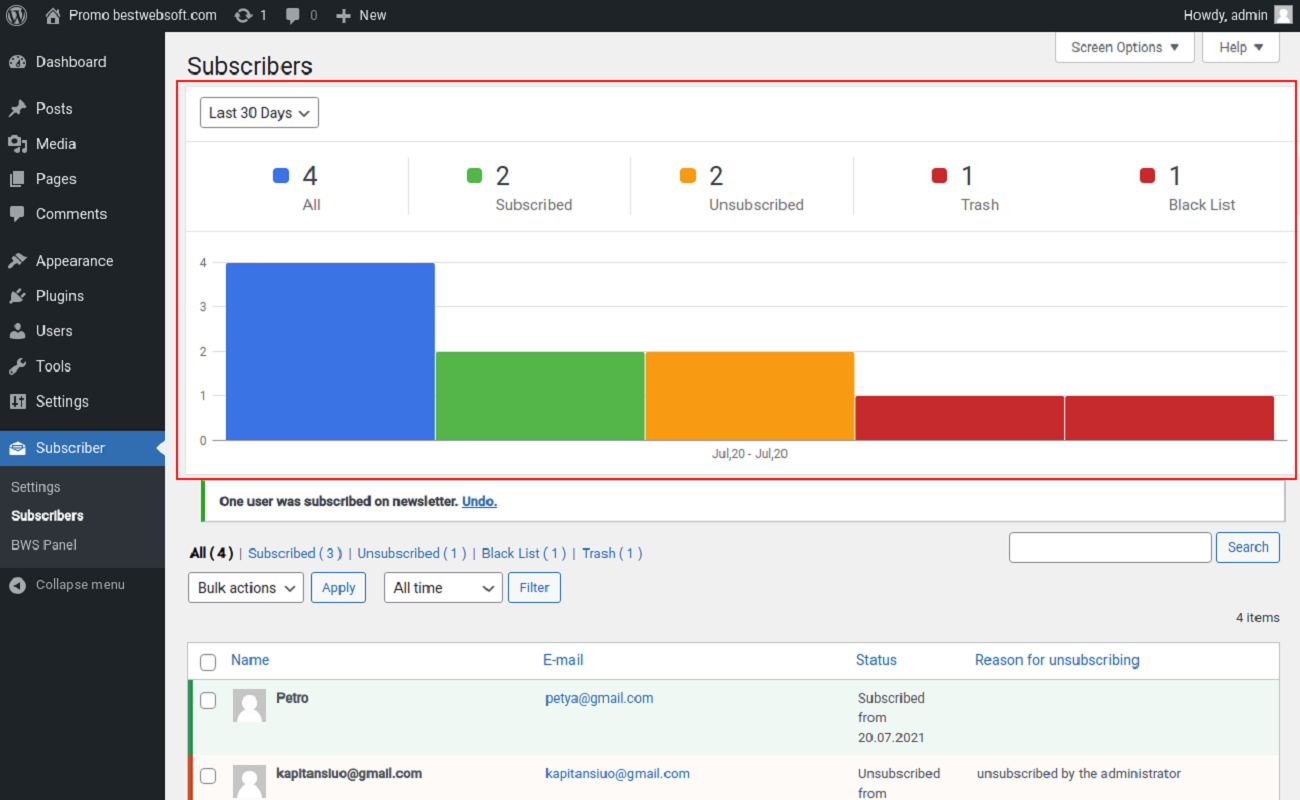
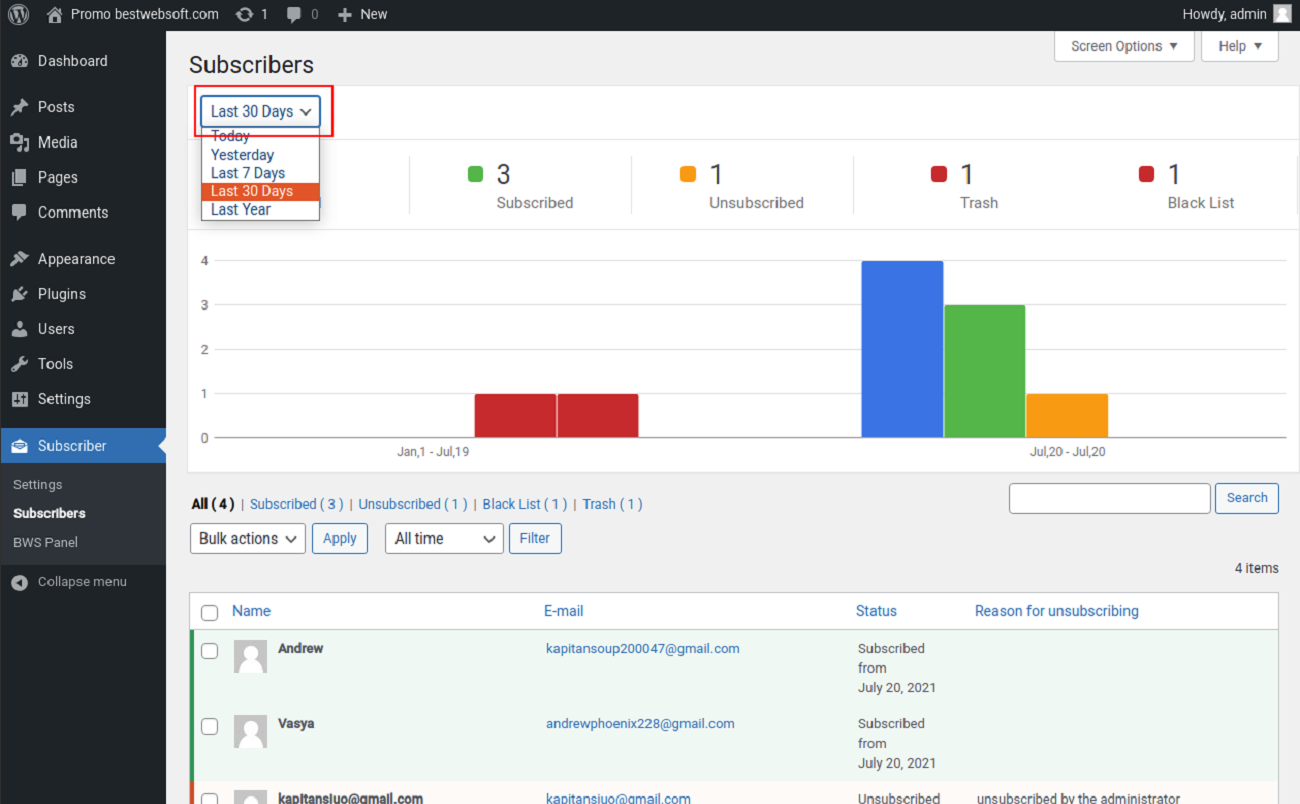
9.2 Use the dropdown menu on the statistics chart to change the statistics interval.
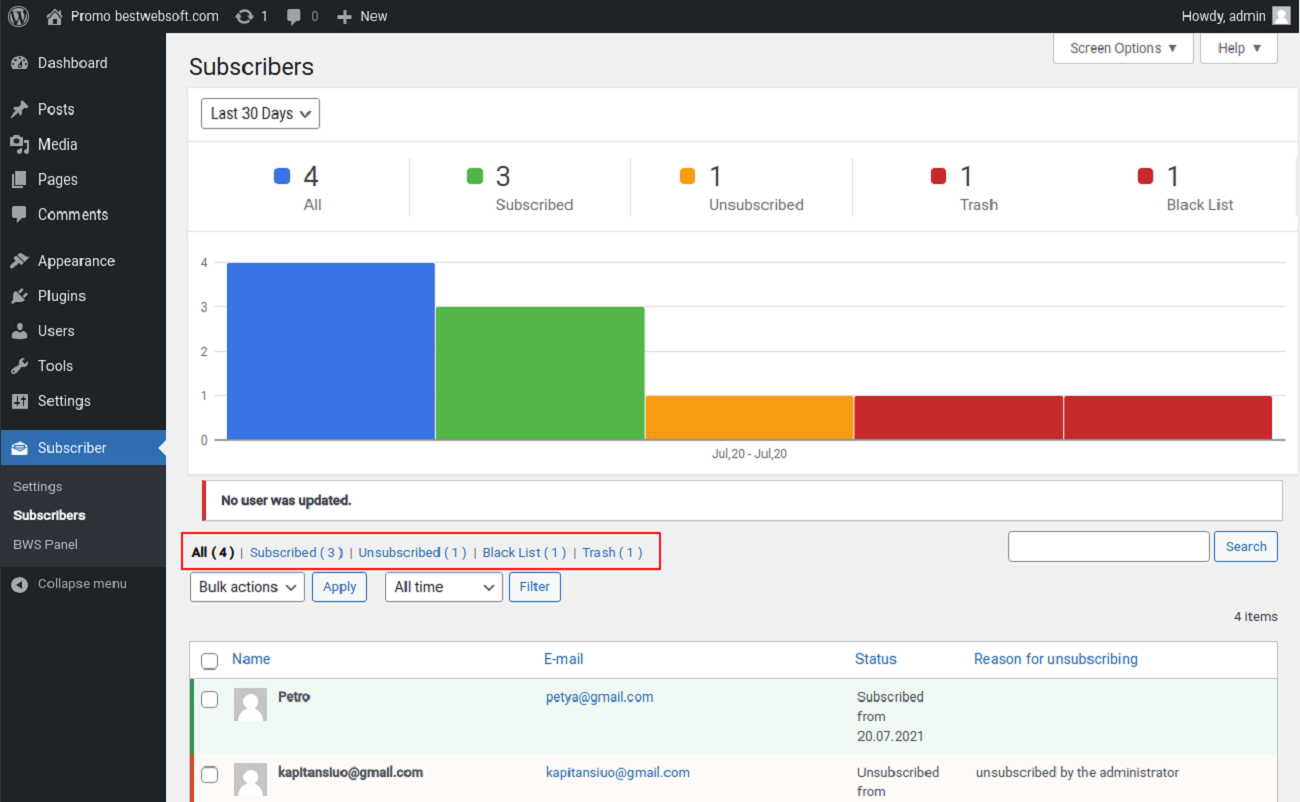
9.3. Switch the tabs to see the lists of subscribed, unsubscribed, blacklisted, and trashed users.
9.4. Hover the cursor on the subscriber’s name to unsubscribe, blacklist, or move the subscriber to the trash tab.
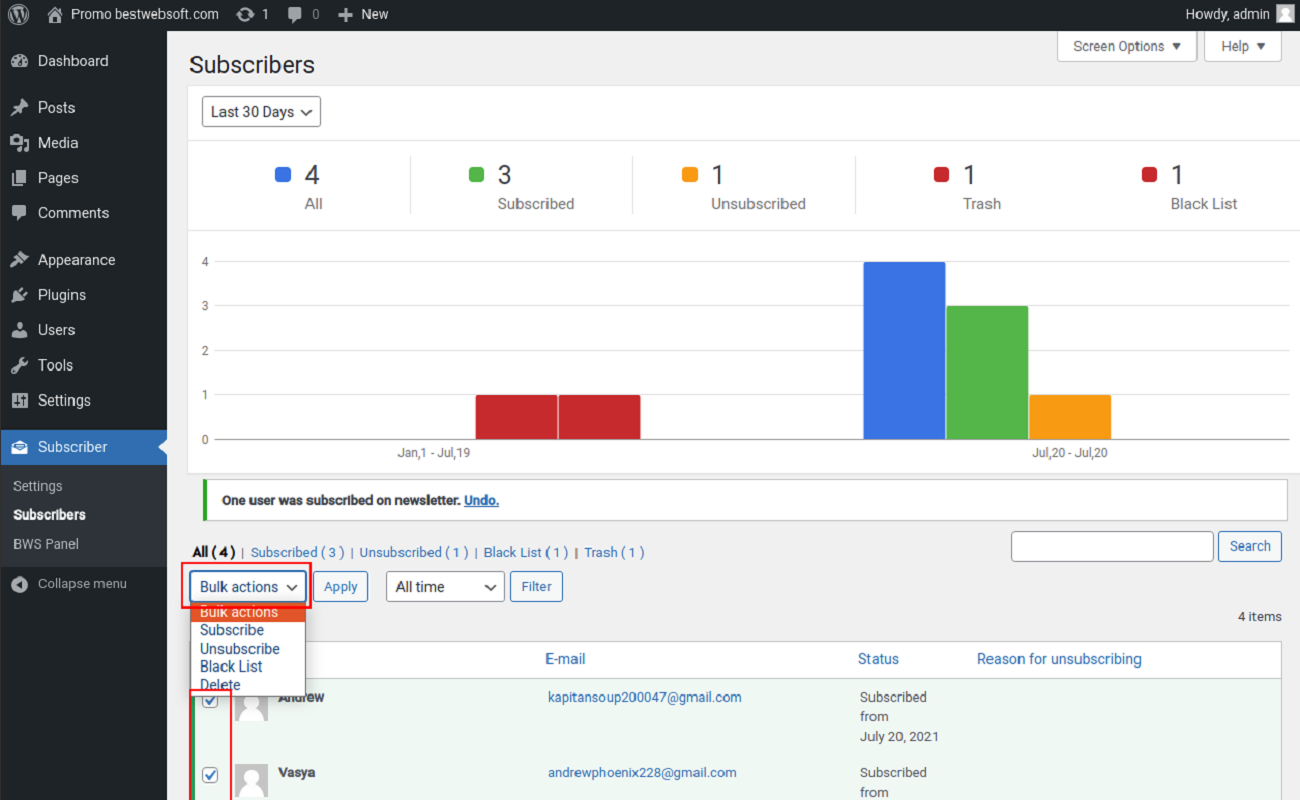
9.5. Use the “Bulk actions” to apply an action on multiple subscribers. Enable the necessary subscribers, select action, and click the “Apply” button.
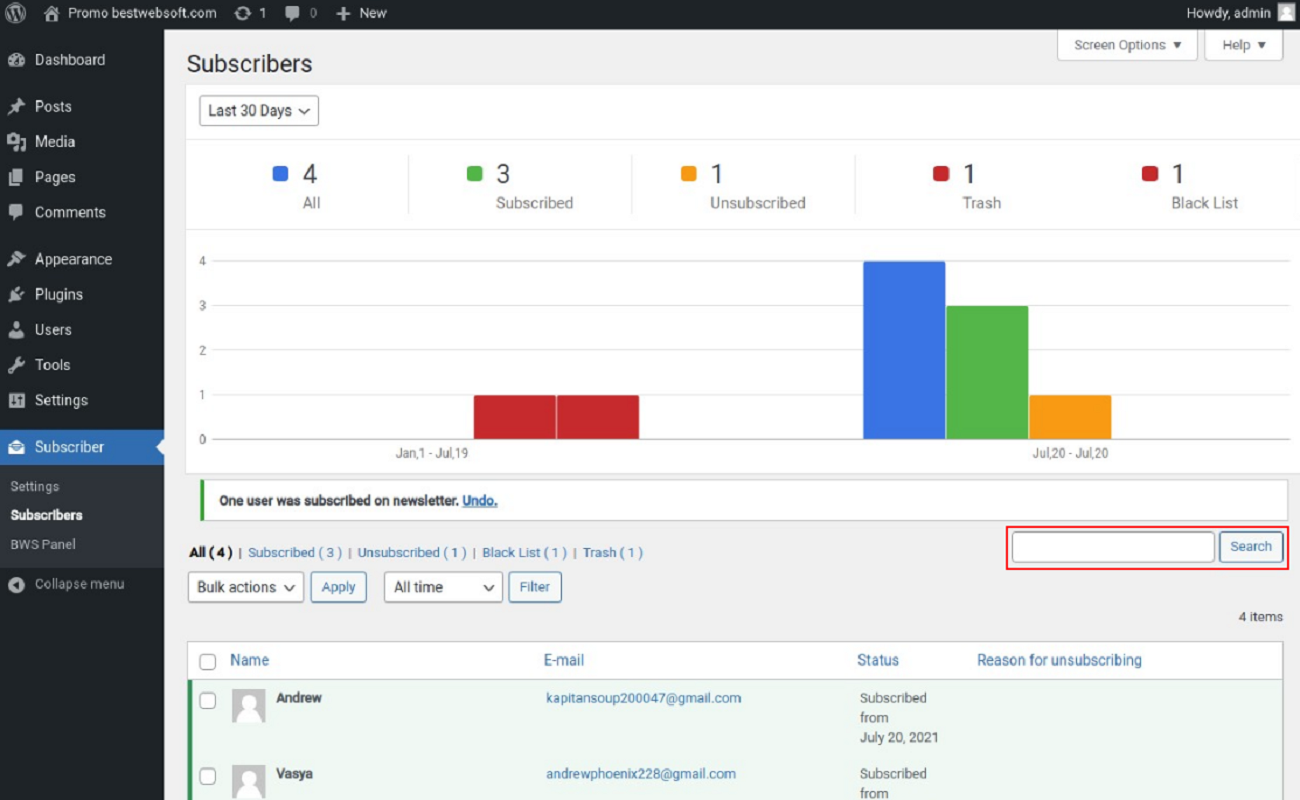
9.6. Use the “Search” field to find the subscriber on the list. Enter the request and click the “Search” button.
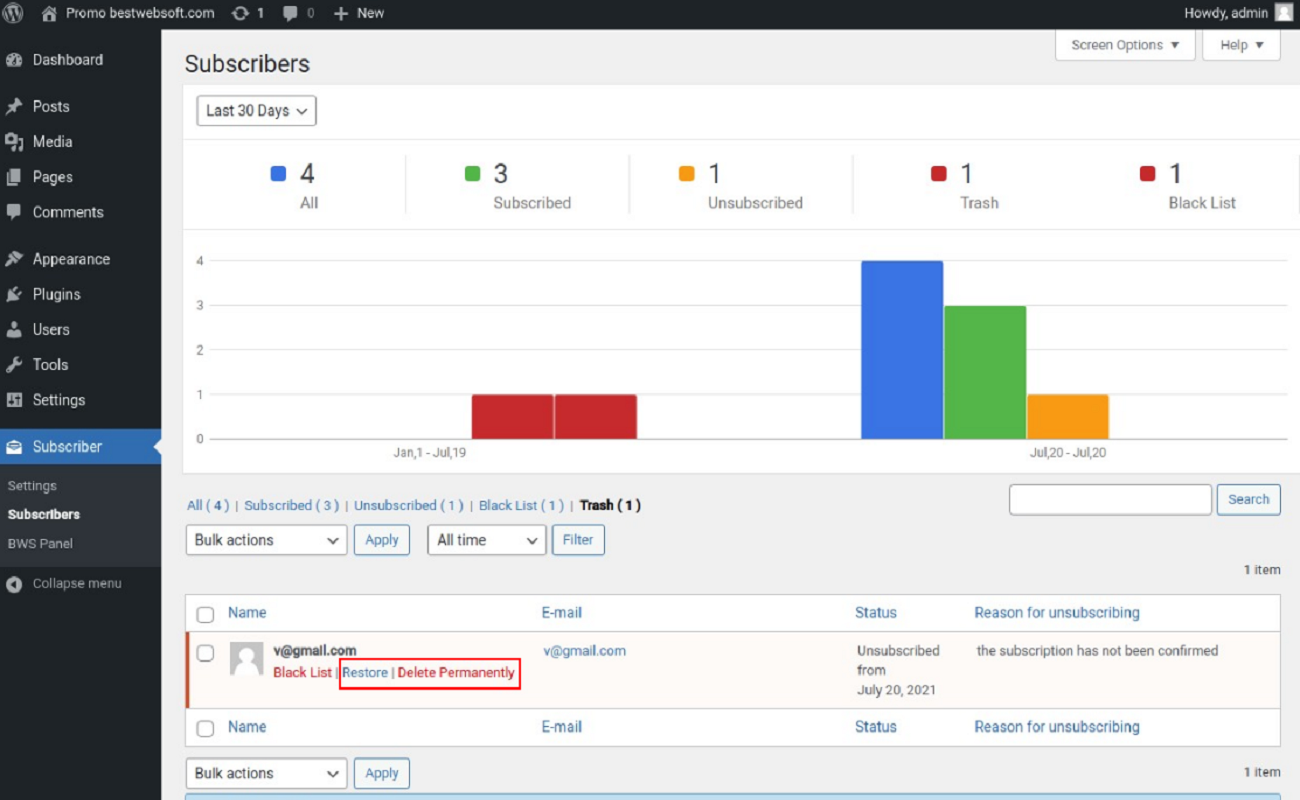
9.7. Click the “Restore” or “Delete Permanently” button on the “Trash” tab to restore the subscriber or completely erase data from the list.
9.8. Click the “Restore From Blacklist” button on the “Black List” tab to make the appropriate action.
10. Add Subscribe Form
Add subscribe form to posts, pages, and widgets.
10.1. Subscribe Form on Posts & Pages
To add a subscribe form to posts and pages open the “Subscriber” > “Settings” page and copy the shortcode from the “Subscriber Shortcode” section.

10.1.1. Open the post or page where you want to add the subscribe form, paste the previously copied shortcode to the necessary place of the post or page, and click the “Update” button.
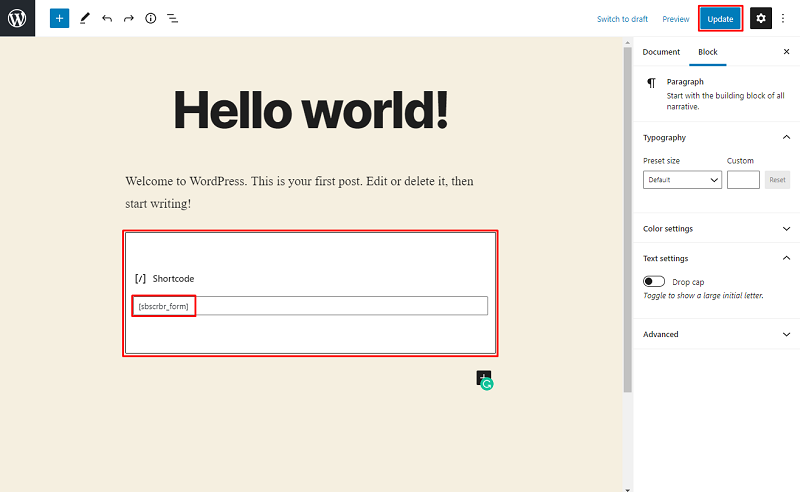
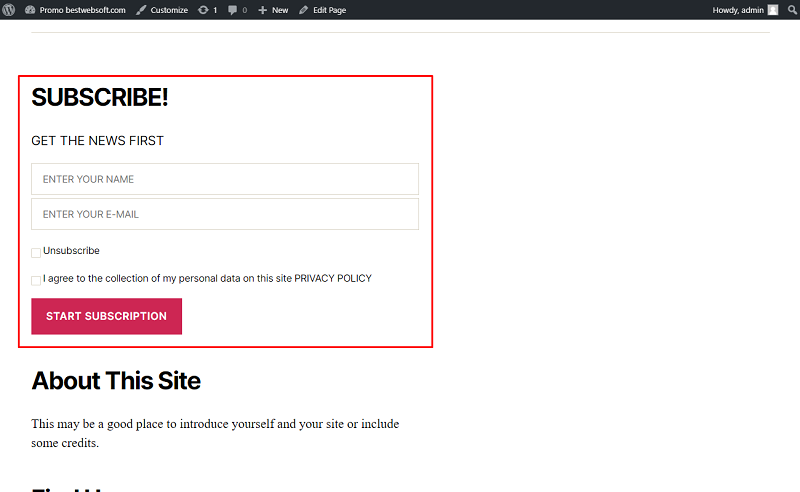
10.1.2. After updating the page or post, the subscribe form may look as follows.

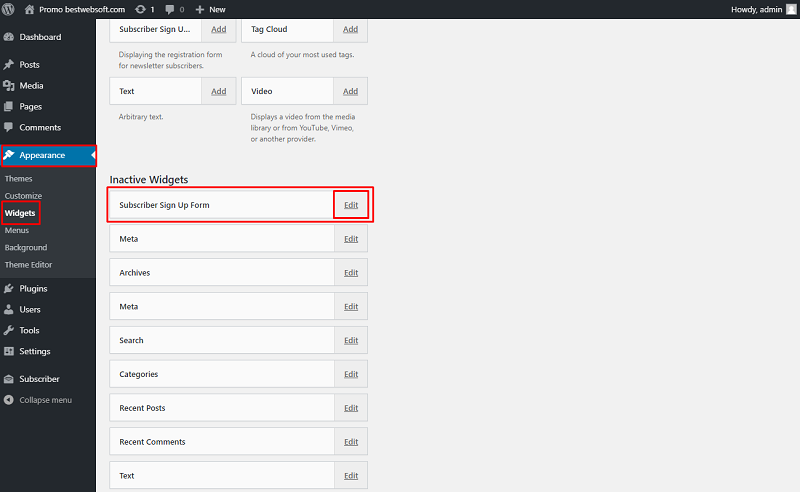
10.2. Subscribe Form Widget
To add a subscribe form widget open the “Appearance” > “Widgets” tab, find the “Subscriber Sign Up Form” widget, and open it in the “Edit” mode.
10.2.1. Use the widget fields to customize the text of labels, placeholders, and buttons, or enable the “apply plugin settings” to use text from the “Form Fields” option on the “Settings” page.

10.2.2. Select both the sidebar for this widget and the position of the widget in that sidebar and click the “Save Widget” button.
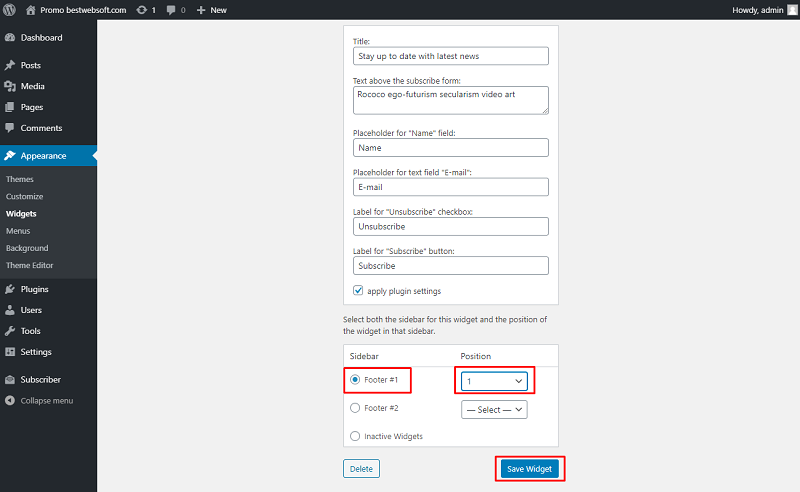
10.2.3. After saving changes subscribe form widget may look on a page as follows.
Thank you!
Help & Support
Visit our Help Center if you have any questions — https://support.bestwebsoft.com/
Services
We provide additional services such as WordPress themes & plugins development,
graphic design, custom programming.
Contact us now to get a free quote — https://bestwebsoft.com/contacts/

