

2-Step Verification
User Guide
2-Step Verification | 1.0.8 * |
WordPress | 6.5 * |
*When using other versions some differences are possible to occur
** Screenshots were taken from a PC
Table of Contents
2.2. Allow Using Verification for
2.3. Email Codes Expiration Time
2.4. Authenticator Time Window
You can download 2-Step Verification Plugin here:
https://bestwebsoft.com/products/wordpress/plugins/google-2-step-verification/
1. Introduction
Note: Сlick the “Save Changes” button in order to apply any changes. |
1.1. Open your WordPress Admin Dashboard and find the menu on the left.

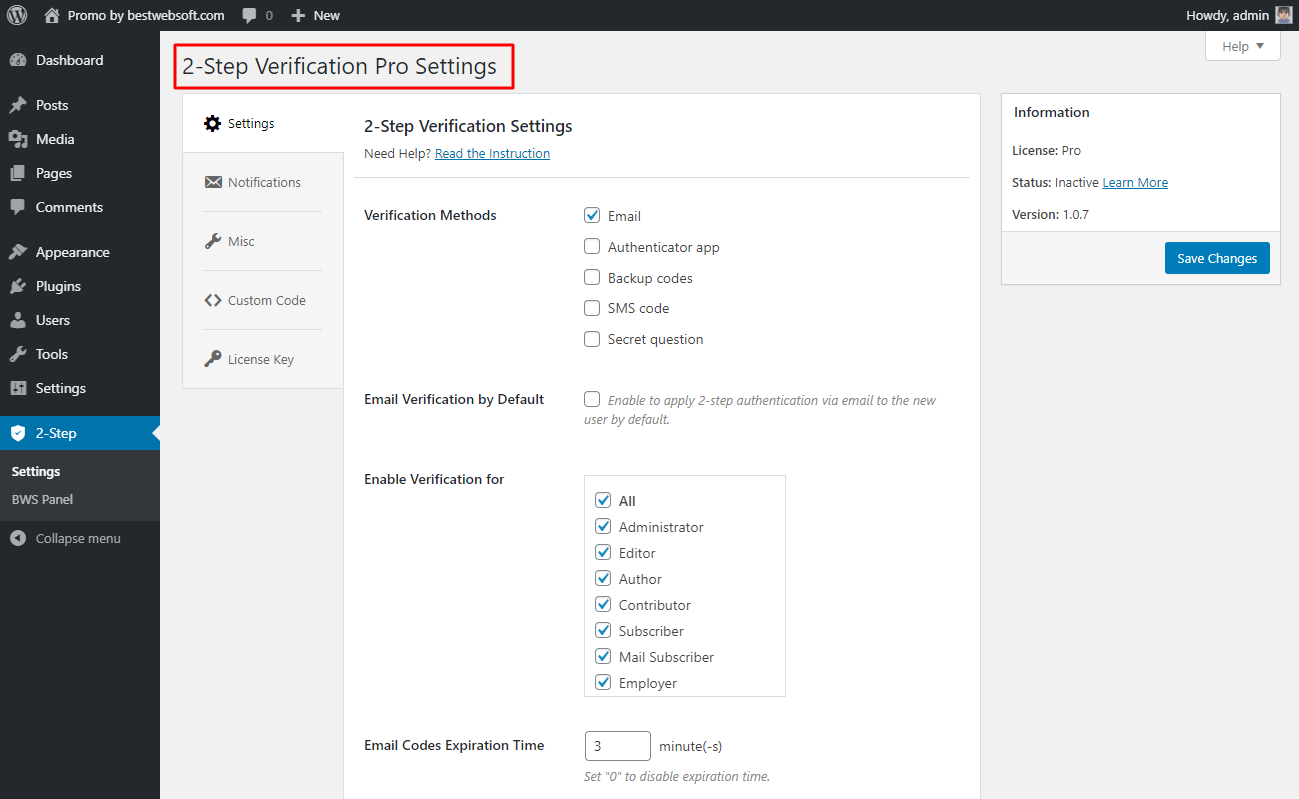
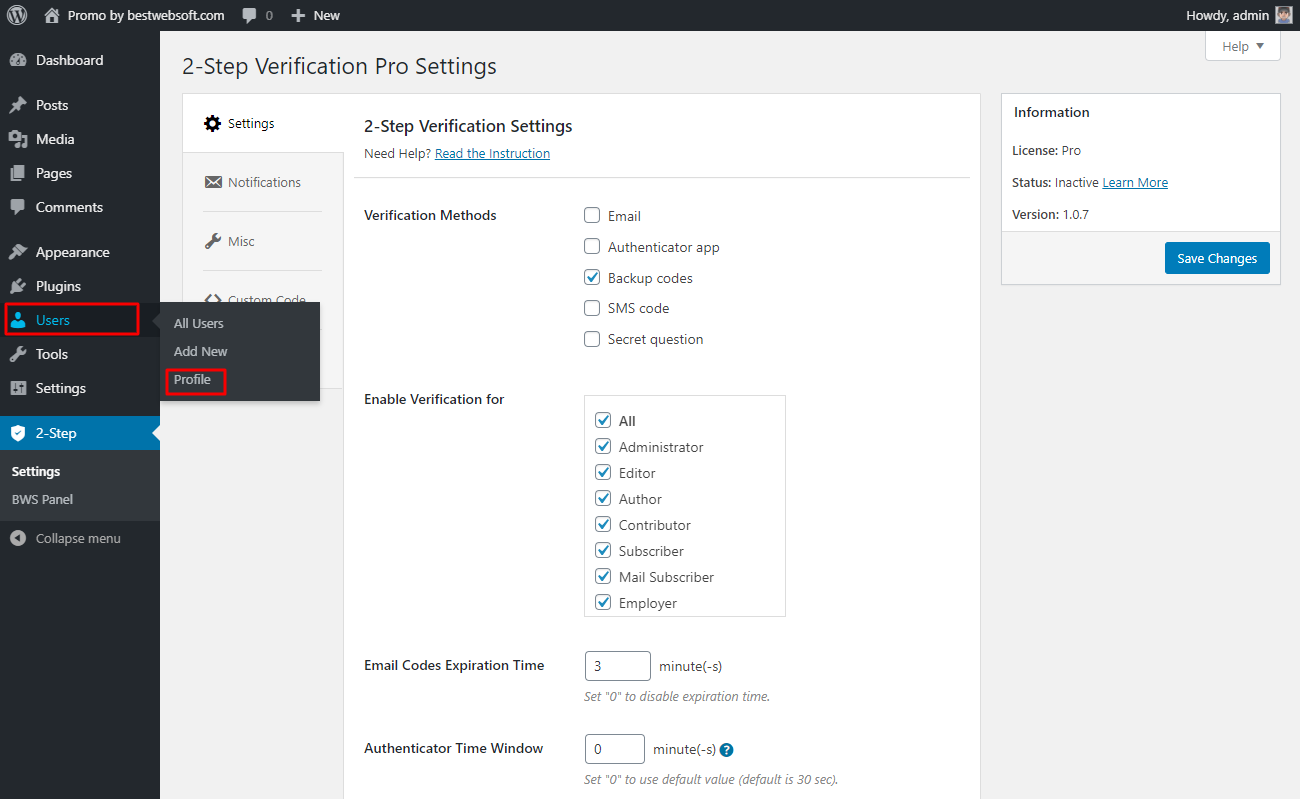
1.2. Open the “2-Step Verification” > “Settings” page on the dashboard.
2. Settings
Use the options of the “Settings” page to make the global settings for the plugin.
Note: Users have to enable a 2-step verification option for their accounts on the personal profile page. |
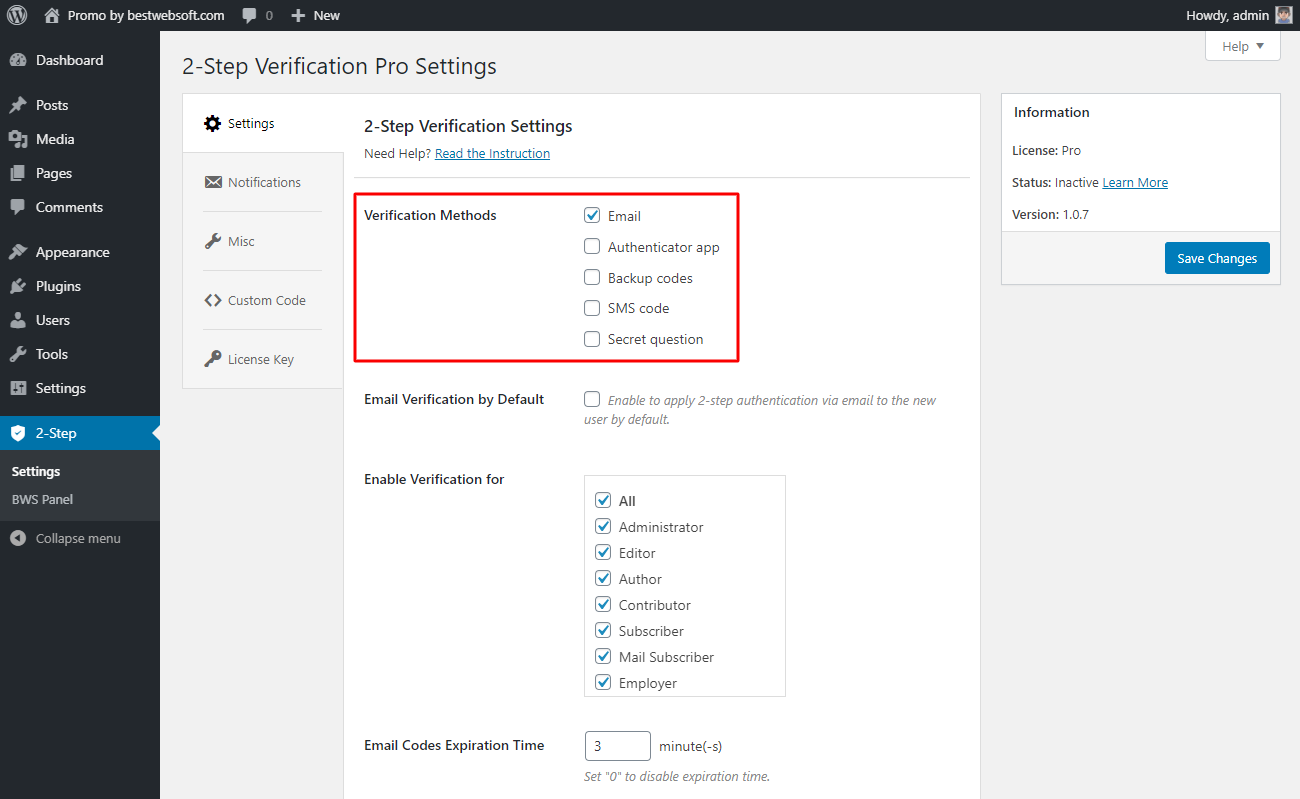
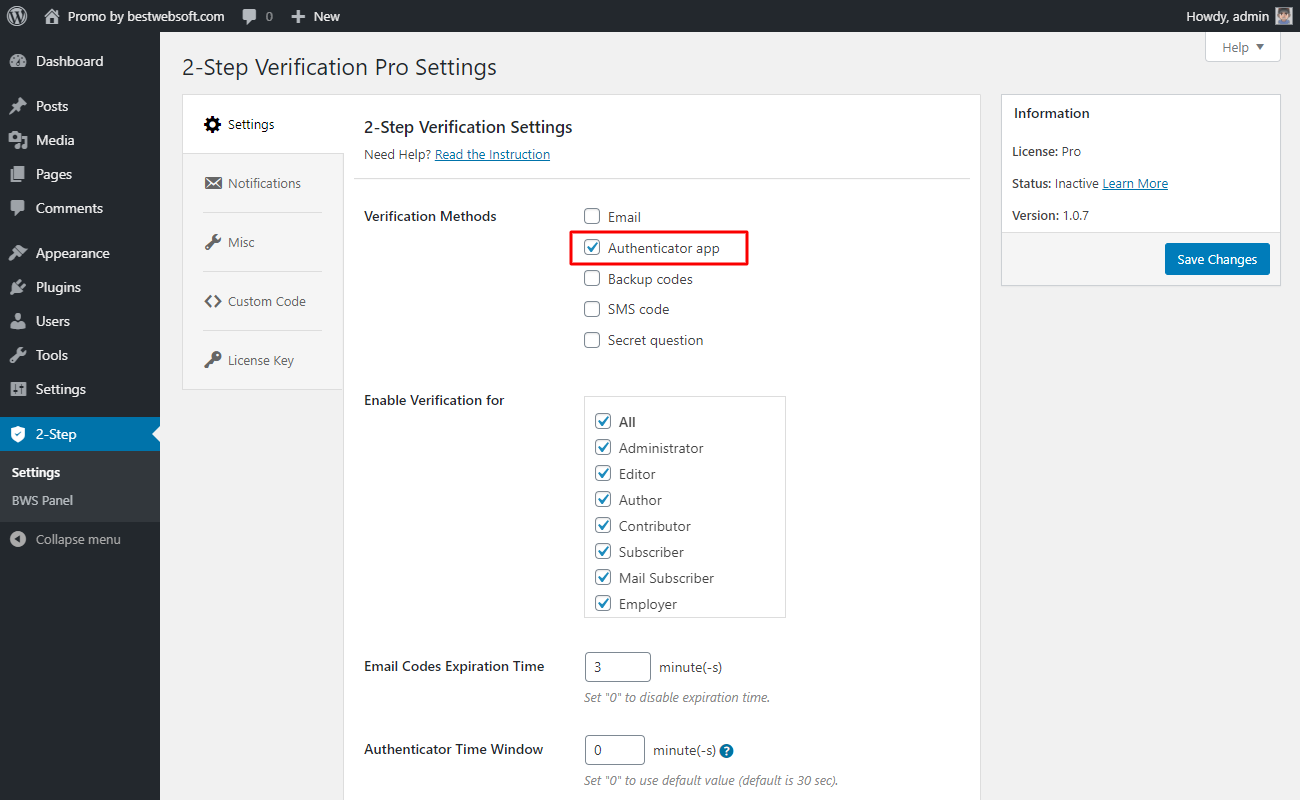
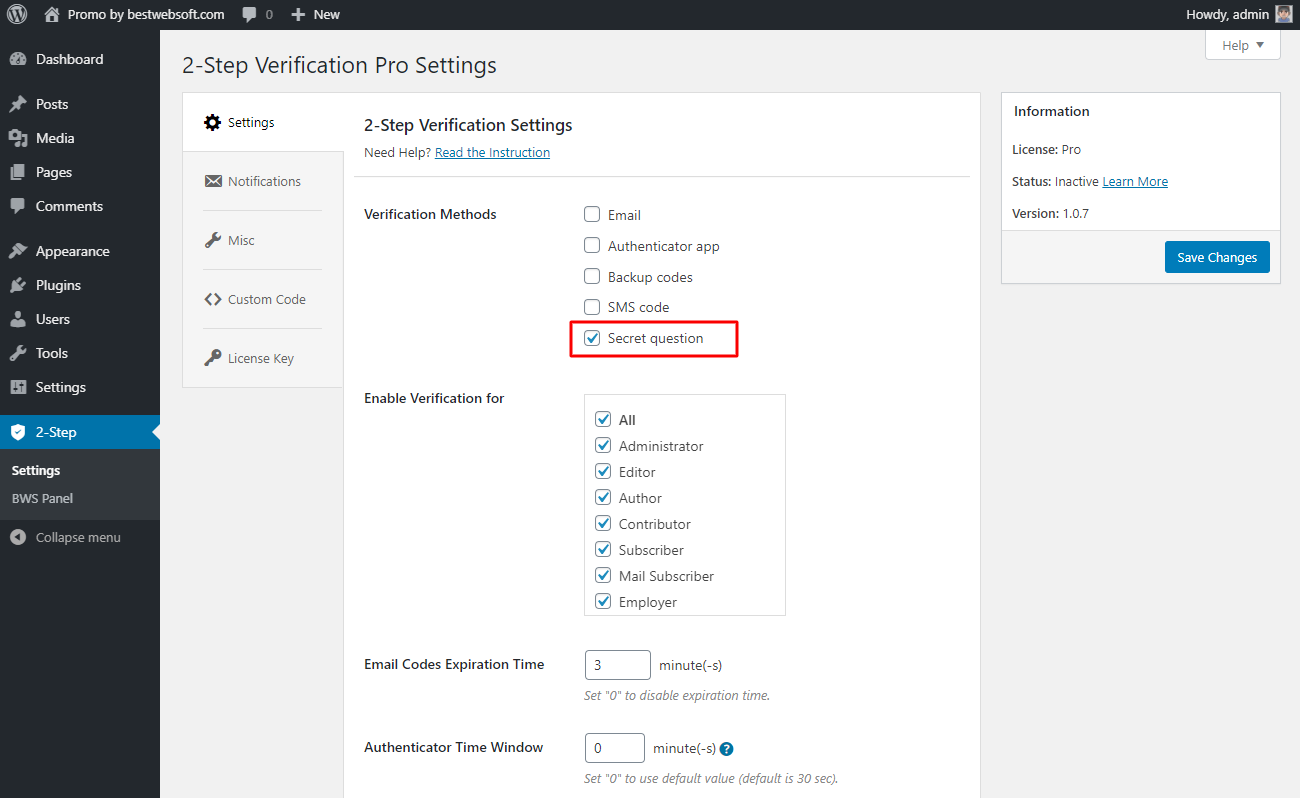
2.1. Verification Methods
Use the “Verification Methods“ option to enable necessary verification methods for login.
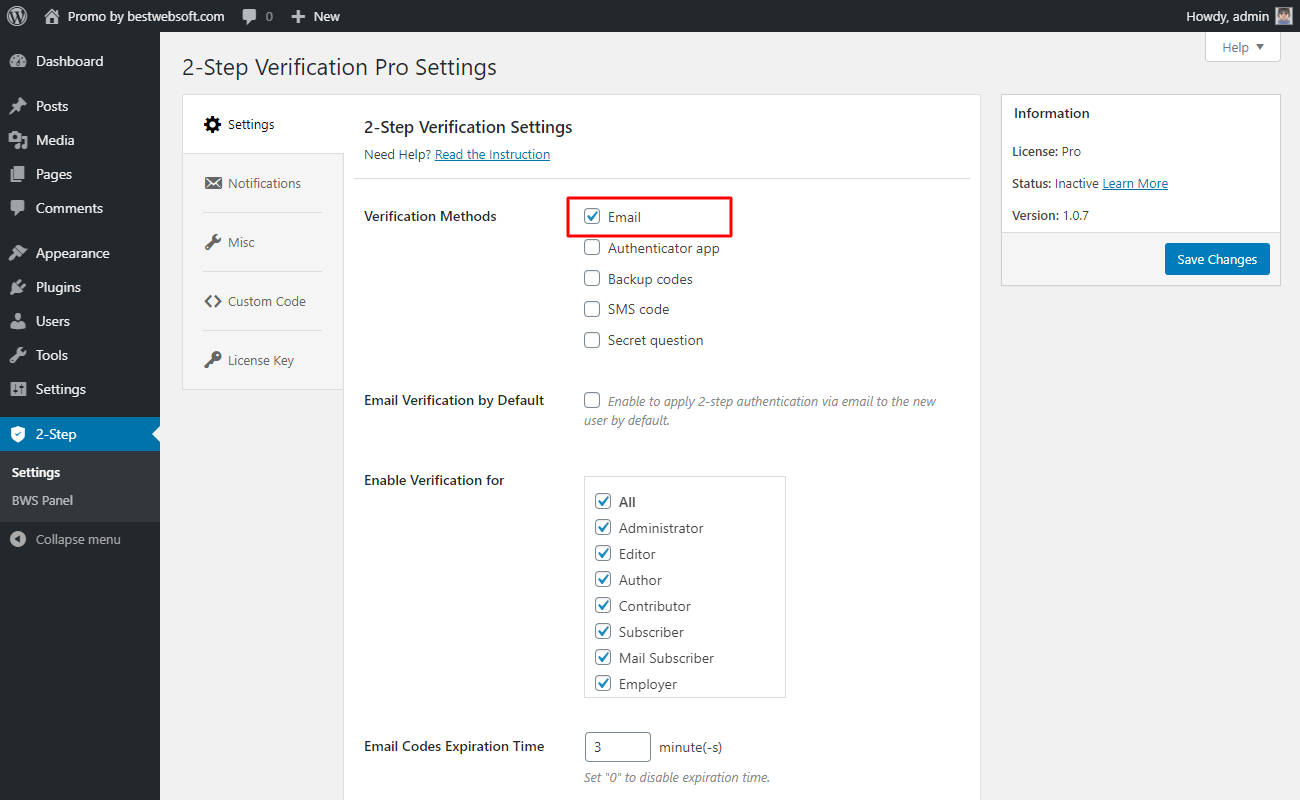
2.1.1. Email
Enable the “Email” to use verification by email.
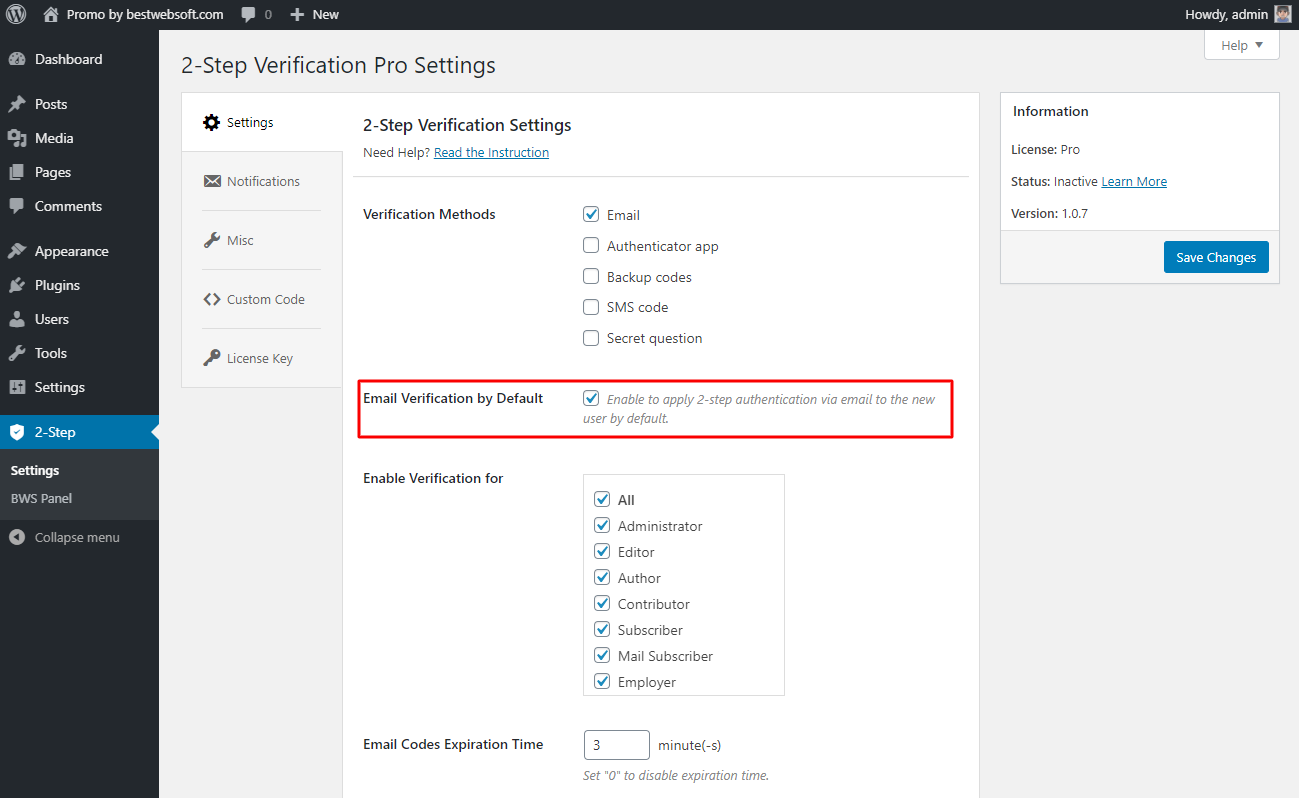
2.1.1.1. Enable the “Email Verification by Default ” option to apply 2-step authentication via email to the new user by default on your site
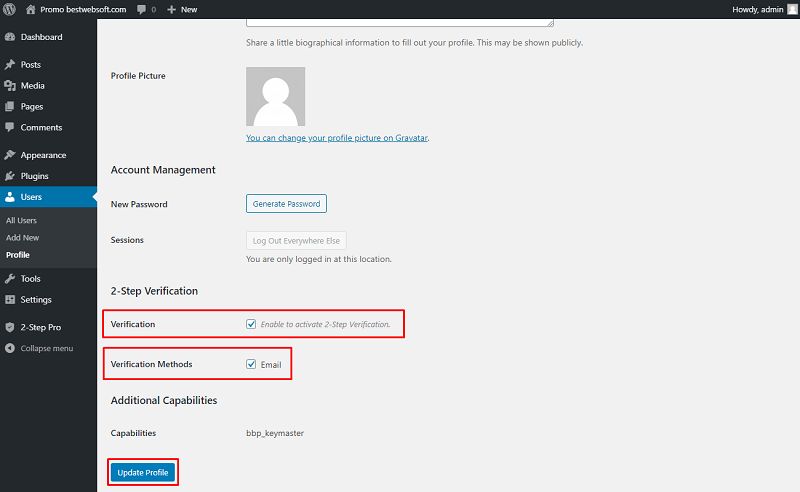
2.1.1.2. Open the “Users” > “Profile” page.

2.1.1.3. Enable the “Verification” and “Verification Methods” > “Email” options. Click the “Update Profile” button.
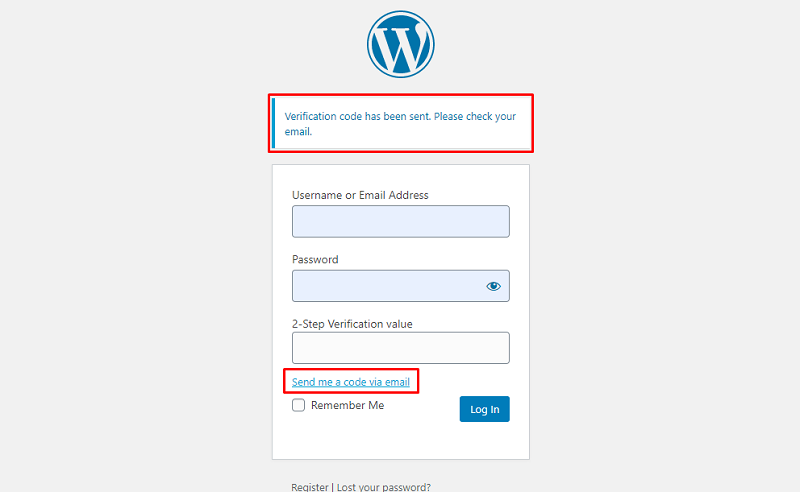
2.1.1.4. Click the “Log Out” button to check the verification settings. Or open the login form in a new Incognito Window.

2.1.1.5. Click the “Send me a code via email” link to receive a verification code. You will see a notification that your code has been sent.
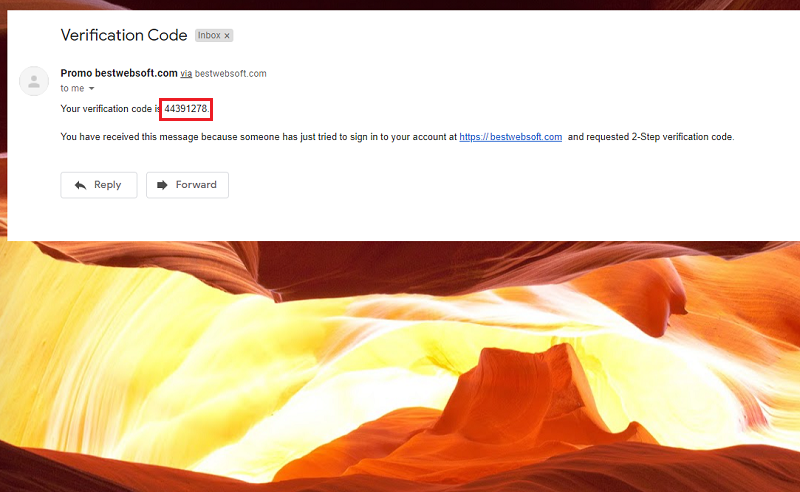
2.1.1.6. Open your email inbox messages, open the one with the title “Verification Code”, copy the verification code.
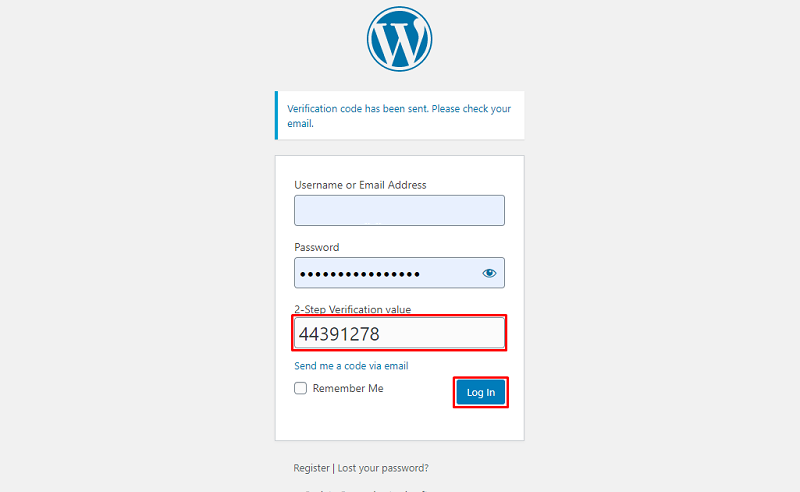
2.1.1.7. Paste the verification code to the corresponding field of the “Login Form” and click the “Log In” button.
2.1.2. Authenticator App
Enable the “Authenticator app” to use verification by Authenticator app.
2.1.2.1. Open the “Users” > “Profile” page.

2.1.2.2. Enable the “Verification” and “Verification Methods” > “Authenticator app” options.

2.1.2.3. Download and install the Authenticator application on your iOS, or Android device.
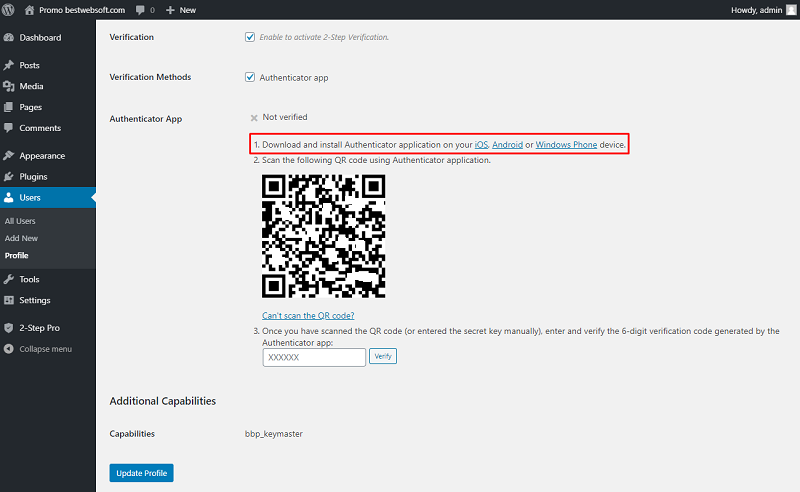
2.1.2.3. Scan the displayed QR code using the Authenticator application.

2.1.2.4. Once you have scanned the QR code, enter the 6-digit verification code generated by the Authenticator app to the corresponding field and click the “Verify” button.
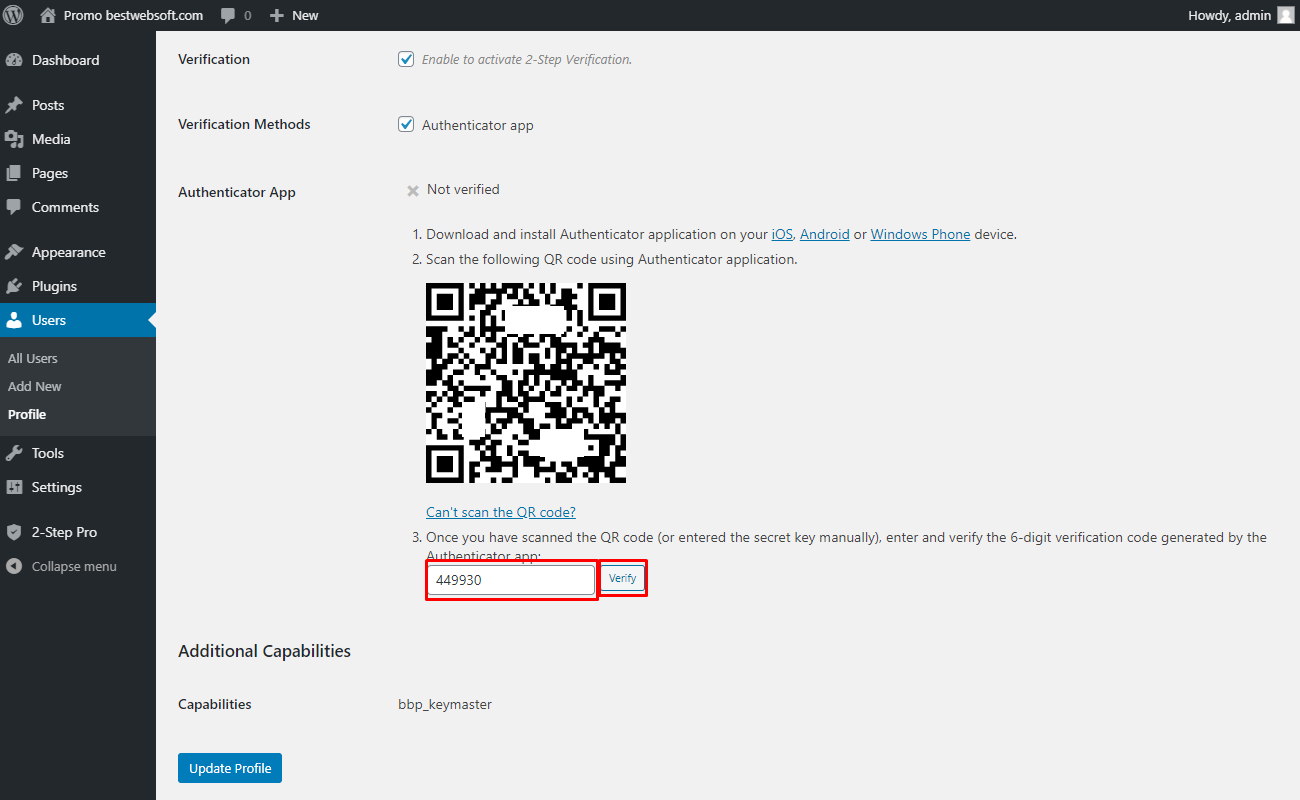
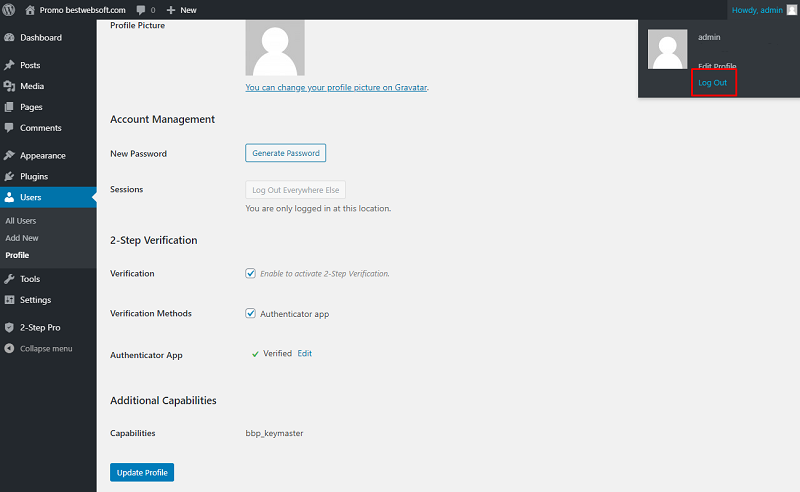
2.1.2.5. The “Verified” status will appear for the Authenticator option after the successful completion of all steps. Click the “Update profile” button.

2.1.2.6. Click the “Log Out” button to check the verification settings. Or open the login form in a new Incognito Window.
2.1.2.7. Open the Authenticator app on your device and enter the displayed verification code to the corresponding field of the “Login Form” and click the “Log In” button.
2.1.3. Backup Codes
Enable the “Backup codes” to generate a list of backup codes that can be used for verification.

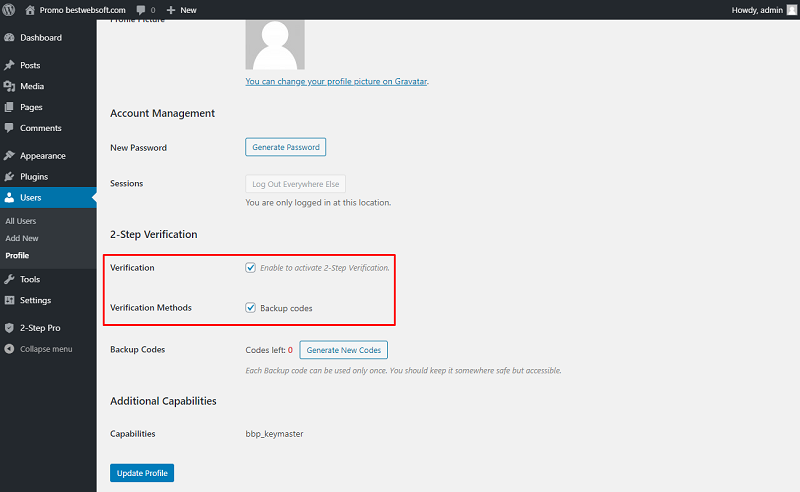
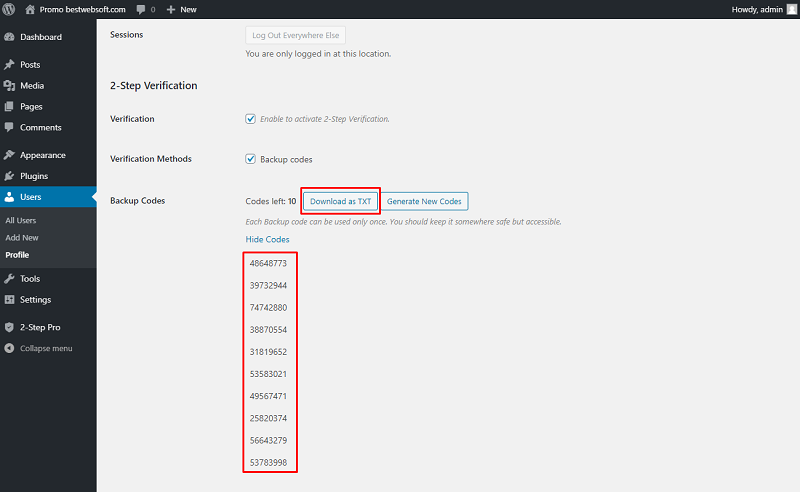
2.1.3.1. Open the “Users” > “Profile” page.
2.1.3.2. Enable the “Verification” and “Verification Methods” > “Backup codes” options.
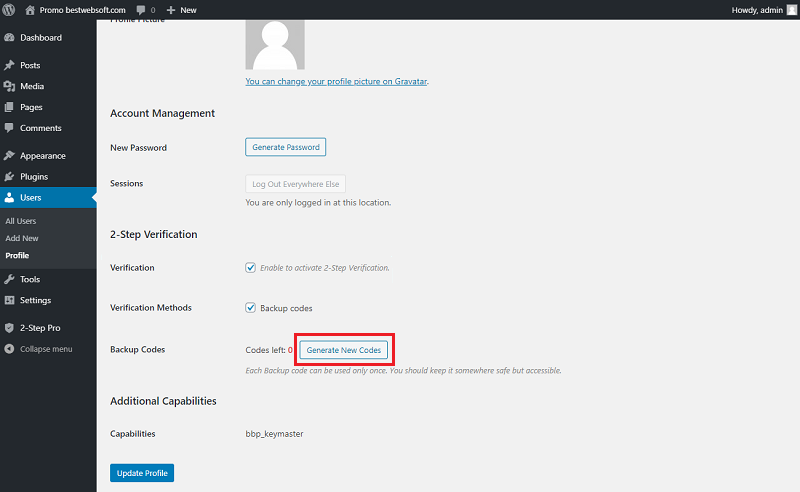
2.1.3.3. Click the “Generate New Codes” button.
2.1.3.4. Copy and paste the backup codes to the remote resource or download them to your PC. Click the “Update Profile” button.
2.1.3.5. Click the “Log Out” button to check the verification settings. Or open the login form in a New Incognito Window.

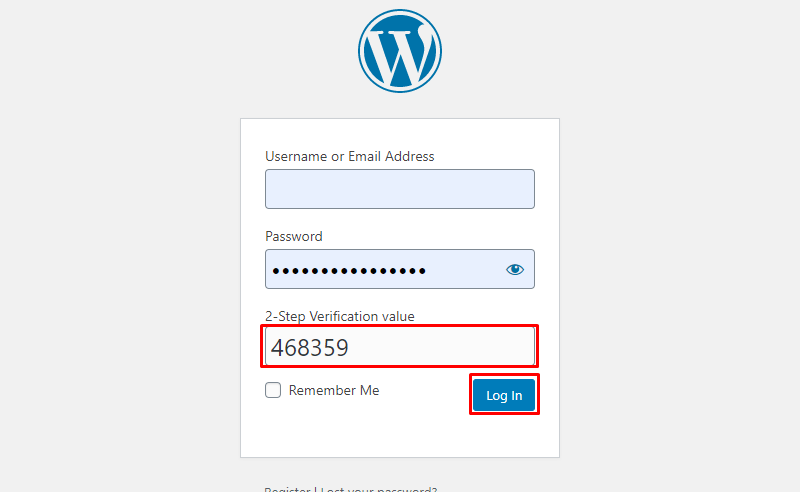
2.1.3.6. Enter the backup code from the previously generated list and paste it into the “2-Step Verification value” field. Click the “Log In” button.

2.1.4. SMS Code
Enable the “SMS Code” to get verification codes to your mobile via SMS.
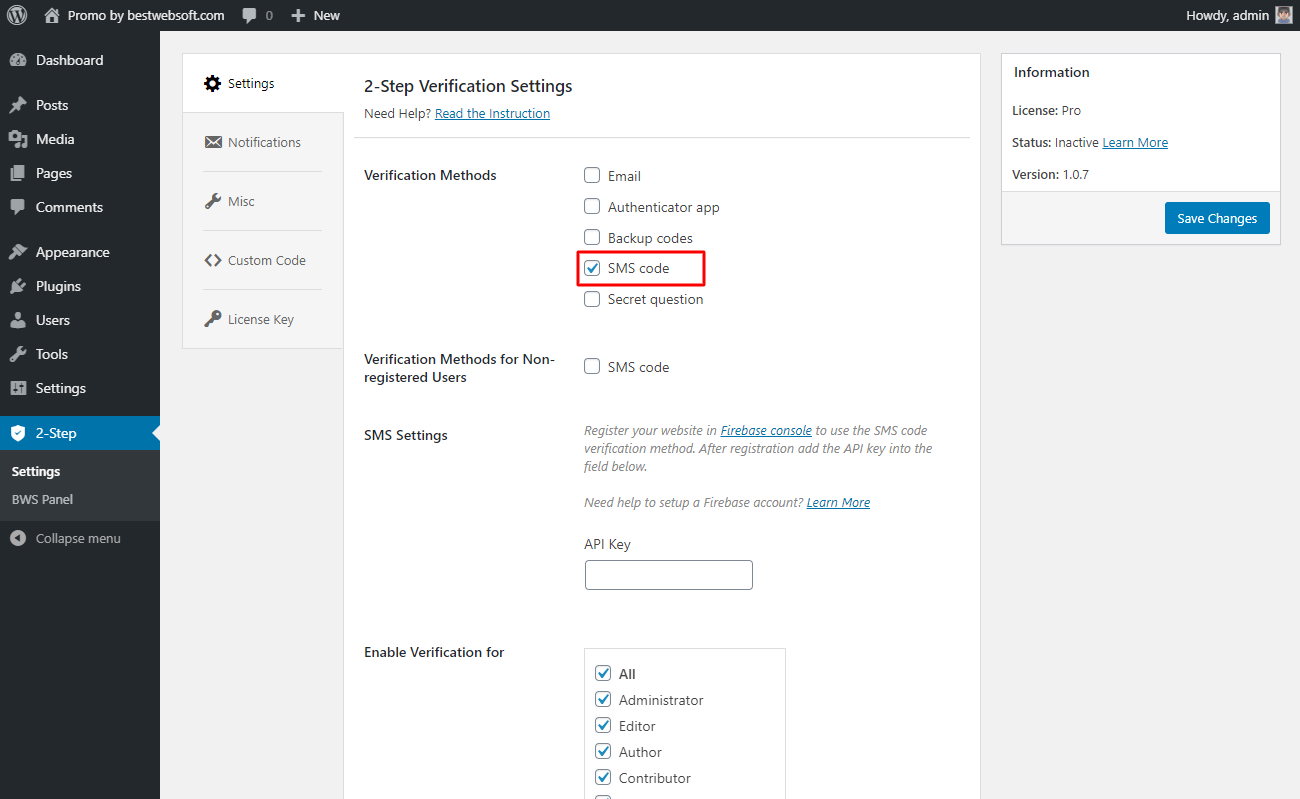
2.1.4.1. Enable the “Verification Methods for Non-registered Users” option to use the SMS code verification for unregistered users on your site.

2.1.4.2. Use the “SMS Settings” option to register your site in the Firebase console in order to get the API key, and enter it in the field.

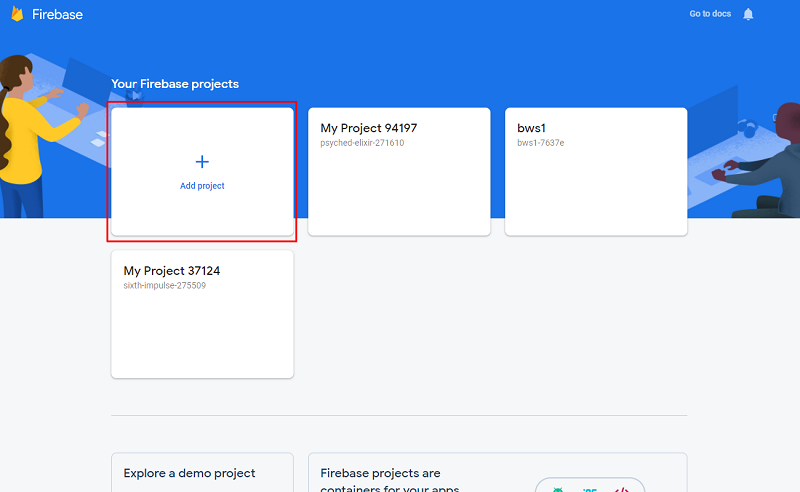
2.1.4.3. Go to https://console.firebase.google.com/, sign in to your Google account, and сreate a Firebase project by clicking the “Create a project” or “Add a project” button.
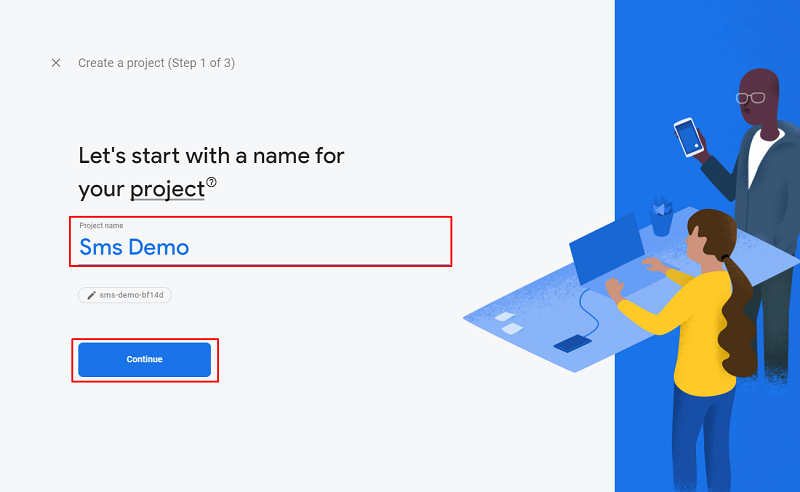
2.1.4.3. Enter a project name and click the “Continue” button.
2.1.4.3. Enable the “Google Analytics” option for your project or just click the “Continue” button.
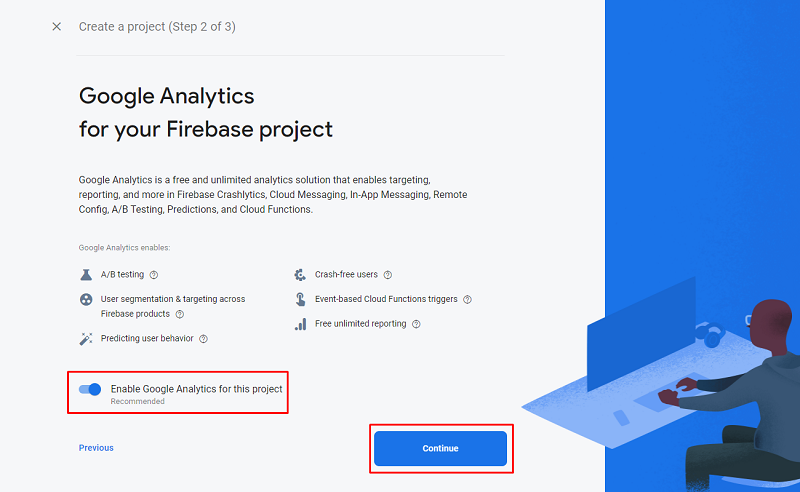
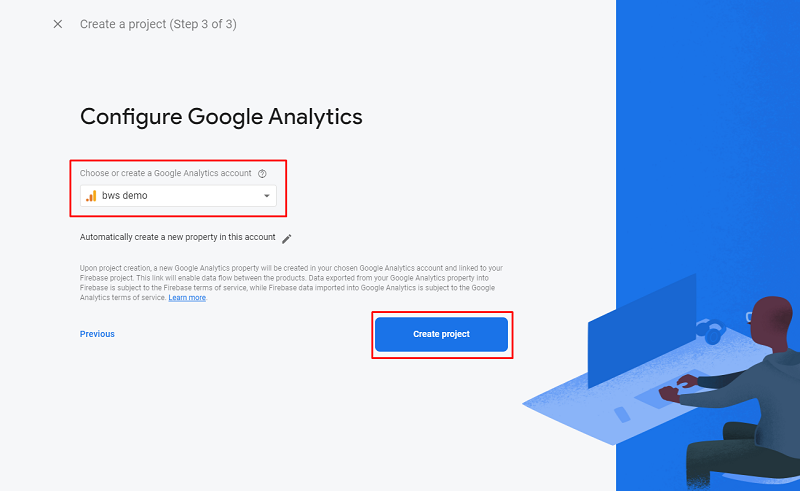
2.1.4.4. If Google Analytics is enabled, select it, otherwise, create a Google Analytics account.
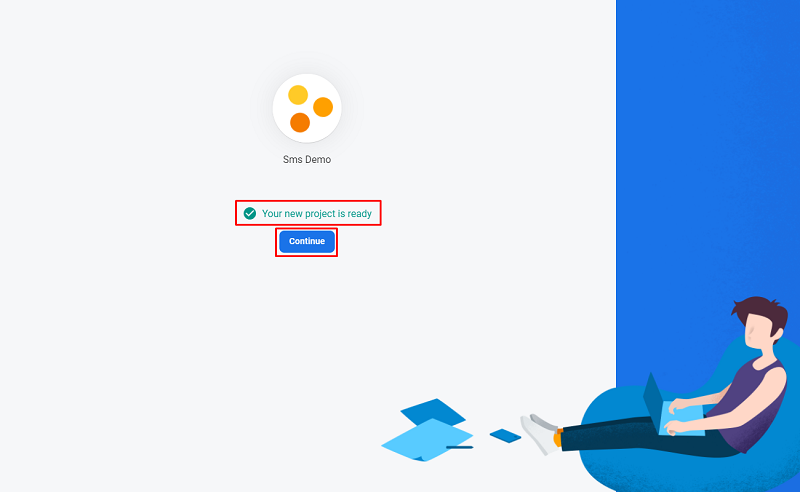
2.1.4.5. When the “Your new project is ready” notification appears, click the “Continue” button.
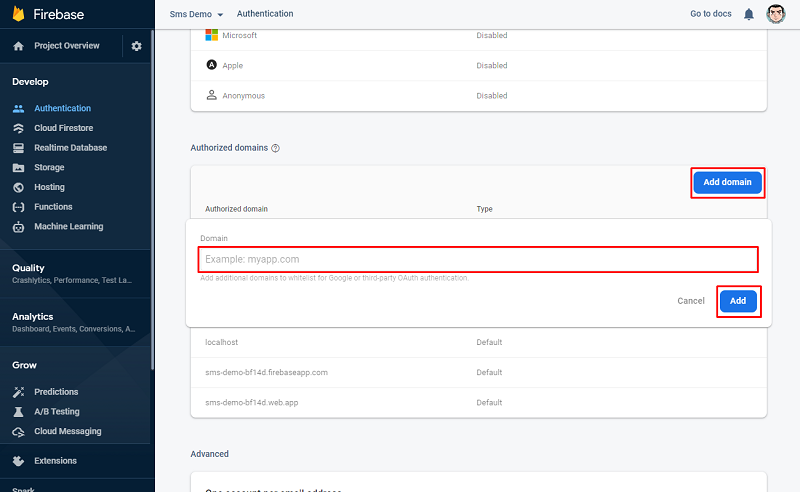
2.1.4.6. Open the “Authentication” section in the Firebase console. Enable the “Phone Number” sign-in method on the “Sign-in Method” tab. Click the “Save” button.

2.1.4.7. Scroll down the page, if the domain that will host your app isn't listed in the “Authorized domains” section, add your domain. Click the “Add domain” button, insert your website domain and click the “Add” button.
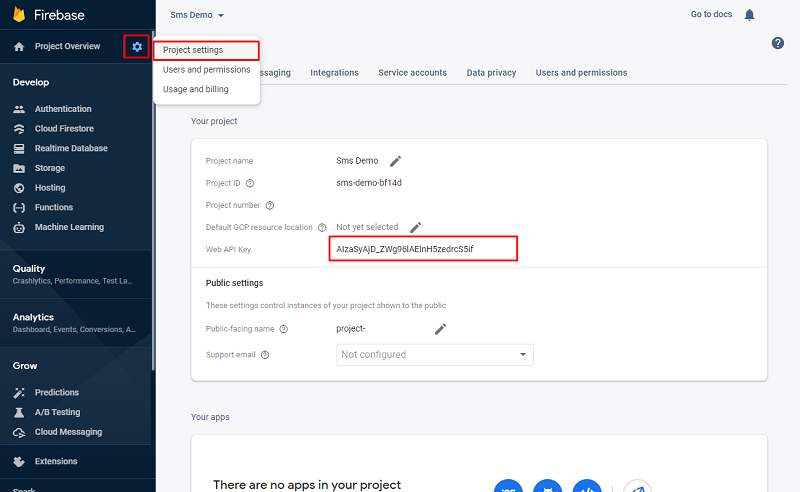
2.1.4.8. Click the “Gear” button, and open the “Project settings” page then copy “Web API Key”.
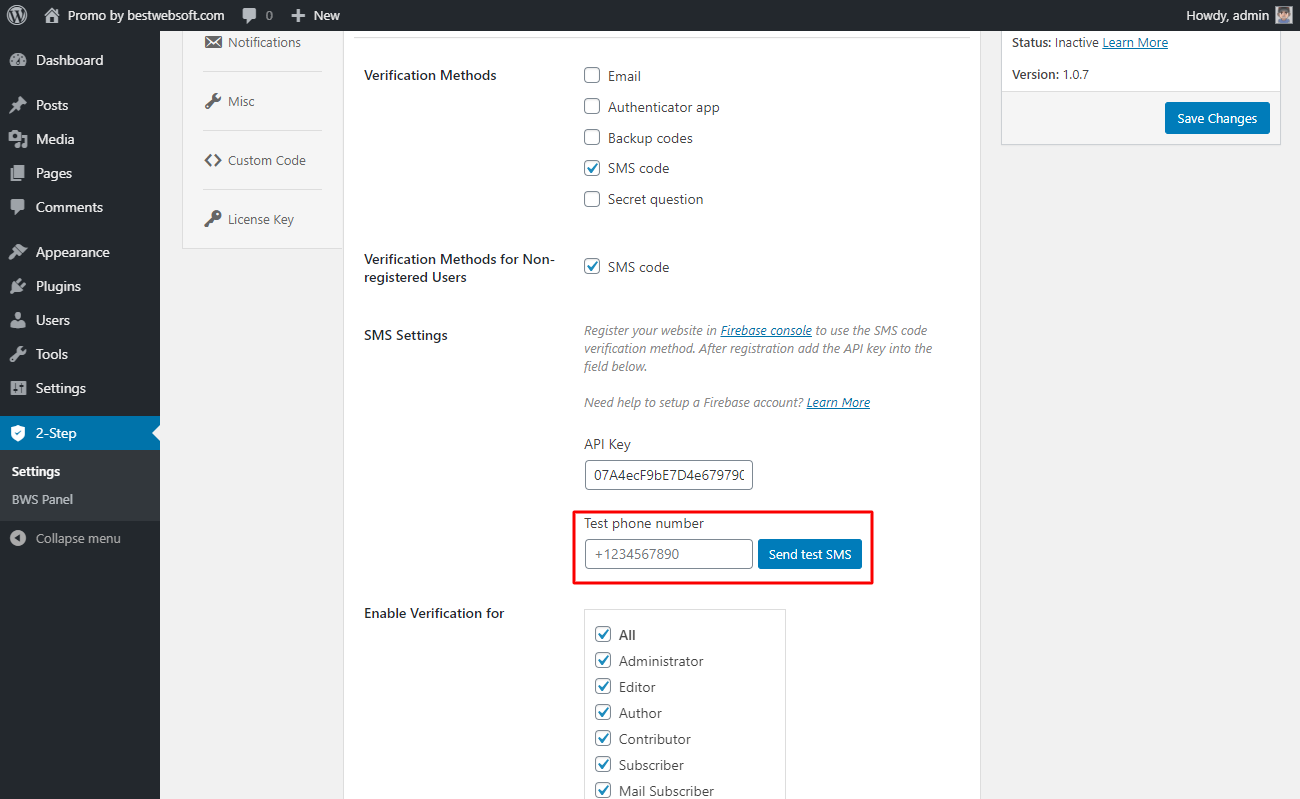
2.1.4.9. Open the “2-Step Verification”> “Settings” and paste the copied key to the “API Key” field.

2.1.4.10. Click the “Test Firebase SMS Auth” button.

2.1.4.11. Enter the test phone number and click the “Send test SMS” button.
2.1.4.12. Enter the code from SMS and click the “Test code” button.

2.1.4.13. If everything is done correctly you will see the “The verification is successfully completed.” notification.

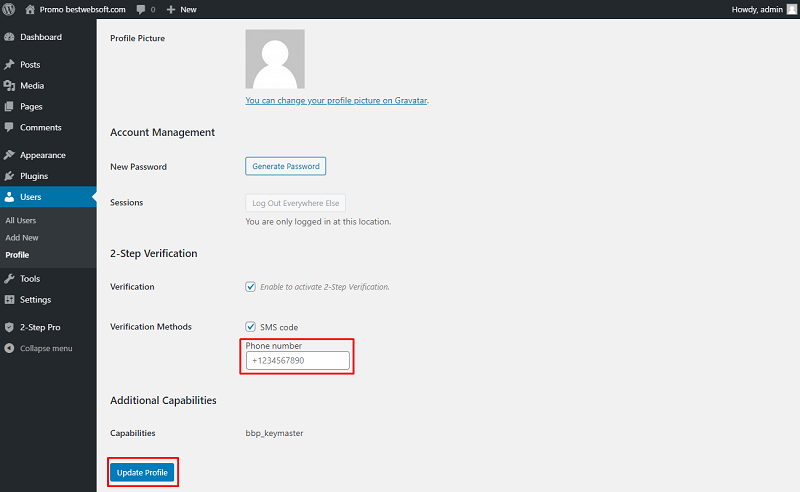
2.1.4.14. Open the “Users” > “Profile” page.

2.1.4.15. Enable the “Verification” and “Verification Methods” > “SMS code” options.

2.1.4.16. Enter the phone number and click the “Update Profile” button.
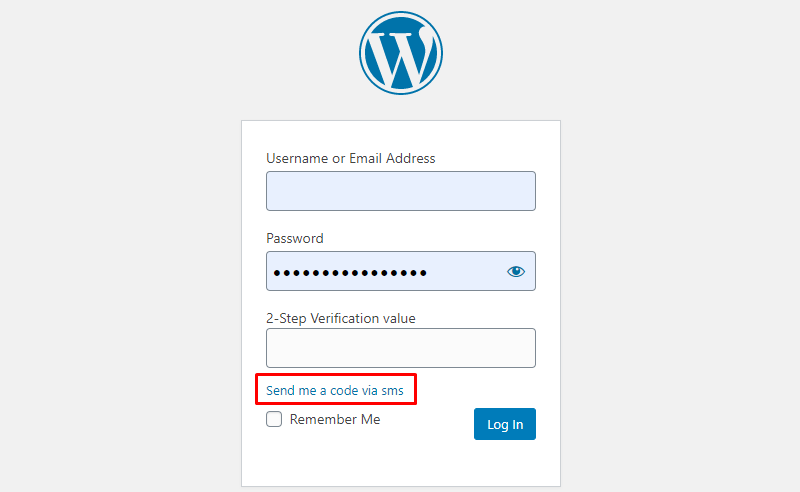
2.1.4.17. Click the “Log Out” button to check the verification settings. Or open the login form in a New Incognito Window.

2.1.4.18. Click the “Send me a code via SMS” link to receive a verification code. You will see a notification that your code has been sent.
2.1.4.19. You will see a notification that your code has been sent. Enter the verification code from SMS to the corresponding field of the “Login Form” and click the “Log In” button.
2.1.5. Secret Question
Enable the “Secret question” to activate verification with a secret question.
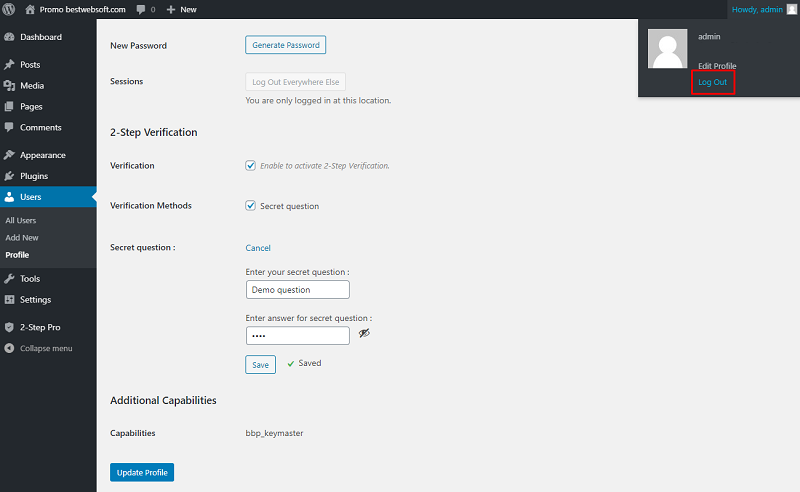
2.1.5.1. Open the “Users” > “Profile” page.
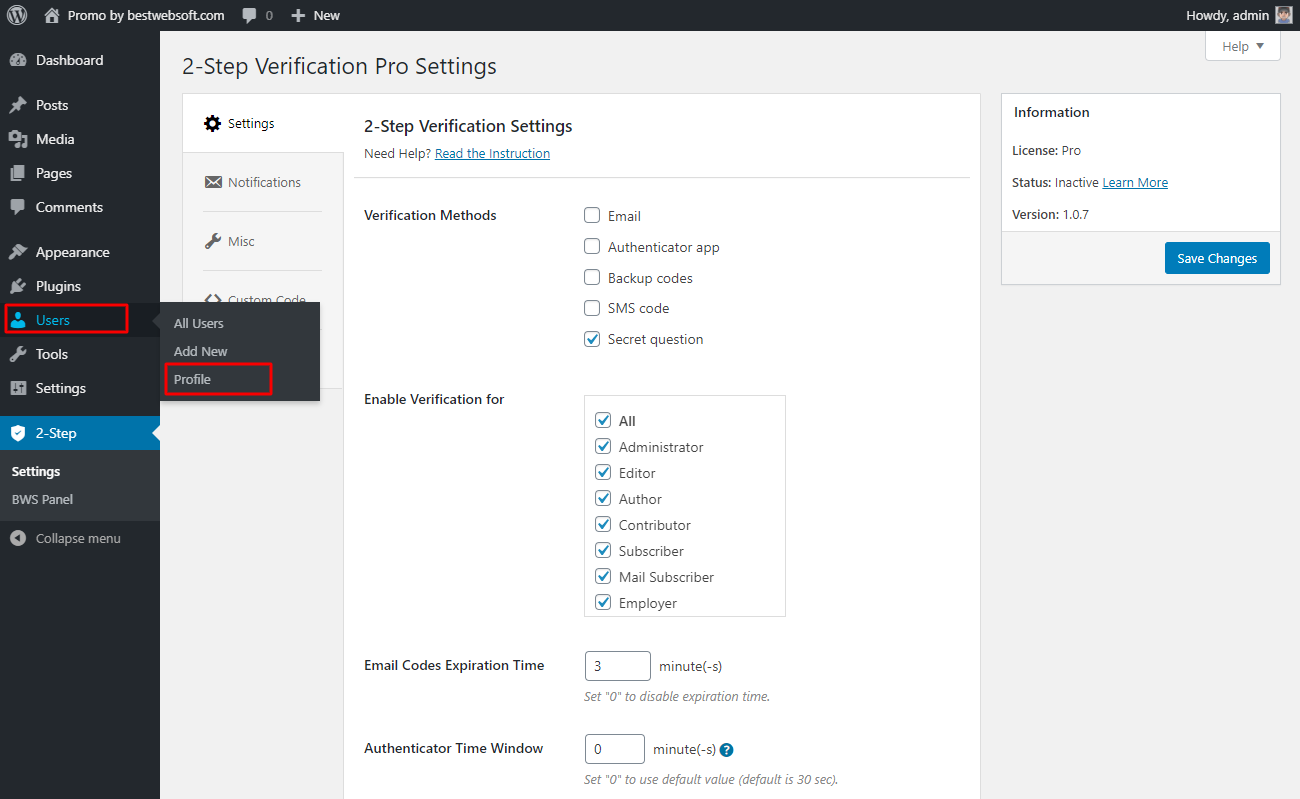
2.1.5.2. Enable the “Verification” and “Verification Methods” > “Secret question” options.

2.1.5.3. Click the “Edit question data” on the “Secret question” option to change your secret question.
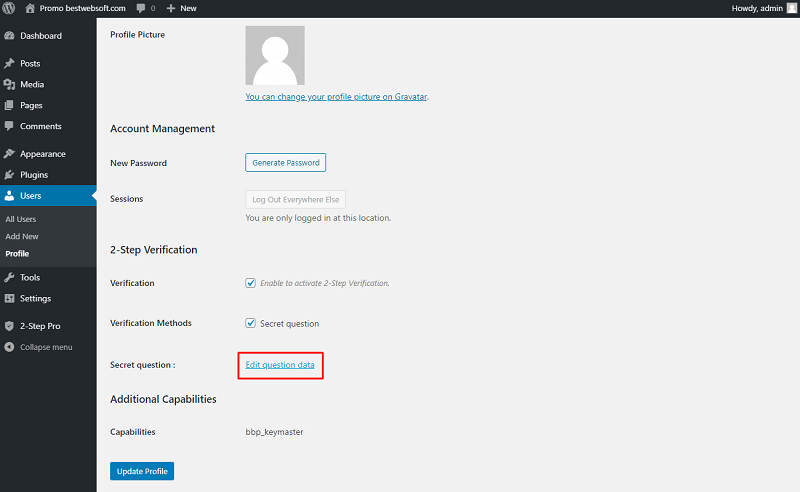
2.1.5.4. Enter your secret question and the answer to the secret question. Click the “Save” button then click the “Update Profile” button.

2.1.5.5. Click the “Log Out” button to check the verification settings. Or open the login form in a new Incognito Window.
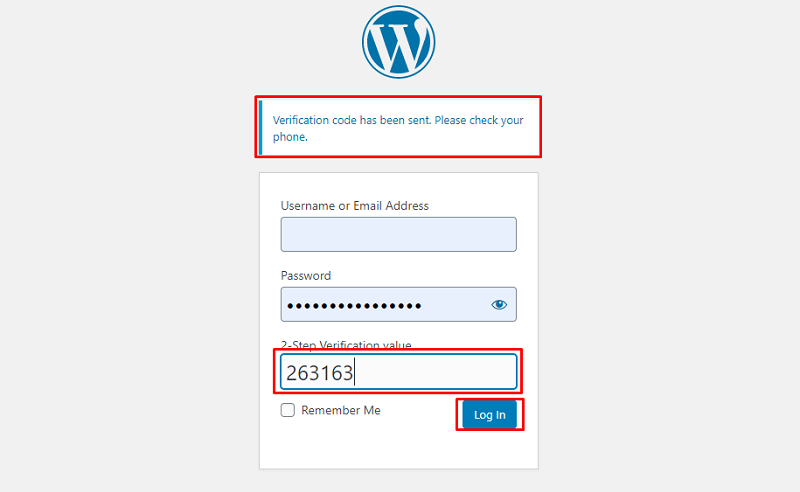
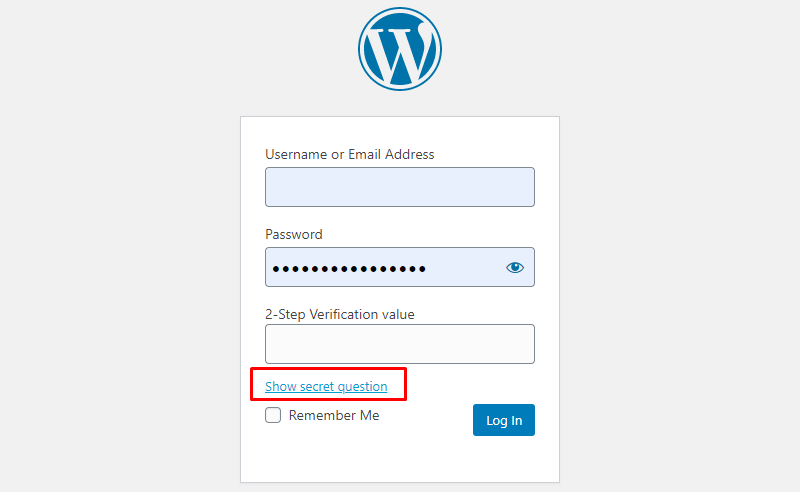
2.1.5.6. Click the “Show secret question” button to display the secret question.
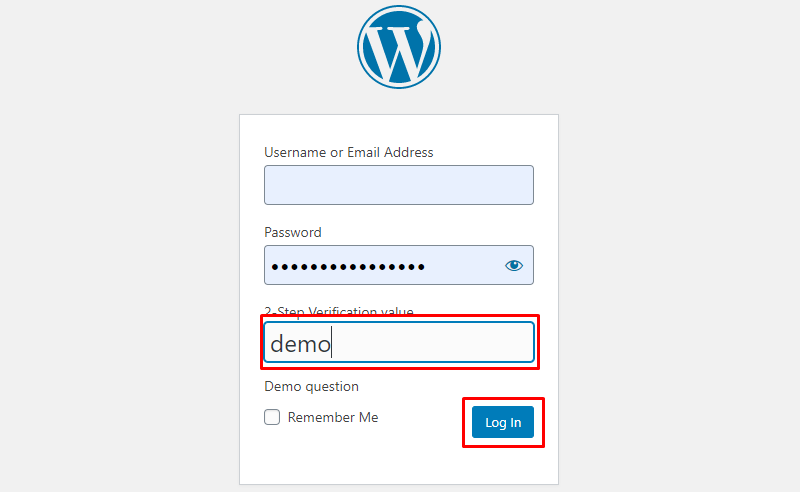
2.1.5.7. Enter the answer into the “2-Step Verification value” field. Click the “Log In” button.
2.2. Allow Using Verification for
Use the “Enable Verification for” option to enable verification methods for different user roles. Enable the option for “All” or for the specific user roles.

2.3. Email Codes Expiration Time
Use the “Email Codes Expiration Time” option to set the time of the email codes expiration. Set "0" to disable expiration time.

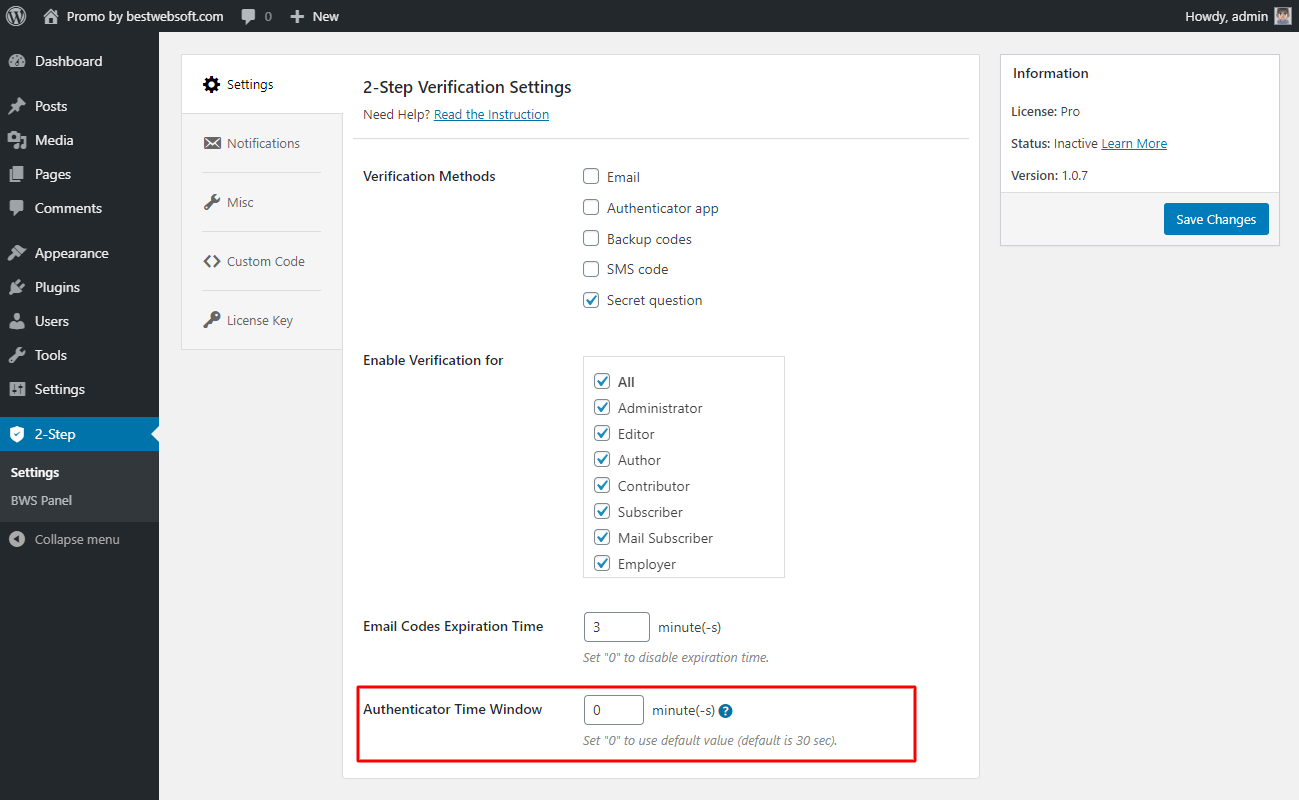
2.4. Authenticator Time Window
Use the “Authenticator Time Window” option to set the time for users to complete authentication. Set "0" to use default value (default is 30 sec).
3. Email Notifications
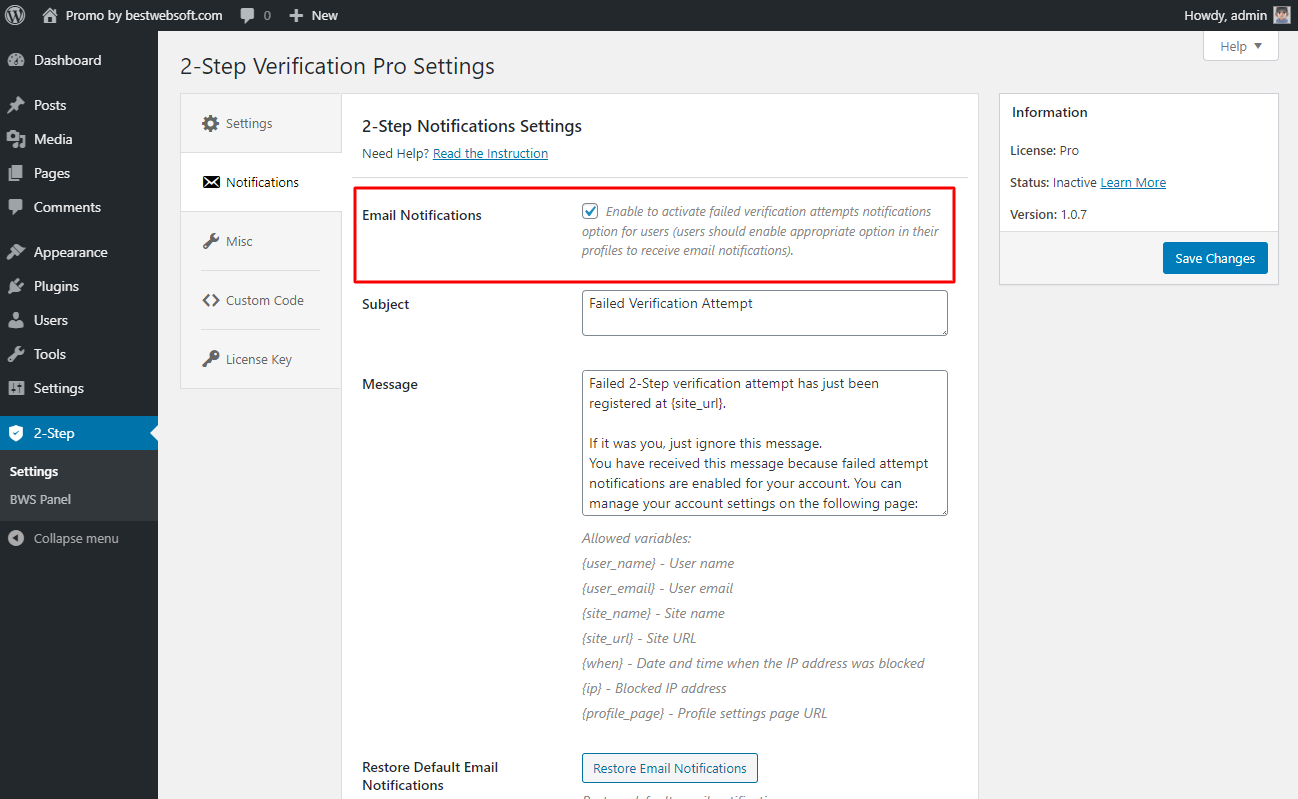
Enable the “Email Notifications” option to activate failed verification attempts notifications option for users
Note: Users must enable the corresponding option in their profiles to receive email notifications. |
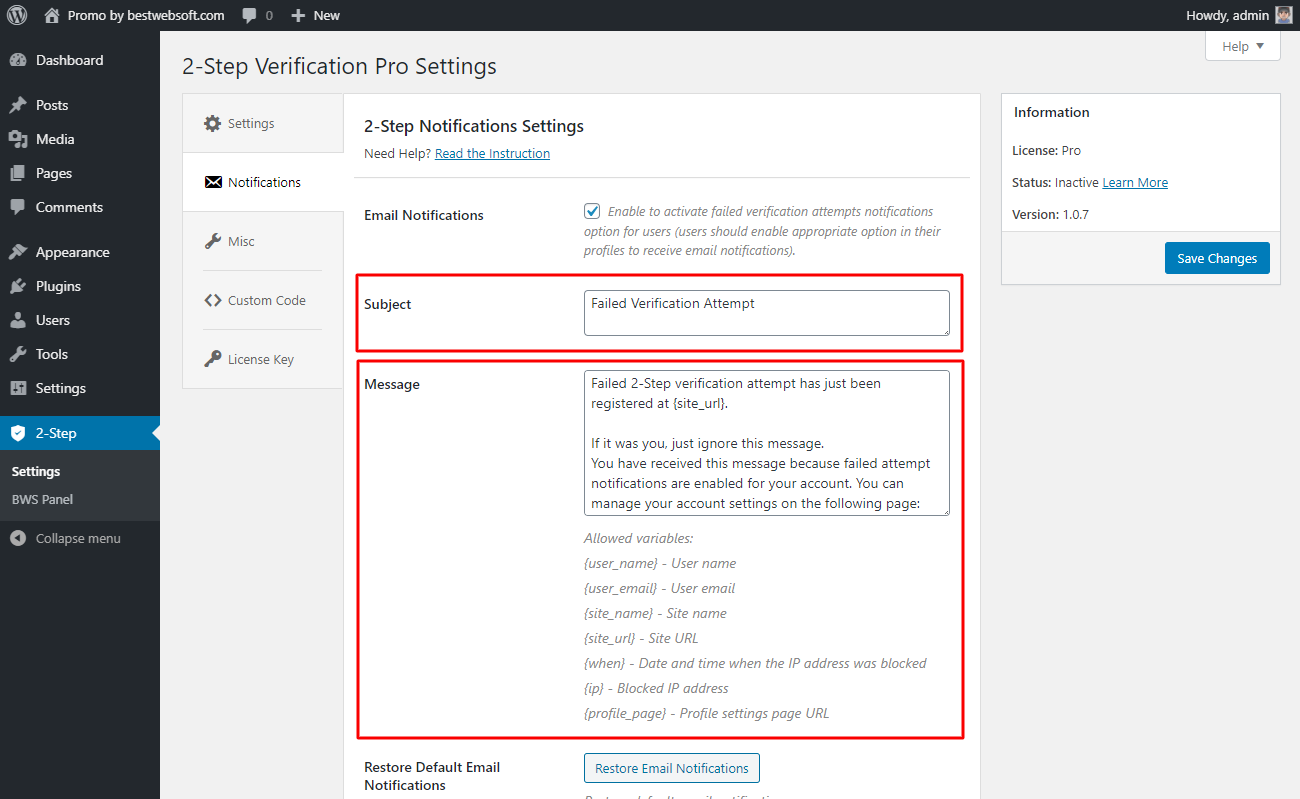
3.1. Customize the subject title and the text of the notification message.
Note: Allowed variables: {user_name} - User name; {user_email} - User email; {site_name} - Site name; {site_url} - Site URL; {when} - Date and time when the IP address was blocked; {ip} - Blocked IP address; {profile_page} - Profile settings page URL; |
3.2. Open the “Users” > “Profile” page and enable the “Failed Attempt Notifications” option.

3.3. Failed attempt notifications may look as follows.

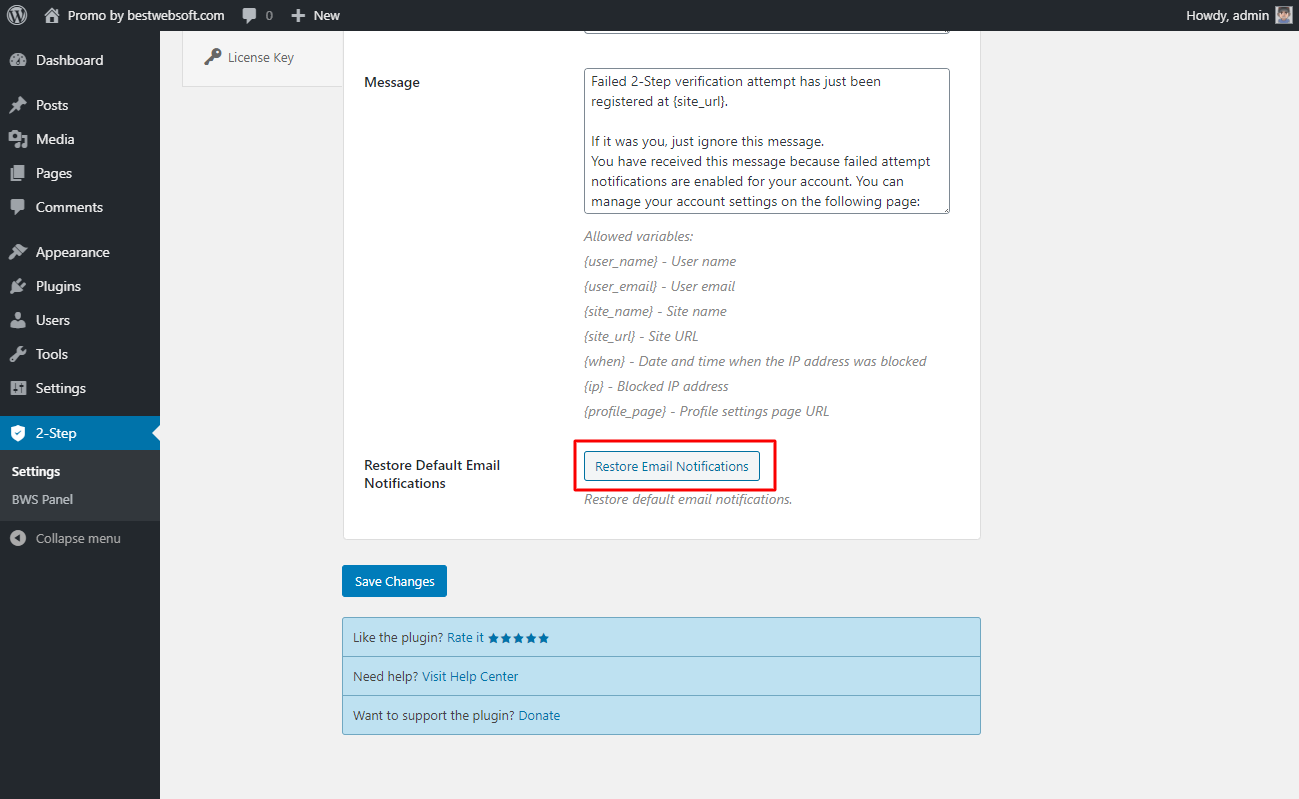
3.4. Restore Default Email Notifications
Click the “Restore Email Notification” button to restore the default email notifications.
4. Miscellaneous Settings
Use the options of the “Miscellaneous Settings” tab to make the settings regarding the track usage and default settings.
4.1. Track Usage
Enable the “Track Usage” option to allow tracking plugin usage anonymously.

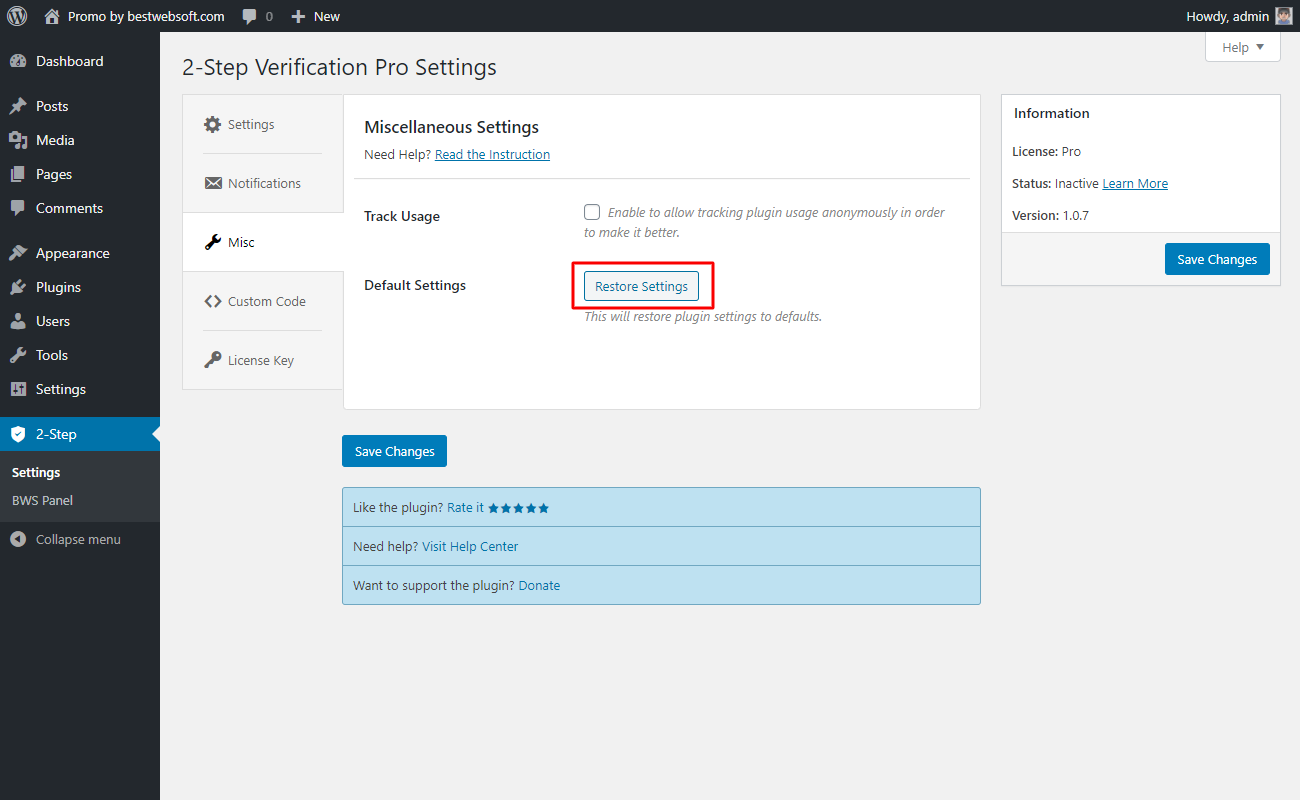
4.2. Default Settings
Click the “Restore Settings” button to reset all the settings made previously and revert them to the default ones.
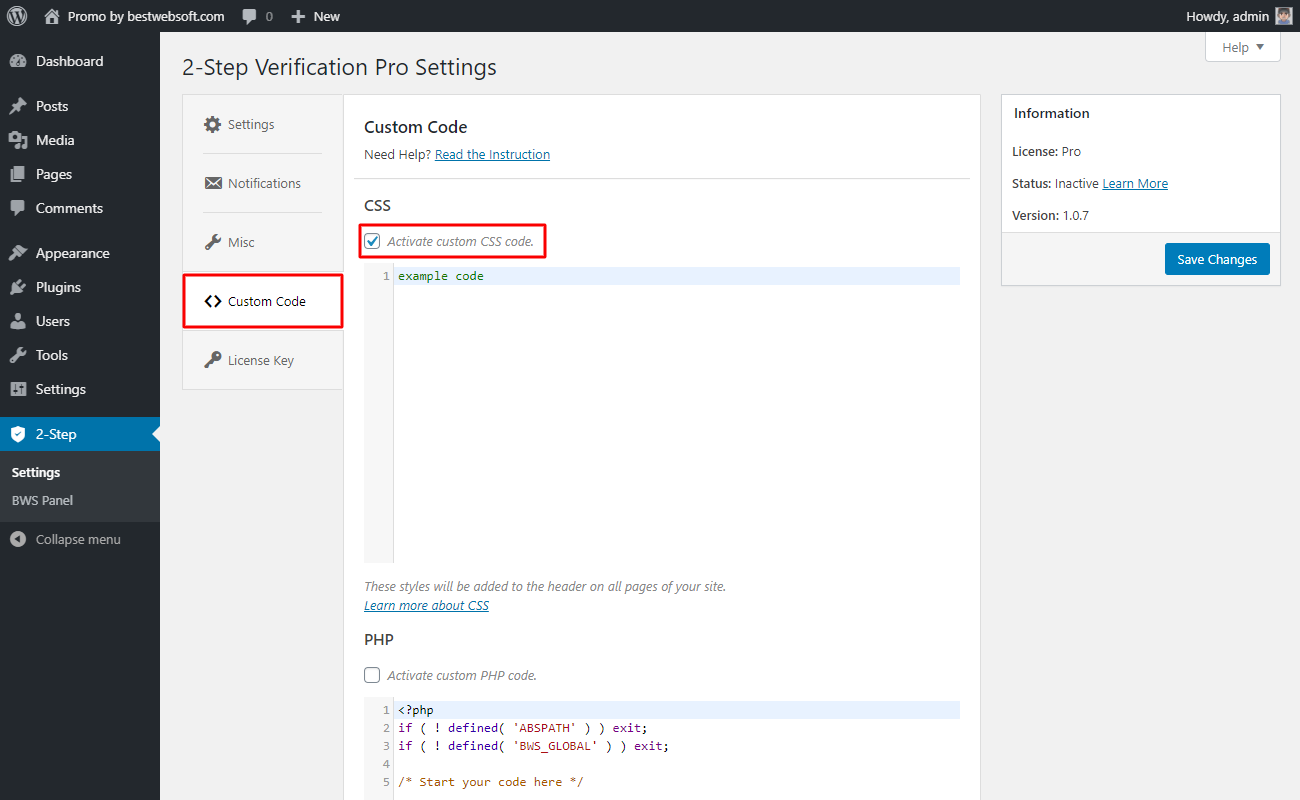
5. Custom Code
Use the “Custom code” tab to insert a CSS, PHP or JavaScript code. To activate a custom code, enable the “Activate custom … code” option and save changes.
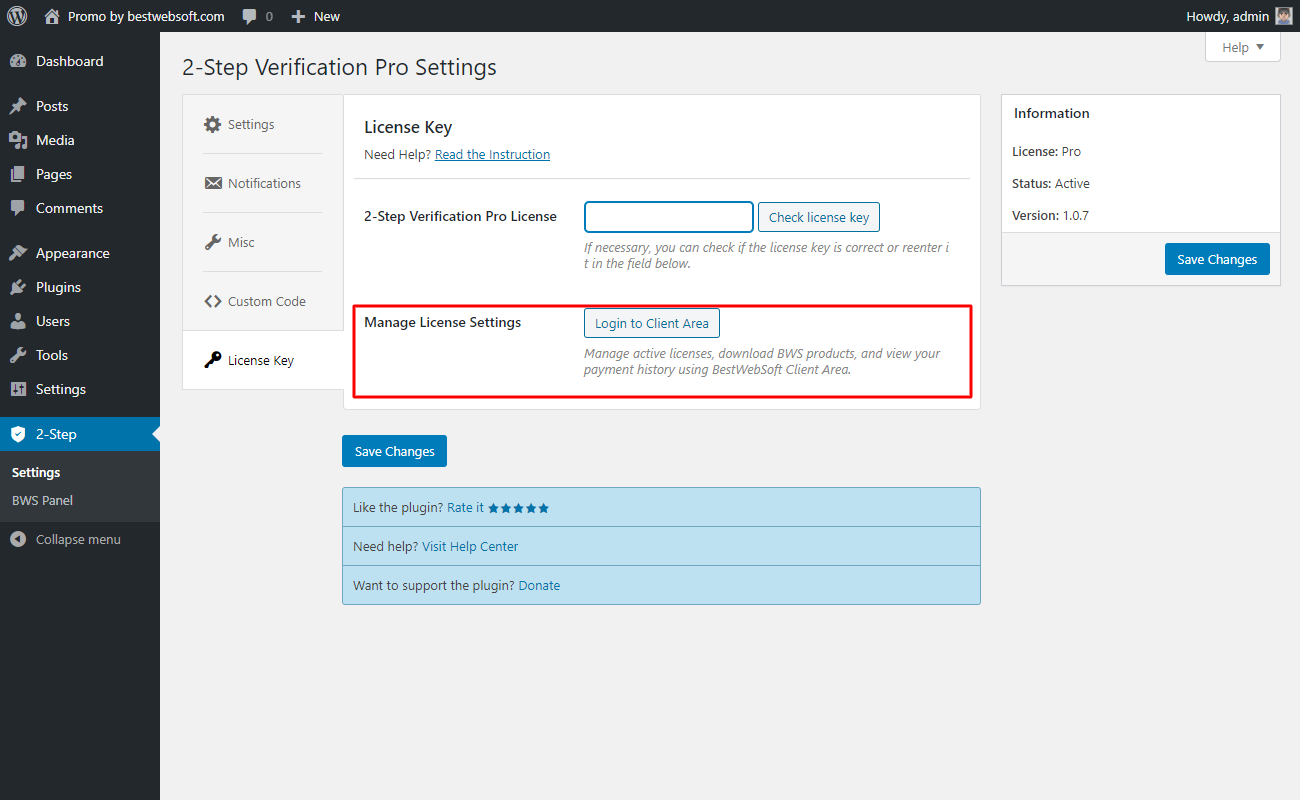
6. License Key
Use the “License Key” tab to activate or check the Pro plugin license.
6.1. Pro License
After a successful plugin purchase, you will receive an email notification with a download link and a license key. Activate Pro license by pasting a license key into the “2-Step Verification Pro License” field and clicking the “Save Changes” button.

6.2. Check License Key
To check the license key, click the “Check license key” button. If the entered key is correct, the notification “The license key is valid. Your license will expire on XXXX-XX-XX” will be displayed in the upper left corner of the page.

6.3. Manage License Settings
Use the “Manage License Settings” option to change your license settings. Click the “Login to Client Area” button to open your personal Client Area dashboard located on the https://bestwebsoft.com/ website. Browse and download purchased products, change the license domain and copy the license keys.
Thank you!
Help & Support
Visit our Help Center if you have any questions — https://support.bestwebsoft.com/
Services
We provide additional services such as WordPress themes & plugins development,
graphic design, custom programming.
Contact us now to get a free quote — https://bestwebsoft.com/contacts/

