So you’ve finished installing WordPress on your site and are wondering what to do next. You may consider installing plugins or start publishing content on your site.
But there is work to do on the back end of your WordPress site before you start working on the front end.
Imagine that you have just bought a new mobile phone. Are you starting to use it right out of the box? Of course not. Because you want your contacts, photos, and other personal information on your new phone. A fresh WordPress installation is similar to our phone.
The fundamental technical aspects of any site, large or small, are the same.
The most important things to do after installing WordPress are:
Set the site title
Your site title and tagline tell people and search engines what your website is about. Your brand is unique and your website name and tagline should reflect that.
Once you are logged in to your dashboard, go to WordPress Settings > General.
The “Site Title” is displayed to users and search engines as the name of your website. It also appears in various places such as the browser title bar and the admin panel of your WordPress dashboard.
A tagline is a short description of what your site is about. If your brand has a tagline or tagline, this is the perfect place to display it.
The WordPress tagline set by default is “Just another WordPress website”. Even if you don’t have a tagline, it’s important to remove the standard text and leave it blank.
Set up the timezone
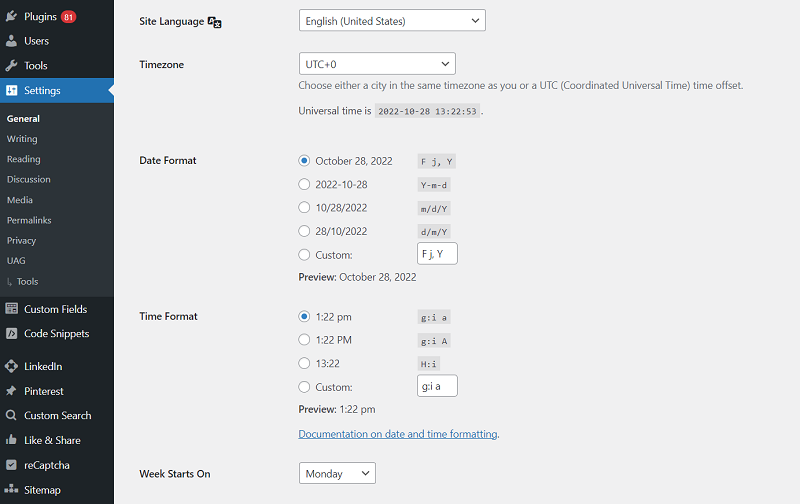
One of the simplest additional sites is to leave the default time zone. Although this may seem like a small problem, when you want to use programming, it can cause problems. Make sure the time zone is set to your local time zone.
To set the time zone, go to Settings > General. Then scroll down and you’ll see a selection of time zone, dates, and time formats. After setting the time zone, don’t forget to click “Save Changes” to save your settings.

Change the permalink structure
Permalinks are permanent URLs to specific pages, articles, and resources on your website. The link to each piece of content must be permanent and never change.
By default, the WordPress permalink structure looks something like this: “example.com/?p=123”. Although it is not visually friendly, it is also not SEO friendly because it does not convey any information.
It is a good idea to change your permalink before you start creating pages on your website. You can easily do this by going to WordPress Settings > Permalinks and selecting one of the 5 default structures. You can also write your own structure.
Set up a Favicon
A favicon is a small image that points to your site on the web. It belongs to the visual identity of your site and helps people quickly and easily identify your website in their browser tabs.
A favicon is usually a visual graphic of your logo or a component of your logo without any copy. Downloading a Favicon is easy, first, go to WordPress Appearance > Customize > Site Identity. From there, click the Choose File button and upload the image you want to use as your site icon. After that, click “Publish” to save the new settings.
Note: the image must be square and have a minimum size of 512×512 pixels
Enable or disable registration
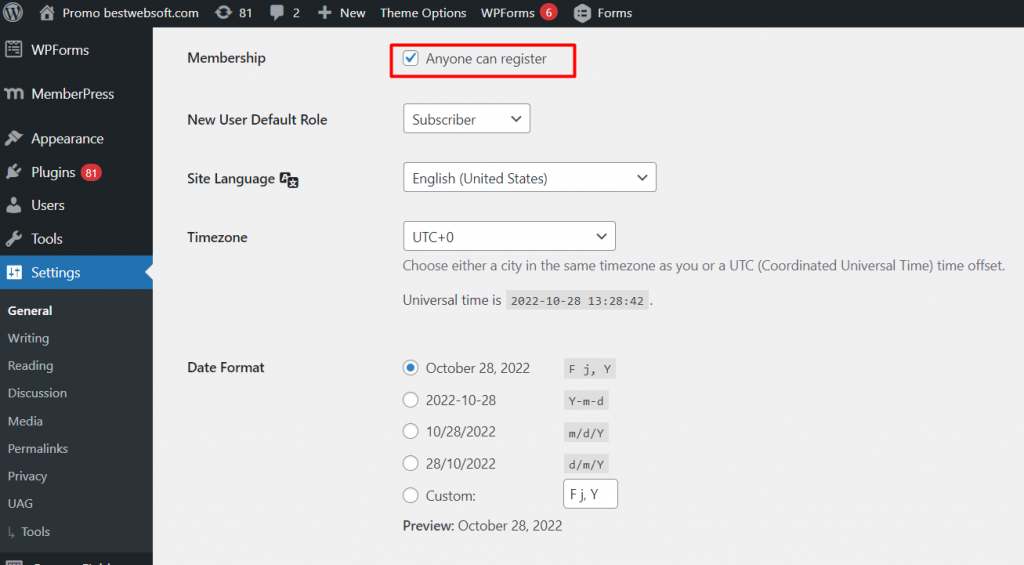
If you want to run a multi-author WordPress site where multiple users have the ability to log in and add content or comment on posts, you must first allow them to register on your website.
You can always opt-out if you intend to be a sole author. To turn off registration go to Settings > General page and disable the “Membership” option.

Create a contact form
Once you’ve built a website, you need to include a contact form, whether it’s a business, non-profit, e-commerce site, or a simple blog.
While it can be tempting to just include your email address and let people write to you directly, this leads to a lot of spam. The best way to compensate for this is to use a contact form and install a Google Captcha to avoid spam bots.
A Contact Form by BestWebSoft allows you to create general fields like email addresses, names, subjects, and messages, as well as advanced fields that allow users to upload files, type phone numbers, etc. You can even add a captcha to prevent spammers from filling out the form.

Install the SEO and Google Analytics plugin
Most websites get a significant amount of traffic through search engines. Using SEO best practices will help you make your blog site search engine friendly and improve the SEO of your WordPress sites. There are great SEO plugins out there that will help you improve your SEO and Google Analytics by notifying you when you add images or keywords and other helpful tips. Also, an SEO plugin can help you create better content for improved SEO so you can rank your post more easily in search engines.
If you want to track your website visitors, Google Analytics is a perfect choice. Provides detailed information about website traffic. First, you need to register your site with Google Analytics, and then you can integrate Google Analytics into your site.
After integrating Google Analytics, you can also install a plugin that will allow you to check traffic stats directly from your WordPress dashboard.
We recommend installing the Sitemap Plugin and Analitycs plugin by BestWebSoft for basic SEO purposes.


Install the backup plugin
We spend most of our lives in front of computers, and all digital content requires backups.
There are most things that can crash your website. This can be a malicious attack, the more popular your site is, the higher the chance that someone will try to compromise it through hacking. Or it could be that a WordPress update, plugin, or theme has conflicted and caused your site to crash.
Regardless of what’s blocking your site, a backup can save you weeks, if not months, of work getting your digital presence up and running again.
Unfortunately, WordPress does not have a built-in backup functionality. Therefore, it is essential to use a plugin such as Backup Guard, or custom UpDraftPlus Backup.
Another option, but we do not recommend it, is to make a backup manually and save it to Google Drive, Onedrive, or Dropbox.
Conclusion
While it’s tempting to get the instant gratification of having content on your site right away, with a little more planning, your site will improve its SEO, be more user-friendly, and have a backup if the worst happens.


